Hi everyone. Last time we got our character spinning around and kicking off walls in a way that looks sorta natural ish!
First thing’s first, I fixed the problem with not flipping back upright after bounces. It works well enough. At some point I may want to tune the timing.
- Bullets
- A foreseen bug that became a rabbit hole
- Rolling around (speed… unspecified)
- Weird squished up face bug
- Gaining the ability to die
- Slowing down time
- Let’s do some profiling
- We’re getting hit by too many bullets
- Rotating the dead
- Restarting the level
- What’s next?
Now, the next item of business is bullets.
Bullets
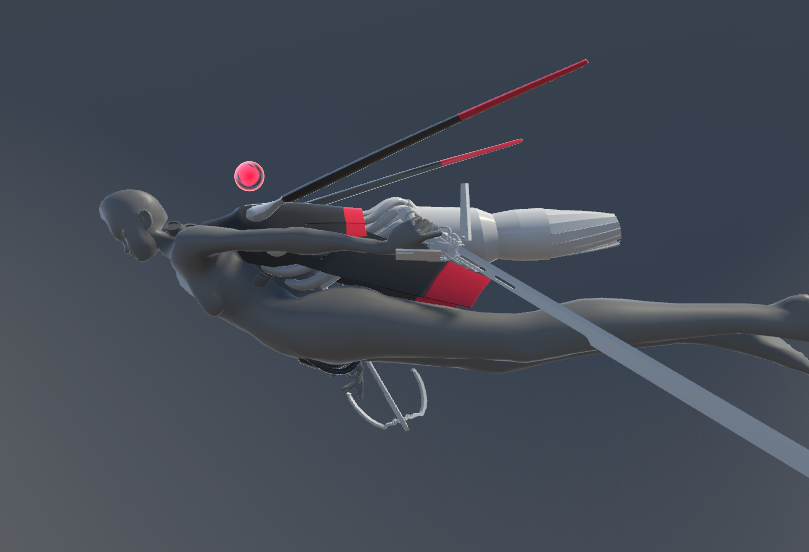
A bullet is a simple thing. It’s a sphere collider (for colliding with the player), an SDF collider (for colliding with the SDF) and a billboard shader quad (for colliding with our eyes).
Rendering bullets
The shader is the tricky part. My inspiration is the way bullets are displayed in NieR Automata and NieR Replicant/Gestalt which is inspired in turn by 2D shmups.
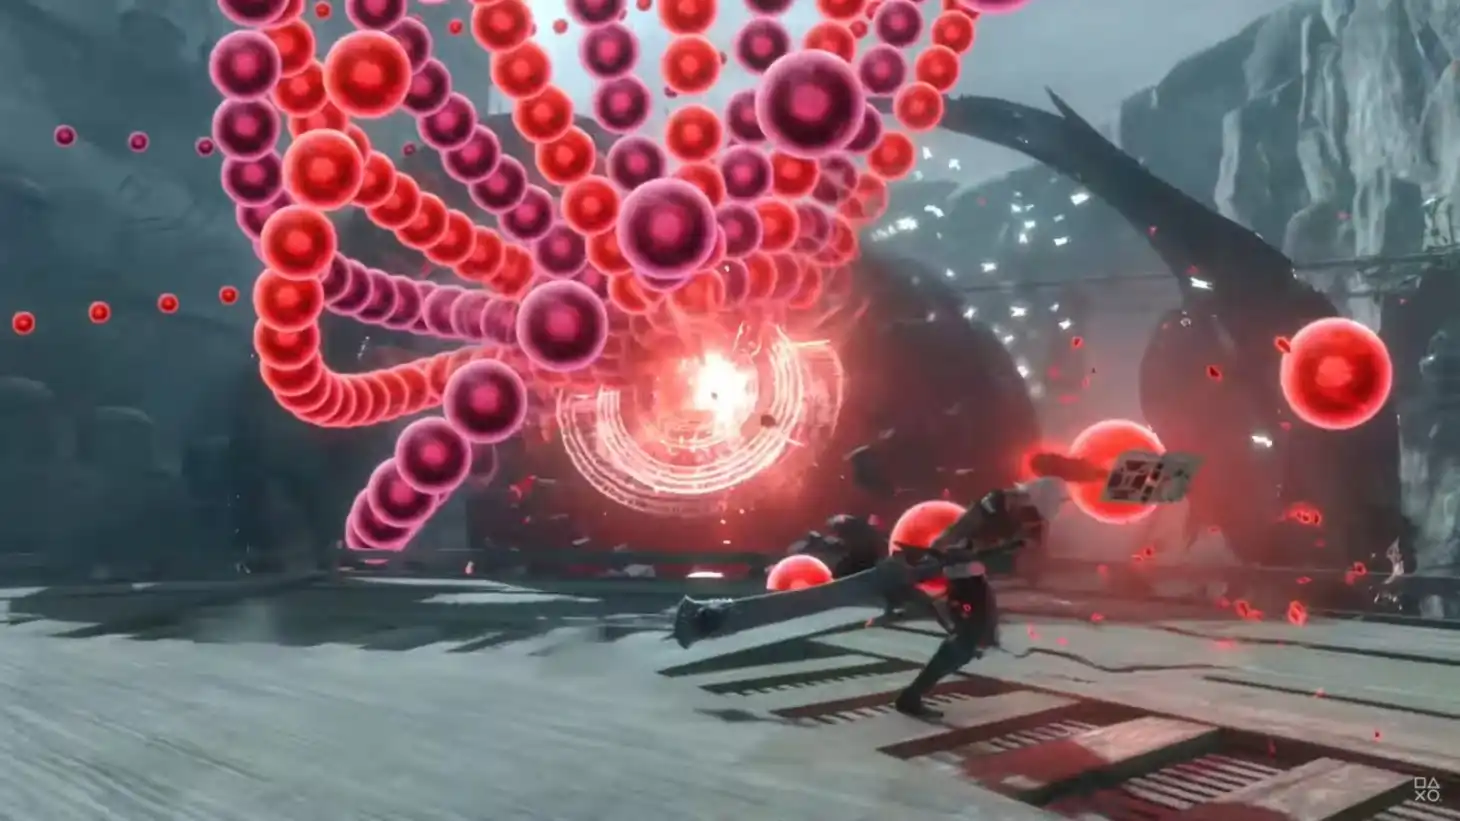
The bullets in NieR Replicant are pretty simple, and I wouldn’t be surprised if they were rendered with a shader too. You have a Fresnel-like fringe around the outside, and a smaller point of light in the middle. This is then disrupted by some cloudy noise.
The Fresnel effect can be computed by a simplification of the Shlick approximation. This approximation says the specular reflection coefficient \(R(\theta)\) for angle \(\theta\) between incident ray and normal can be estimated as
\[R(\theta)=R_0 + (1-R_0)(1-\cos\theta)^5\]where \(R_0\) can be computed from the different refractive indices of the materials, \(n_1\) and \(n_2\), as
\[R_0 = \left(\frac{n_1-n_2}{n_1+n_2}\right)^2\]In this case, we have a parameter which varies with distance from the centre of the quad. For an approximation to Schlick’s approximation, we can just treat this as the angle \(theta\). But tbh I just spent a couple of hours wiring up shaders rather than be too mathematical with it. The resulting shader is… rather sprawling, but looks pretty in motion.
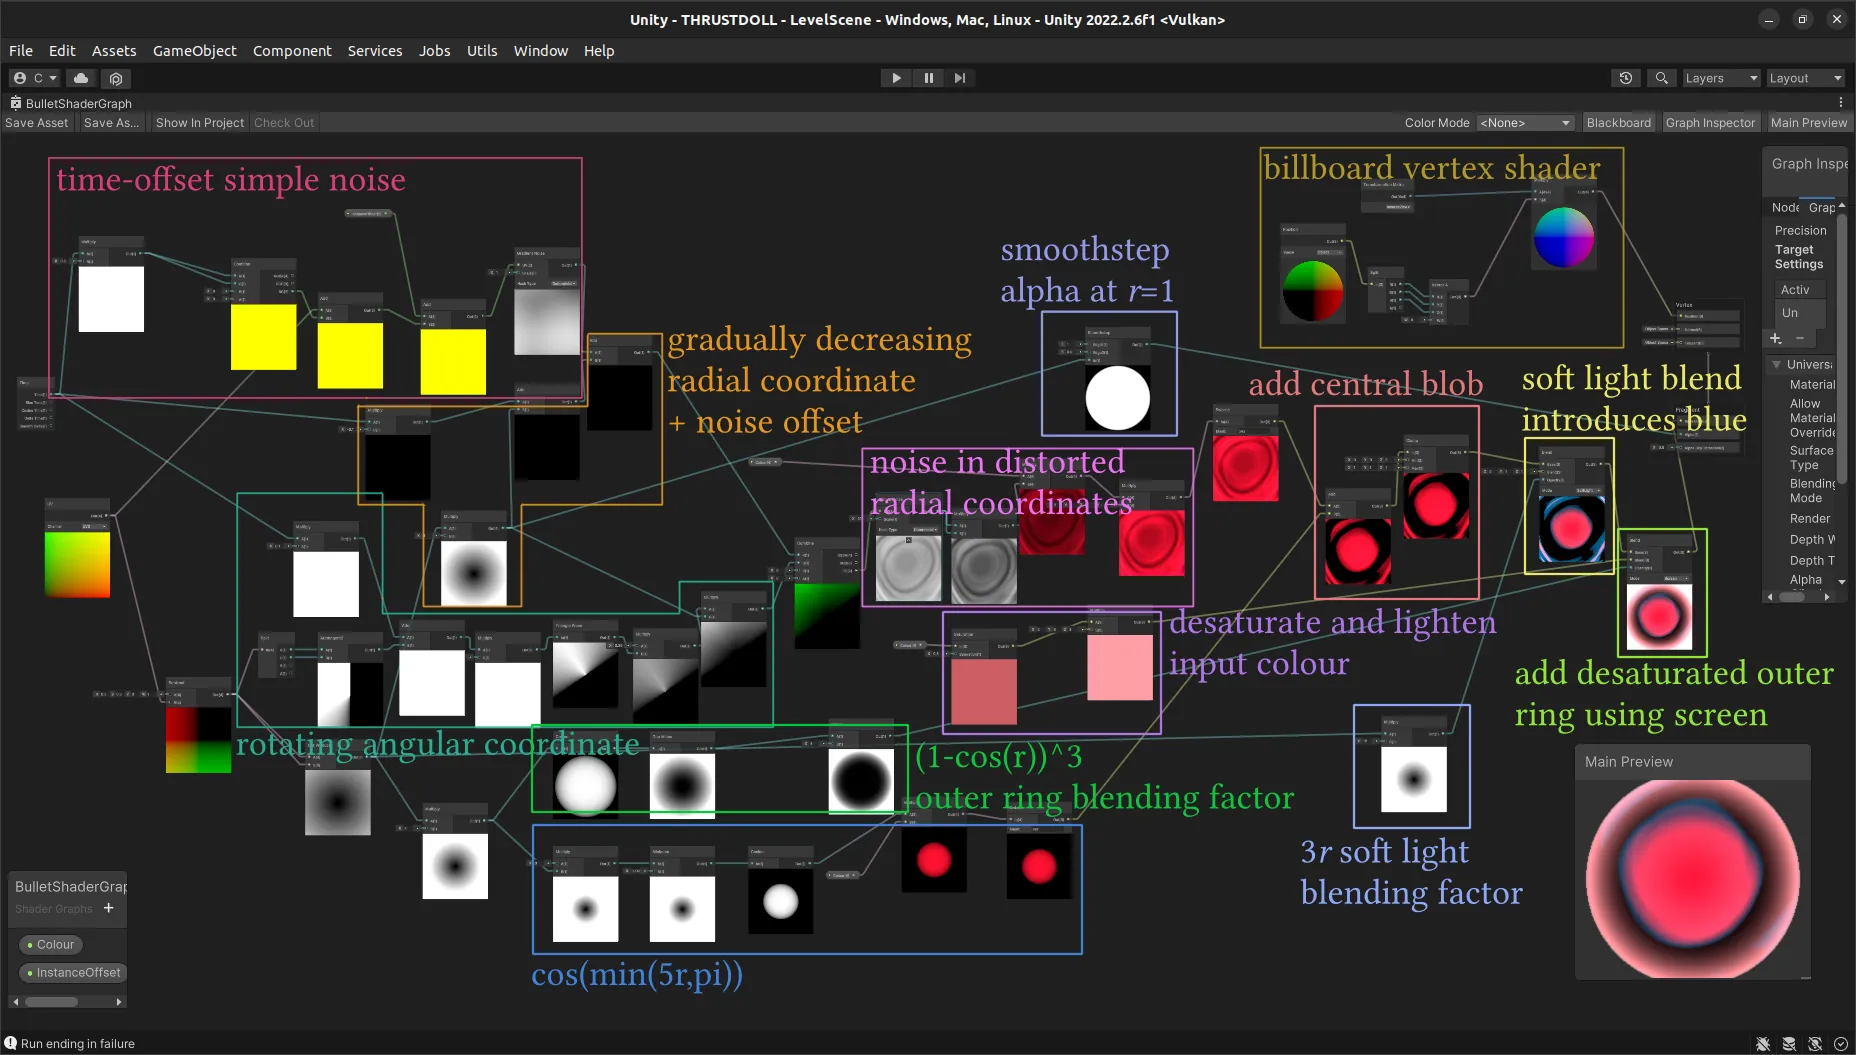
So what’s going on in here? The basic elements of a shader like this are noise functions and coordinate remappings. A noise function generates smoothly varying randomness, and you can tune parameters such as the scale. Shader Graph offers a handful out of the box; for details on how they work see The Book of Shaders.
The default noise functions are so widely used in games that they stand out very obviously if you just use them directly, but you can get more interesting patterns by interpreting the output of noise functions as coordinates for other noise functions, and use unusual coordinate systems such as polar coordinates. We’ve talked about generating polar coordinates in a previous devlog, so I won’t go into that too much here.
To generate the kind of rings we see here, the radial coordinate is scaled much more than the angular coordinate. The angular coordinate is rotated continually with time, causing the whole effect to revolve. The radial coordinate, meanwhile, gradually decreases with time, which causes the rings to gradually move outwards towards the edge of the bullet.
To add some interesting variation to this, I add some simple noise on top of this radial coordinate. This causes a very pretty effect where the rings are distorted in a kind of egg shape. To vary this, I add the time onto the \(x\) and \(y\) coordinates of this noise function, plus an additional per bullet offset to give them each a slightly different appearance.
Now, there are some features to combine with this. For the kind of central glow, I took the cosine of the (undistorted) radial coordinate, stopping at pi. The effect of this is essentially to create a bright blob in the middle surrounded by a dark ring. Adding this on top of the noise rings creates a lovely effect where the rings kind of peel away from the central blob.
To create the Fresnel-like ring, I computed the cosine of the radial coordinate again (rescaling in a different way), but this time subtracted it from 1 and took a power of it. This creates a function that’s mostly near zero at the centre but increases rapidly to 1 at the edge. I then used this to blend in a desaturated version of the bullet colour with a ‘screen’ blending mode.
Finally, I found that by using a ‘soft light’ effect increasing in strength away from the centre, I got some nice blue-cyan tones in the negative areas of the ring, which is quite pretty.
For the alpha, I simply had a hard cutoff at \(r=1\), though I put a small smoothstep on this for anti-aliasing purposes.
How did I work all that out? Gradually! I definitely didn’t have a plan, just some vague ideas like ‘what if noise in radial coordinates’. The very nice thing about Shader Graph is that you can get a little preview of the effect of every single node you add, so it made it very easy to tune parameters for a nice effect. (The less nice thing about Shader Graph is that it leaks memory like crazy when you’re in the editor, so you have to switch out of that tab every so often before it floods all your swap with uncollected garbage and freezes your computer.)
Bullet collisions with the world
Shader in hand, I quickly created a prefab with a quad with this material and the appropriate authoring components. There’s an interesting effect where in the editor (not when the game is running), the animation only updates when you move your mouse or do something else to provoke an update.
The logic is very simple: if the SDF registers a collision, delete the bullet. However, there is a wrinkle. The component SDFCollision is presently added in the EndSimulationEntityCommandBufferSystem. This means that we’d have to wait until the next frame to be able to detect this collision and delete the entity. Not ideal! I could find some way to tuck it into the presentation system group but that seems screwy. Luckily, Latios once again has a solution for us, a solution that might even be faster. The DestroyCommandBuffer described here fits the bill. To use it, we need to get a handle on the running SyncPointPlaybackSystem. This can be found from the LatiosWorld’s SyncPoint property.
using Unity.Entities;
using Unity.Burst;
using Latios;
using Latios.Systems;

[BurstCompile]
[UpdateInGroup(typeof(PreSyncPointGroup))]
partial struct ProjectileWallCollisionSystem : ISystem
{
    LatiosWorldUnmanaged _latiosWorld;

    [BurstCompile]
    public void OnCreate(ref SystemState state)
    {
        _latiosWorld = state.GetLatiosWorldUnmanaged();
    }

    [BurstCompile]
    public void OnDestroy(ref SystemState state)
    {

    }

    [BurstCompile]
    public void OnUpdate(ref SystemState state)
    {
        SyncPointPlaybackSystem syncPointSystem =
            _latiosWorld.syncPoint;

        DestroyCommandBuffer dcb =
            syncPointSystem
                .CreateDestroyCommandBuffer();

        new ProjectileWallCollisionJob
            { DCB = dcb
            }
            .Schedule();
    }
}

[WithAll(typeof(Projectile), typeof(SDFCollision))]
partial struct ProjectileWallCollisionJob : IJobEntity
{
    public DestroyCommandBuffer DCB;

    void Execute
        ( Entity entity
        )
    {
        DCB.Add(entity);
    }
}
Note with a DCB, you call Add, not DestroyEntity.
Unfortunately, there’s a problem with this approach. The ProjectileWallCollisionSystem simply schedules ProjectileWallCollisionJob and immediately exits, and the SyncPointPlaybackSystem begins. But that means ProjectileWallCollisionJob is trying to run while those buffers are being processed, leading to a dependency clash. If before we were running it too early, now it’s too late.
All is not lost. There are three solutions:
- complete the dependency (forcing the main thread to wait)
- schedule the system somewhere else, e.g. during the
PresentationSystemGroup. - change the logic, e.g. by scheduling the command to delete the entity during the collision test job.
The last one is nice and simple, and avoids moving the bullets between archetypes. It does however mean the SDF collision system has to access more components and have even more logic.
Another solution might be to make SDFCollision an enableable component. This makes iterating over collisions less efficient, but it means nothing has to be moved to a new archetype and the flagged objects can be processed in the same frame.
Let’s give that a try.
First, we make SDFCollision an enableable component. Then we adjust CollidesWithSDFBaker to add this component and immediately disable it.
Next, in SDFCollisionSystem, we change the calls to AddComponent and RemoveComponent to SetComponentEnabled. At the time of writing this, I thought there’s no simple way to find disabled components with an IJobEntity. So this will require passing a ComponentLookup and, since the system runs in parallel, using (gulp) [NativeDisableParallelForRestriction].
float distance = math.log(expDistance);

if (distance < collider.Radius) {
    RefRW<SDFCollision> collision =
        CollisionLookup
            .GetRefRW(entity, false);

    float3 normal =
    math.normalize
        ( k.xyy * normalExpDists.x
        + k.yyx * normalExpDists.y
        + k.yxy * normalExpDists.z
        + k.xxx * normalExpDists.w
        );

    collision.ValueRW.Normal = normal;
    collision.ValueRW.Distance = distance;

    CollisionLookup
        .SetComponentEnabled
            ( entity
            , true
            );
} else {
    CollisionLookup
        .SetComponentEnabled
            ( entity
            , false
            );
}
Since IJobEntity is sensitive by default to the enable flag on entities, everything else should work just fine. But now ProjectileWallCollisionSystem can join its friends in LevelSystemGroup.
(I later learned there’s theoretically a simpler way to do this. In the signature for Execute, you can put an argument of type EnabledRefRW<ComponentType>, and enable or disable a component through that. However, this requires you to manually construct an entityquery to match the job’s type signature—and moreover, it seems you can’t give it both the enabled bit and the component itself, or Unity complains about a duplicate type handle.)
Spawning bullets
To test this nicely, let’s make a simple bullet spawner. It will create bullets in a spiral. The code is basically the same as the ECS tank tutorial (remember that)?
First, a gun. This is what a gun looks like.
using Unity.Entities;

partial struct ProjectileSpawner : IComponentData
{
    public double LastShot;
    public float Interval;
}
‘What direction should it shoot’? It’s simple. We give it an angular velocity and use its rotation to answer that question. The rotation axis should be determined by the Y axis of the spawner.
To fire this gun, we get the current direction from the rotation and mark a command to instantiate a bullet (just one for now) at the spawner’s location. The tricky part comes with giving each one its own random offset value for the shader, so they don’t all look identical. There is a way to use Unity’s Mathematics.Random in parallel described by the good Inquisitor Eizenhorn here. However, for now I don’t expect to have a ton of bullet spawners in a level, so we don’t need to execute in parallel, and instead can just hold on to one single random. This needs to be passed by reference to the job. This can be done using the NativeReference struct in Unity.Collections.
partial struct SpiralSpawningJob : IJobEntity
{
    public double Time;
    public Entity BulletPrefab;

    public NativeReference<Random> Rand;

    public InstantiateCommandBuffer<Velocity, Translation, ProjectileShaderOffset> ICB;

    void Execute
        ( ref ProjectileSpawner spawner
        , in Translation translation
        , in Rotation rotation
        , [ChunkIndexInQuery] int chunkIndex
        )
    {
        float sinceLastShot = (float) (Time - spawner.LastShot);

        if (sinceLastShot > spawner.Interval)
        {
            Random rand = Rand.Value;

            Velocity velocity =
                new Velocity
                    { Value =
                        math.mul(rotation.Value, new float3(0,0,1)) * spawner.ShotSpeed
                    };

            spawner.LastShot = Time;

            ProjectileShaderOffset offset =
                new ProjectileShaderOffset
                    { Offset = rand.NextFloat2()
                    };

            ICB.Add(BulletPrefab, velocity, translation, offset, chunkIndex);

            Rand.Value = rand;
        }
    }
}
With a few tweaked parameters… this works! There are bullets! They come out in a spiral! When they hit the walls they disappear!
Well, that means it’s time to spawn an ungodly amount of bullets and see how much the system chokes, I suppose.
I tried adding seven bullet spawners, all pumping out bullets. At first I felt that this had a disappointingly noticeable performance impact (felt sluggish, framerate noticeably low), but it seems like my computer must have been doing something else, because it soon went back up to the framerates I’d had before. Compared to raymarching, it seems these bullets are no trouble. (I’d be surprised if they are, although the shader could perhaps be simplified.)
Let’s push it further!! To get up to hundreds of bullets onscreen I’ll need to create some new patterns. But first, I went outside the level one too many times.
A foreseen bug that became a rabbit hole
One problem with the method of setting a collision-disabling tag on the player to clear the wall after a collision is… if you are bouncing along a curved surface at a sufficiently shallow angle, you can end up passing through the wall.
At first I thought it was because ClearingWall is not stripped until we are no longer colliding with the outer collider. However, increasing the outer radius shows that collisions are still registered, but without the proper animations. This is honestly quite surprising.
On further investigation, the time override isn’t actually being set properly. This turns out to be because I forgot to pass WallkickFacingDuration in the level struct. I feel like there ought to be some sort of shortcut to simply copy all the fields on the Authoring MonoBehaviour to the corresponding fields on a component, having to manually write out each one like…
public class LevelBaker : Baker<LevelAuthoring>
{
    public override void Bake(LevelAuthoring authoring)
    {
        AddComponent
            ( new Level
                { MouseSensitivity = authoring.MouseSensitivity
                , ThrustWindup = authoring.ThrustWindup
                , ThrustDuration = authoring.ThrustDuration
                , ThrustCooldown = authoring.ThrustCooldown
                , ThrustForce = authoring.ThrustForce
                , TurnSmallTransitionIn = authoring.TurnSmallTransitionIn
                , TurnSmallDuration = authoring.TurnSmallDuration
                , AfterThrustTransition = authoring.AfterThrustTransition
                , WallkickFacingDuration = authoring.WallkickFacingDuration
                , WallkickStopDuration = authoring.WallkickStopDuration
                , IncreasedDragDuringFlip = authoring.IncreasedDragDuringFlip
                , CubePrefab = GetEntity(authoring.CubePrefab)
                , BulletPrefab = GetEntity(authoring.BulletPrefab)
                , MetaballSmoothing = authoring.MetaballSmoothing
                }
            );
    }
}
…just seems to be asking for trouble! Sure, often you want to do more complicated things, but…
…hmm, I wonder if marking a struct as serializable and exposing it in the editor would work? It feels like it would break something. Of course you’d need to special case handle the prefab entity fields, but all the floats and stuff would work. I won’t do that right now, but something to test in the future.
It’s crazy that I somehow didn’t notice that the feature I touted isn’t working at all.
That leaves the mystery of why collisions with walls are registering even when the transition-in animation doesn’t seem to play. On some further investigation, there is a lot going wrong. I forgot to remove the AnimationTransition component when entering the WallKick state, which causes the animation to appear to suddenly jump back to an earlier state. Since it happens so fast, I had to go frame by frame in Unity to realise what was going on.
Probably distinguishing between ‘before hitting a wall’ and ‘after hitting a wall’ is a bad call, and this system needs to be rethought. The two states we have are ‘near a wall’ and ‘pushing off a wall’. If the ‘pushing off a wall’ animation transitions back into ‘near a wall’, any number of bounces can happen before we stop being ‘near a wall’. Now, I can simply reapply the AnimationClipTimeOverride and FaceWall components to fit the archetype sought by the WallKickLerpJob. At first I thought, due to the way AnimationTransition currently works with the override applying to the incoming animation rather than the previous animation, the ‘wall kick’ animation will play out at normal speed, being overriden by a playing-in-reverse ‘level flight’ animation. Since the ‘level flight’ animation is a pretty simple loop, I hoped this won’t be too jarring.
However, thinking about it more carefully, if it’s set to transition to level flight controlled by distance, and the distance is now decreasing, it will actually abruptly snap to level flight and gradually transition back to the kick off animation. Gah! No wonder it’s janked up.
Instead I might try setting it up exactly as it was before, and just discard the ‘after kicking off’ part of my animation. However, that will look like shit because the character will immediately bunch up her legs after kicking off.
But what if… and hold with me here, this is going to sound crazy… I transitioned from the kick off animation to itself? The currently playing animation would continue based on time, and the new animation would be imposed based on distance. …no, the same problem would present itself. When I’m close to the wall, it would blend fully to the wrong animation.
This is where inertial blending would be fantastic, and I’ll probably revisit the entire animation system once that’s possible in Latios.
What I really want is different behaviour when I’m moving towards a wall and when I’m moving away from it. Well, that can be measured with a bit of finagling. We’ll have to store the previous frame’s distance, and then compute the delta.
Here’s the three cases to consider:
- before a wall kick, or approaching wall without colliding:
ClearingWallis not set. We can just use the distance to control the animation as we have been. - after a wall kick, no further collisions:
ClearingWallis set, and the distance will monotonically decrease. We want to transition fromWallkickShallowtoLevelFlightbased on distance. - after a wall kick, another collision impending:
ClearingWallis set. We want to continueWallKickShallowuntil the distance starts to increase again, and then blend it into a newWallKickShallowwhose progression is based on distance.
This also doesn’t go into the logic of what should happen if the player initiates a thrust while near a wall. Currently this will jump in and overwrite the AnimationTransition etc. causing no end of havoc with states.
So, it’s time for a change of logic. Instead of hooking into the existing animation blending with AnimationClipTimeOverride, I think I will put that logic back how it was and add an extra animation clip component to get blended on top. That does mean sampling potentially three different animation clips per frame, but I don’t think that’s a serious problem since it’s only on the one character.
So, in addition to CurrentAnimationClip and AnimationClipTransition I’ll add a new component, say DynamicAnimationClip. AnimationTransitionJob can take advantage of the blending system in Kinemation to leave the BufferPoseBlender in an unfinalised state. A second job scheduled right after can sample the DynamicAnimationClip on top.
partial struct AnimationTransition : IComponentData
{
    public AnimationClipIndex Index;

    public float SampleTime;

    public float Weight;
}
This is much more flexible, decoupling the dynamic animation from whatever the default animation system is doing.
…except that blending in separate jobs won’t work, because the weights won’t sum to 1 in this case, and we’ve seen that results in bizarre behaviour. Instead we’ll have to have two paths, one for the case that has a DynamicAnimationClip, and one without. Actually four different jobs for all the possible combinations.
For a logical simplification (at the cost of always sampling a DynamicAnimationClip), I can make it so there is always a DynamicAnimationClip on the doll, but it has weight zero by default. Then I don’t have to perform a complicated shuffle of AnimationTransitions, I can just ramp up the weight of the DynamicAnimationClip when you’re near a wall. The SampleTime can be set in the same way we set the old override.
This is progress, but what about the post-bounce animation situation? In this case, we want to blend using time from the currently blending animation to a dynamic one.
Perhaps this can be achieved by manipulating the weight of the dynamic animation based on the time in WallKickLerpJob. We can store the time this animation blend started in FaceWall. The transient can be calculated with a smoothstep. This transient will also apply the first time we approach a wall, but I think that may be OK.
In the end it’s all as simple as making this logic in the WallKickLerpJob…
dynamicAnimation.SampleTime =
    tau * NotionalDuration;

float transient =
    math.smoothstep
        (0
        , TransientDuration
        , (float) (Time - faceWall.TimeCreated)
        );

dynamicAnimation.Weight =
    math.clamp(tau, 0, 1) * transient;
(Aside: Why is the type signature for clamp backwards compared to smoothstep? (x, a, b) vs (a, b, x). We will never know I guess. Not like it matters, partial function application isn’t a thing in C#.)
As for ClearingWall it can now be a flag on FaceWall.
In WallKickStartJob, things have changed a bit…
partial struct WallkickEndJob : IJobEntity
{
    public double Time;
    public double WallkickStopDuration;
    public float TransitionDuration;

    public EntityCommandBuffer ECB;

    void Execute
        ( in WallKick wallkick
        , in Rotation rotation
        , ref Velocity velocity
        , Entity entity
        )
    {
        if (((float) (Time - wallkick.TimeCreated)) > WallkickStopDuration)
        {
            velocity.Value = wallkick.ReflectionVelocity;
            ECB.RemoveComponent<WallKick>(entity);
            ECB.AddComponent
                ( entity
                , new AnimationTransition
                    { NextIndex = AnimationClipIndex.LevelFlight
                    , Start = (float) Time
                    , Duration = TransitionDuration
                    , Looping = true
                    }
                );
            ECB.AddComponent
                ( entity
                , new FaceWall
                    { InitialRotation =
                        quaternion
                            .LookRotationSafe
                                ( wallkick.ReflectionVelocity
                                , new float3 (0, 1, 0)
                                )
                    , TimeCreated = Time
                    , ClearingWall = true
                    }
                );
            ECB.AddComponent<ClearingWall>(entity);
        }
    }
}
Hiding under the dynamic animation clip, the wallkick animation transitions back to level flight.
Breaking out of the FaceWall state is now handled by FaceWallEndJob.
[WithNone(typeof(SDFCollision))]
partial struct FaceWallEndJob : IJobEntity
{
    public double Time;

    public EntityCommandBuffer ECB;

    void Execute
        ( Entity entity
        , in Rotation rotation
        , in FaceWall faceWall
        , ref DynamicAnimationClip dynamicClip
        )
    {
        ECB.RemoveComponent<FaceWall>(entity);

        dynamicClip.Weight = 0;
    }
}
At some point during working all this out I wrote…
I tried this and… well, frankly, the results are mixed. In a lot of ways it looked worse than the system I had before. I’m no longer leaving the level, but sometimes the doll will get caught in a bizarre loop of twitching and rotating at a wall. And in general the rotation to face a wall feels very mechanical. I think the bugged version at the end of the last devlog looks a lot better, which is a frustrating thing to think after putting all this effort into ‘fixing’ it!
But then I kept putting in more effort to fix bugs and oversights I’d accidentally introduced. When the dynamic animation blending finally worked as intended I was so relieved that it actually looked good.
I go mad trying to find a bug
This next bit of the devlog is mostly scratching my head and throwing stuff at the wall. tl;dr: RotateTo was running too long, and fighting with FaceWall.
Madness
I’m not sure the RotateTo is entirely necessary because by the time we get out of this state, we should be already levelling out. But when I don’t have it… weird stuff happens. The character is rotating in all kinds of weird ways, seemingly overrotating before the animation kicks in, and rotating weirdly on the way out as well.
What is going on!!!!!!!
Despairingly, I set it to log the value of \(\tau\) in the console. \(\tau\) should never be outside of the \([0,1]\) range except right before a collision stop begins. All seemed to be in the expected range.
It’s mostly on the way outwards that the problems lie. It might have to do with the combo of FaceWall imposing rotation and the rotation applied during the WallKick. There is an overlap: both RotateTo and FaceWall are writing to the rotation. Looking at the list of systems, WallKickSystem comes after AlignmentSystem. So, while we’re in the FaceWall zone, FaceWall is god. But the moment we leave it, we snap into whatever point in the interpolation RotateTo had gotten to.
There’s a couple possible solutions to this. The best one is I think to put the duration back in RotateTo, since this has become a more general rotation component. That decouples us from all rotations having to take place at the speed of ThrustWindup. We can have the rotation within the stop happen in exactly as long as the stop lasts, i.e. within 0.1 seconds. However, I expect that will be too fast.
Out of curiosity, I also removed the RotateTo component from FaceWallEndJob. In theory this ought to leave us in whatever state it was on the last frame of FaceWall being active. This resulted in bizarre rotations where the doll was flying belly first. So something is screwy! Maybe the rotation being set when we reapply FaceWall after a collision.
That rotation is…
quaternion
    .LookRotationSafe
        ( wallkick.ReflectionVelocity
        , new float3 (0, 1, 0)
        )
This ought to return a rotation so that our z will be pointing along the direction we’ll be pinging off the wall, and the ‘up’ axis is the global Y. This quaternion seems to be generated correctly, at least insofar as if we have a RotateTo component tacked on the end, it blends into that direction correctly enough. So why then does it not come out that way from just plane old WallKickLerpJob??
What’s even stranger is that after a bit, the system seems to settle down, and go back to the intended behaviour. Perhaps then some piece of the Thrust sequence is still there, and interacting with it in a weird way! …nope, that isn’t it, rip.
Framing through the animation, the problem seems to come first during the actual kick off rotation, and then again on the way out. So definitely I’m making some sort of mistake with computing these rotations. Possibly the culprit is LookRotationSafe not acting how I thought it does. Except… we’re also using LookRotationSafe to face the wall when flying in and that’s working just fine. So, huh?? What gives?
I tried deleting RotateTo and just setting the rotation and suddenly it worked great. At this point I realised that the job that ends RotateTo has not caught up with the whole new time idea. What time is it using? Oh yes, it’s StatusTransitionSystem again. Time to have the job that updates the rotation in RotateTo also have capacity to delete the job, I don’t know why I didn’t do that before… I guess I was on a ‘jobs should be as small as possible’ kick, but separating my logic into all these different call sites and systems just becomes a debugging nightmare, as we see here.
I swear, StatusTransitionSystem has to be by far the worst development decision in this whole project.
So the solution in short is…
RotateTonow carries a durationRotateToJobis now responsible for deletingRotateTowhen it’s done
With that small fix basically everything worked fine.
Rolling around (speed… unspecified)
One thing that was rather nice in the video in the previous devlog is that the doll would keep its orientation when coming away from the wall. This wasn’t intended behaviour so I fixed it… but I’m actually thinking I like it better that way.
Funnily enough I’ve already anticipated this in the way I calculate which rotation to use. So I think that should not require modification. All that really needs to be done is to set the eventual outgoing rotation of the wall kick to the same rotation that you get immediately after the jump. The doll will reset to the global ‘up’ after a thrust. Eventually I want to be able to be able to give roll controls and create a full 6DOF movement system, but for now that is unnecessarily complicated.
Actually, come to think of it, I could reintroduce the post-FaceWall RotateTo component and use this to very gradually roll back to the upright position. It would get overriden as soon as you go near a wall, so you’d still get the cool mode of bouncing we have currently, but if you soar away from a wall you’ll gradually settle back to the default position.
That’s a lot of text and no video. Here’s the fixed up animation system in action. Notice how you move your legs into position as you get close to a wall. Also look at how I can skim along the surface making a bunch of tiny bounding leaps. This ‘scamper’ is an emergent behaviour of this animation system and I think it’s really cute.
But there are also some obvious problems still. At around 00:11, I attempt a thrust while close to a wall, and the resulting slerp looks fucking terrible. I think I need to add some logic in the thrust controller system to deal with that case.
We could eliminate FaceWall when the thrust starts, which would exclude all the related rotation systems fighting over how to rotate the doll, but this wouldn’t do much good because immediately the FaceWallStartJob would pick it up and shut down the thrust. So essentially thrusting near a wall would do nothing, which is no good since that’s our primary means of mobility.
We could have the WallKickLerpJob deactivate when Thrust is applied to the doll. However, this would mean the player could fly through walls, which is also no good.
I think the solution is to…
- adjust the
Fliporientations generated byThrustStartSystemto take into account proximity to a wall. (Actually, since it takes into account the doll’s orientation during the flip, I think this is fine already.) - remove
FaceWallduring the flip part of an Immelmann-type thrust, and makeFaceWallStartSystemonly activate ifFlipdoesn’t apply. - clear components like
ThrustandThrustActiveonly when you actually hit the wall. Only removeRotateToto avoid fighting over the rotation system. - after this,
FaceWallStartSystemkicks in. Since it’s a newFaceWall, there will be a transient to smooth over the blend. There’s no need to add aRotateToin this case. At this point, the doll should be basically pointing where she’s going, so theFaceWalllogic should work fine.
That’s simple enough, but I have a bunch of extra turn animations to add which will introduce further complications.
I’ve definitely made life difficult for myself in having such a complex animation system. Most third person game designers don’t have this problem—they can at least rely on the model always being the same way up. But it’s worth it!! Still, I wonder what the motion controller looks like in the recent Spider-Man games? I bet it’s nuts.
(I also wonder if at some point I should come up with a more procedural, dynamic IK-based animation system instead of blending clips together and trying to keep it in some sort of natural sync with the rotations.)
This works pretty good, and best of all, it’s nice and simple as a solution.
(Subsequent to this section, I learned about write groups, which seem to be designed to solve the problem of multiple systems fighting over writing a component. It may be possible I can get cleaner code by refactoring with write groups instead of writing out a bunch of [WithNone(...)], but there’s no need to re-solve this problem now.)
Weird squished up face bug
Something odd is happening in the thrust active-animation.
I don’t know why that’s happening but it is noticeable. It’s not happening in the animation in Blender. So perhaps it has something to do with the new dynamic animation blending.
It’s very strange, the more I look at it, the more it seems the whole character is a bit stretched out, though that might be in part perspective distortion. In any case, her face is definitely being shoved back in a bizarre way.
So what’s causing this? My first guess is that the blending weights don’t sum to 1. However, I looked at the jobs that write these animations and it really looks like they do sum to 1.
currentClip.SamplePose
    ( ref blender
    , (1 - nextWeight) * (1 - dynamicAnimation.Weight)
    , currentClipTime
    );

nextClip.SamplePose
    ( ref blender
    , nextWeight * (1 - dynamicAnimation.Weight)
    , nextClipTime
    );

dynamicClip.SamplePose
    ( ref blender
    , dynamicAnimation.Weight
    , dynamicAnimation.SampleTime
    );
The total here is, letting \(n\) stand for nextWeight and \(d\) for dynamicAnimation.Weight
So no matter what the values here, the total will always be 1.
Perhaps something strange still happens in the event that one of these values is higher than 1, even if the total is correct. I don’t know what negative weights, or weights greater than 1, would do. Since nextWeight comes from a smoothstep, it can’t be the culprit. And dynamicAnimation is written by
dynamicAnimation.Weight =
    math.clamp(tau, 0, 1) * transient;
where transient is from a smoothstep, so that’s also guaranteed to be between 0 and 1.
To investigate further, I decided to reach in with the hand of the developer and start fiddling with values myself. I want to find which combination of clips and weights causes the problem. So I’ll set the CurrentAnimationClip to ThrustActive, and adjust the value of the dynamic clip to see what happens.
In fact I didn’t need to look very far: the instant I set it to Thrust, the flattening took hold.
At this point, I decided to take a look at the FBX import, and zooming in on the animation in the tiny little inspector window, I beheld that the face was flat.
So, it’s not a problem with Kinemation, Kinemation is doing exactly what it’s supposed to do and sampling my janky broken animation.
Perhaps something had gone wrong with exporting the FBX from Blender? I re-exported it. The face flattening was still in effect. I turned on ‘Leaf bones’, but not surprisingly adding extra non-deforming bones didn’t help. I imported the exported FBX back into Blender. Guess what? It’s flat!
Presumably some of the more advanced Rigify features aren’t properly being exported, and this is the one animation that exposes the problem. Gahh. I had a look and every single face bone is a bendybone. I have no idea if it’s doing anything funky with scale on top of that, it seems plausible, but Rigify is a nest of complicated constraints so I can’t really be sure.
I went looking for solutions to this problem and found one in Game Rig Tools. This seems considerably more general and better designed than the janky ‘Rigify to Unity’ add-on I tried and rejected before: it does stuff like disabling BendyBones, stripping non-deform bones, baking their motion. Essentially it copies all the deform bones into a new rig, matching the original deform bones with constraints, and either preserving or flattening the hierarchy; you can remove bone scale and potentially replace it with simply moving the bones around. This video discusses its features.
This seems like precisely what I need to solve all the rig problems I’ve had in one go!
Initial results seemed promising. However something very strange happened to the soft flexible component that connects the doll to the jet. I think this is because the centre of this object is not set to the origin and it has a weird rotation. I tried applying its transforms, and re-ran the ‘generate game rig’ button… and the same thing happened. Gah. What’s weird is that the doll seems just fine. But other things parented to the armature got moved 1.12m down and a few centimetres back, as I was able to determine by putting the rig in rest position. This displacement caused the deformation to go a bit crazy. I have no idea why this happened, but at least it was easy to fix.
Bone-parented stuff is not getting moved over to the generated rig, but I can do that manually. Once that was done… everything went perfectly. My animations baked nicely, I could pre-apply the timeline trimming in Blender, and once imported into Unity, the squashed face issue went away.
Hooray for things working! Big thanks to ‘CGDive’ for writing this script, it’s going to save me so much trouble in the future I’m sure.
Gaining the ability to die
When the player is killed, a lot needs to happen. Admittedly, at this stage in development, less needs to happen than later when we’ll have disposable resources to restore, and things like that.
The most basic implementation of a player death would simply…
- delete all bullets
- purge all state-related components from the player (
Thrust,FaceWalletc.) - reset the player’s velocity and orientation
- move the player back to the spawn point
At this point the game would basically be in the same state as startup.
The easiest way to make certain that the player character is in the correct starting configuration is to spawn a whole new player character, and connect the controls to this player rather than the old one. The player can easily be converted into a prefab that can be instantiated as needed, and controls can be disconnected by removing the Character component from the previous instance. This has the added benefit that we can leave the player’s corpse in the level! (We might even want to apply ragdoll to it. That’s going to be a fun puzzle one day.)
In addition to this, it’s necessary to display some sort of animation in order to communicate to the player that they died and respawned. It should be very easy to retry—similar to Super Hexagon, you can hit R within moments of dying to immediately have another go, or wait a moment to see some statistics.
This end screen should list certain information: your time, your best time, the number of runs so far (spun as the number of THRUST//DOLLS expended on this mission), and have a button to either retry the level or have another go.
Of course we gotta build this incrementally. The first step is…
Sorting my bullets
Detection should be easy—it’s already there, writing to the console. Theoretically. I had a real ‘super genius game developer’ moment where I was like ‘why aren’t any collisions being registered’ and then realised that I had removed the collider from the doll.
Once I fixed this I was able to hit some bullets. But there was a problem: the bullets at the initial size I set (radius 0.5) are tiny! For that reason it’s actually quite hard to get hit by one, even when you’re in the middle of a bullet-rich zone. I doubled the size of the bullets but it’s still surprisingly easy to weave between them.
Reckoning depth with bullets is also difficult. One solution to that is to add a mist component to the post-processing. However, when I did this, it applied to neither the raymarched geometry nor the bullets, which is not very useful!
I noticed another problem as well. For some reason, although bullets are properly slotting into the level geometry, relative to each other they seem to be drawing in reverse order! They’re also overdrawing the circular UI element in the middle of the screen. This is what we call ‘not correct’.
I tried setting its depth write to ‘force enabled’, which fixed that issue, but this led to a new problem: sometimes the corners of bullets would overlap other bullets and not be drawn there - presumably because that particular bullet happened to get drawn second, and then tested its depth to be behind the first bullet. However, when I also set ‘alpha clip’, that solved all the problems with bullet ordering (presumably by not drawing anything for fragments with zero alpha). I did the same to the targeting reticule.
As for depth, I’ll probably have to put the fog calculation into the bullets myself. And as for the SDF, I will probably need to switch to the unlit version of the shader (which should at least avoid having to do further raymarching for shadows, even if it’s a shame to lose out on the cool features of uRaymarching). Hold that thought.
Doing something with collisions
If the player gets hit by a bullet, a lot needs to happen. The system that tests for collisions between player and bullets shouldn’t have to worry about all that, especially since we will sooner or later have other projectile types. Instead, what it can do is write some component like ‘level should end’; another system will consume that and do something with it.
This means I had better use ColliderCast rather than FindPairs, just because aggregating all the results of a parallel FindPairs to determine if any narrow phase collisions happened… well, it’s possible, I’d probably have to have an array indexed by the sort key or something? Each thread can write to the array if it finds a collision, then afterwards, I scan over the array for any trues. Or I just add multiple redundant commands to a command buffer with a parallel writer? There’s probably an easier way to someone more familiar with parallel programming in C#.
Anyway, ColliderCast is supposed to be faster for one collider vs a collision layer, plus I can sweep through every position since the last frame. The problem we had with not testing for collisions at the start and end points was, I think, a convex collider only problem. So let’s use that.
I can’t tell if that bug is no longer happening, but with collider casts, we certainly register plenty of collisions. So let’s move on to the next stage.
Where do we write the ‘game should end’ message? The Scene Blackboard Entity seems like the obvious choice. Although there are various ways to write to it, I assume calling AddComponentData causes a structural change. In principle it doesn’t matter to pause all the jobs if it happens once ever in a level performance-wise, but in terms of game logic, this raises questions about having this take place half way through a frame. Then again, ProjectilePlayerCollisionSystem runs pretty much at the end of the simulation group. I think I’m overthinking this. Let’s just try it and see what happens.
So, I’m testing for player collisions in an IJobEntity. In practice this should only run once and I’m only using IJobEntity as a convenient shortcut to get the right component refs. I’ll pass this job a BlackboardEntity field and see if Burst is happy with that…
[WithAll(typeof(Character))]
partial struct PlayerColliderCastJob : IJobEntity
{
    public CollisionLayer TargetLayer;

    public BlackboardEntity Blackboard;

    public double Time;

    void Execute
        ( in Collider collider
        , in Rotation rotation
        , in Translation translation
        , in Velocity velocity
        )
    {
        RigidTransform transform =
            new RigidTransform
                ( rotation.Value
                , translation.Value - velocity.Value  // <- mistake!
                );

        if
            ( Physics
                .ColliderCast
                    ( collider
                    , transform
                    , translation.Value
                    , TargetLayer
                    , out ColliderCastResult result
                    , out LayerBodyInfo layerBodyInfo
                    )
            )
        {
            Blackboard.AddComponentData
                ( new RunEnd
                    { Time = Time
                    }
                );
        }
    }
}
It compiles! Hooray! But it gets very upset when you try to run it. The reason is that BlackboardEntity contains unsafe pointers, which Burst jobs do not love. Given we are only using it to add a component anyway, it is not so difficult to refactor to use an ECB instead, since BlackboardEntity will implicitly cast to a regular Entity.
RunEnd is right now a very minimal component that just stores the time of death. We also need to store the level start time to compute how long the run lasted. The system that sets this component will be activated each time a new level begins; it should also handle instantiating a new player. For now though, let’s just record some basic stats. So this is RunStartSystem, which I’ve placed in InitializationSystemGroup so it should run before everything important on the first frame of the game:
[BurstCompile]
public void OnUpdate(ref SystemState state)
{
    BlackboardEntity blackboard =
        _latiosWorld
            .sceneBlackboardEntity;

    blackboard
        .AddComponentData
            ( new Run
                { Start = SystemAPI.Time.ElapsedTime
                }
            );

    blackboard
        .AddComponentDataIfMissing
            ( new LevelStats
                { Deaths = 0
                , BestTime = 1.0/0.0;
                }
            )

    state.Enabled = false;
}
And then RunEndSystem should clean up the level and signal the UI to appear.
We need to basically pause all the systems that run the level when this happens. Fortunately, all of them reside in LevelSystemGroup. LevelSystemGroup requires the component Level to run, but we don’t really want to delete Level, since it has a lot of important parameters that will be relevant in the next run. The solution is to add some other tag component that has to be present for LevelSystemGroup. Actually, we have already made a perfect such component in the form of Run.
(An alternative would be to make time slow down, creating a similar effect to what happens in a game like Dark Souls when you die. This can be done by adjusting UnityEngine.Time.timeScale, which apparently also applies to DOTS. (This seems to potentially cause problems with Unity DOTS Physics… but guess what, we’re not using that.) A nice natural effect would be to ramp down the slowdown to zero while applying some kind of post-processing effect. However, I’ll try the sudden stop to begin with.)
I was slightly surprised to find out that the Blackboard Entity does not have a RemoveComponent method. That’s fine, I can do it with an ECB instead. (I could also fetch the entitymanager but ECBs are serving me well so far.) The next frame, LevelSystemGroup will not update.
[BurstCompile]
public void OnUpdate(ref SystemState state)
{
    BlackboardEntity blackboard =
        _latiosWorld
            .sceneBlackboardEntity;

    EntityCommandBuffer ecb =
        SystemAPI
            .GetSingleton<EndSimulationEntityCommandBufferSystem.Singleton>()
            .CreateCommandBuffer(state.WorldUnmanaged);

    if (blackboard.HasComponent<RunEnd>())
    {
        Run run = blackboard.GetComponentData<Run>();

        ecb.RemoveComponent<Run>(blackboard);
    }
}
On testing, sure enough, when you hit a bullet, everything freezes. However, the console starts spamming about being unable to find Run… because the system we just wrote doesn’t stop updating every frame, after all, RunEnd still exists! A simple solution is to tuck this system into LevelSystemGroup; this way it will only run once, at the end of Level. Now everything freezes, except for the shader animations in the bullets.
That works perfectly, but it definitely feels abrupt and underbaked. So let’s go back to that slow-mo idea. It would also be good for the camera to start orbiting the doll, and to have some effect indicating which bullet killed the player.
Slowing down time
My initial idea to slow down time was to use UnityEngine.Time.timeScale, but the problem with this method is that we don’t want all animations to slow down - we’d still like to orbit the camera. Really, we only want time to slow down in LevelSystemGroup.
One option to solve this would be to have a timeScale component that gets loaded by every component that uses the time. However, this would be unwieldy and prone to desync.
An alternative would be to use the approach taken by the fixed time step group, and use the PopTime method to temporarily override the time at the beginning of LevelSystemGroup, and then restore the real time afterwards. This can be a function of the elapsed time. Essentially we want the gradient of the time to initially match the normal game time, but for it to gradually asymptote towards a constant value. (It doesn’t necessarily need to asymptote; C1 continuity would be enough.)
A simple function to make this is…
\[f(t)= \casealign{ & t & \qquad & t & {} \le t_\text{end}\\ & t_\text{end} + T\left(1-\exp\left(-\frac{t-t_\text{end}}{T}\right)\right) & & t & {} > t_\text{end} }\]This function has gradient 1 at \(t=t_\text{end}\), and asymptotes towards \(t_\text{end}+T\), so we can tune the duration of the slowdown by adjusting \(T\).
This also means we need to set the DeltaTime. We could store the adjusted time, but it’s also possible to calculate it directly, with calculus.
so we can simply multiply the ‘real’ DeltaTime with this, as per \(\dif f = \df{f}{t} \dif t\). There will be some inexactness because of the fixed time step and floating point error, but it should be close enough.
This is what LevelSystemGroup now looks like…
[UpdateBefore(typeof(TransformSystemGroup))]
public partial class LevelSystemGroup : SuperSystem
{
    protected override void CreateSystems()
    {
        RequireForUpdate<Level>();
    }

    protected override void OnUpdate()
    {
        BlackboardEntity blackboard =
            latiosWorldUnmanaged
                .sceneBlackboardEntity;

        bool popTime = false;

        if ( blackboard.HasComponent<RunEnd>() )
        {
            popTime = true;

            double tEnd =
                blackboard
                    .GetComponentData<RunEnd>()
                    .Time;

            double T =
                blackboard
                    .GetComponentData<Level>()
                    .SlowMoEnd;

            double t = SystemAPI.Time.ElapsedTime;

            float dt = SystemAPI.Time.DeltaTime;

            double exponential = math.exp(-(t - tEnd)/T);

            double adjustedTime = tEnd + T * (1 - exponential);

            float adjustedDt = dt * (float) exponential;

            TimeData tempTime = new TimeData(adjustedTime, adjustedDt);

            World.PushTime(tempTime);
        }
        base.OnUpdate();

        if ( popTime )
        {
            World.PopTime();
        }
    }
}
We also need to make sure ProjectilePlayerCollisionSystem shuts down or it will constantly overwrite the time in RunEnd. In fact a number of other systems should probably shut down, but I’ll get to those in a moment.
If this works, then when I hit a bullet, time should gradually slow to a halt. Well, this didn’t happen at first: I was making various mistakes like forgetting to add the original time, or multiply by the original dt. But eventually I got it to work correctly. The parameter \(T\) needed to be much smaller than I initially thought—since we have an exponential decay, this is the time it takes for the ‘speed of time’ to reduce by a factor of \(\mathrm{e}\). About 0.2-0.4 seconds seems to be a sweet spot.
One interesting discovery is that the camera-rotating script does not get slowed down, since it actually doesn’t use the DeltaTime or ElapsedTime when computing the rotation delta. This might be desirable, depending on whether we want the user to be able to interact with the interface.
Now, we need to add some sort of ‘tumble’ animation to the doll to indicate that she died, and ideally some sort of visual effect. Eventually it would make sense to get all guro with it and blow limbs off or punch holes through the model, but that would require some pretty complex algorithm to modify the mesh on the fly and perform booleans that cut through the triangles. (Of course, I could rapidly swap out the model for some premade gibs, which is the standard approach used in game engines, but I think it would be more interesting for it to be dynamic.)
So, let’s shelve ragdoll physics and mesh damage for now. Instead, we can represent the hit with some kind of particles or visual effect. But let’s get the game end screen wired up first.
Game over screen
Creating a game over screen in UI toolkit is pretty easy. We’ve already found a bunch of fonts and stuff for the configurator section. The biggest problem is that the USS visual editor has a tendency to just randomly delete your work every so often and roll back to the last save. I should really open another bug report. At this point I’m so sick of everything in Unity just about almost working right. Programming in Unity is like building up a longer and longer mental list of weird little quirks and bugs you have to watch out for. To some extent that’s just software, but…
Anyway, here’s what I came up with.

How did I get that chamfered edge with cutouts? Well, turns out Unity has an SVG importer now, and it’s supported in UI Toolkit. The SVG is tesselated (converted to triangles) and rendered on the graphics card with everything else. At higher resolutions, it might be possible to see the smooth curves break up into straight segments, but this is more than worth the advantage of being able to design interface elements with all the features of SVG.
Compared to HTML and CSS, it is much more difficult to actually place the SVG image in an interface element, but I was able to get a reasonably good looking result with the ‘scale and crop’ scale mode. Apparently UI toolkit supports ‘9-slicing’ of SVGs, which would be a very nice feature for creating responsive interface elements in SVG, but I don’t understand how the slice values work, and how you’re supposed to designate the 9-slice corners, so I’m leaving them all at zero.
Of course, this all depends on animation to really hit. The animation I intend is for the UI element to slide in from the left with just the top and bottom text, and the word ‘expended’ in white; then the word ‘expended’ goes to red, and the statistics fade in on subsequent beats.
UIToolkit supports certain inline formatting options, specified with XML-like tags. The <color="red"> tag overrides whatever colour is set on the text as a whole. So what I’m going to do to achieve this effect is actually put <color="white"> on the part that says THRUST//DOLL, and leave the rest of it to be controlled with the text colour of the element, which can more easily be overriden from code.
Like in CSS, the UI Toolkit supports various animation transitions, which apply automatically when a property changes. This seems like the most efficient way to get animated UI elements. I set a Translate property on the root UI element, and defined a corresponding animation transition (ease in, lasts for 2s). Now, if I change the value of Translate in code, it ought to animate.
Now, we need to find a way to signal the UIToolkit element from within ECS. Well, I thought, that’s a previously solved problem, although it’s a while ago. So I took a look at the systems in the ConfiguratorSystemGroup. Lol, lmao, no. Apparently I never actually finished that part.
Oh well. It shouldn’t be too hard, right?
Talking to UI Toolkit
The UI Document lives on a GameObject. We’ll need to write another MonoBehaviour to live on that GameObject and receive commands from the ECS.
(Here I will repeat a warning that I learned a few months ago when I first started using Unity: don’t use anything in the UnityEditor namespace in a game. They’ll work in the editor but not in a build. This includes the data binding features that are helpfully mentioned on the landing page of the UI Toolkit manual. Data binding is only for adding stuff to the editor. Don’t make my mistakes.)
There’s two ways we can call a method on the MonoBehaviour. One is to have a managed system which stores a reference to it (probably by using the singleton pattern); the other is to have it ask the DefaultGameObjectInjectionWorld for information during its own Update or LateUpdate. I considered the latter but then changed my mind and went with the former since it seems like it ought to be simpler.
It took me a long time to figure out an issue where the Q query method, when looking for a specific element by name (ID), should not have the # in front of it. It’s not like the Javascript method Document.querySelector: if your element’s ID is DeathScreenRoot (say), you want to write Q("DeathScreenRoot") and not Q("#DeathScreenRoot"). And frustratingly, if the query doesn’t find anything, it just returns null, and you only find out later that the reference you cached in Awake() is actually null…
Once I finally solved that bug, I got the MonoBehaviour working. Here’s what it looks like:
using System.Collections;
using System.Collections.Generic;
using UnityEngine;
using UnityEngine.UIElements;

public class GameEndScreen : MonoBehaviour
{
    private VisualElement _root;
    private Label _titleElement;
    private Label _deathCounterElement;
    private Label _runTimeElement;

    [SerializeField]
    private string _deathCounterTemplate =
        "dolls killed in this deployment: <b>{0}</b>";
    [SerializeField]
    private string _runTimeTemplate =
        "this doll lived for: <b>{0:0.0} seconds</b>";

    public static GameEndScreen Instance;

    void Awake()
    {
        Instance = this;

        _root =
            GetComponent<UIDocument>()
                .rootVisualElement
                .Q("DeathScreenRoot") as VisualElement;
        _titleElement =
            _root
                .Q("Title") as Label;
        _deathCounterElement =
            _root
                .Q("DeathCounter") as Label;
        _runTimeElement =
            _root
                .Q("RunTime") as Label;
    }

    public void DisplayDeathScreen(double runTime, uint deaths)
    {
        _root.style.translate = new Translate(0, 0);
        _deathCounterElement.text = string.Format(_deathCounterTemplate, deaths);
        _runTimeElement.text = string.Format(_runTimeTemplate, runTime);

        _titleElement.style.color = Color.red;
        _deathCounterElement.style.opacity = 1f;
        _runTimeElement.style.opacity = 1f;
    }
}
We’ll end up adding more methods for other screens later. Anyway, this works great; the UI element slides in smoothly, although ease-in 2 seconds turned out to be completely wrong: instead ease-out 0.5 seconds was the ticket. I also added a short delay so I can add some visual effects before the text confirmation.
The way all these USS properties seem to be implemented in code is a struct that is something like, say, StyleTranslate, which has two fields, one for a keyword enum for CSS USS keywords like inherit and one for a specific value… which will be another struct, something like Translate. Fortunately, implicit casts exist for all of these so you don’t have to manually write the StyleXYZ constructor.
The only part that doesn’t work with this system is changing the colour of the title element to red. For some reason, the inline <color="white"> tag is overridden when I change the colour. The only way to solve this I could see was to split the title element into two segments, one saying ‘THRUST//DOLL’ and one saying ‘ EXPENDED’, collectively belonging to a visual element with a horizontal flex direction. Then I can select just the final word and make it red.
That works pretty good! However, it’s annoyingly inconvenient to have to go into the USS document to tune the transition times—much better to be able to do it right in the editor. Well, that’s not so hard to do, if a little tedious. Setting a transition time in code looks generally like…
_runTimeElement.style.transitionDelay =
    new List<TimeValue>
        { _animationDelay
        + _slideDuration
        + _turnRedDuration
        + _fadeInDuration
        };
_runTimeElement.style.transitionDuration =
    new List<TimeValue>
        { _fadeInDuration
        };
The list is implicitly converted into a StyleList, and the floats in it are implicitly converted into TimeValues. Very convenient.
Let’s do some profiling
At this point I took a look at the profiler. I recently learned that Unity colours Bursted code green, and managed code blue. Peering at the worker threads, I saw… a lot of blue! Even though we have plenty of time thanks to the GPU, this revealed a misunderstanding. I assumed all job code was Bursted by default, but… that’s not true, I don’t know why I thought it was. So I went down all my systems and slapped [BurstCompile] on each and every job. (Fortunately, it seems it’s enough to just apply it to the job, you don’t have to also write it on the Execute function.) All the jobs got faster. This did not improve the framerate of course, since we have to wait for all the raymarching.
Speaking of the raymarching… I was sure that the raymarching is the culprit for the framerate drops. And indeed, empirically that seems to be the case, since disabling the raymarching quad gets a hefty framerate increase at full screen, and the framerate is much better when the window is smaller. At fullscreen with the raymarching turned on, I’m getting frame times of about 10-15ms. This isn’t terrible by any means, the game is plenty playable, but I’m antsy about how it will scale for more complex levels. The profiler unfortunately does not tell me how much time the graphics card is spending on any given shader.
One oddity is that Unity’s older non-DOTS physics engine seems to appear on certain frames. Although it only takes tens of milliseconds to run, I don’t have any use for this physics engine, so I will try to find a way to disable it.
My own code makes up an absurdly tiny part of the frame. The whole LevelSystemGroup where most of my code lives takes just 0.4ms. There is absolutely no point trying to optimise it any further. Any optimisation gains are going to have to come from graphics.
So how the hell do we make raymarching faster? I tried switching the raymarching shader to the unlit version—fortunately this is trivial to do with uRaymarching—on the thought that raymarching to cast shadows is probably taking up some amount of time. However, this gained basically nothing. I also reduced the limit of raymarching steps from 100 to 60, thinking a lot of time was probably being spent with rays noodling about at grazing angles. However, this didn’t help at all.
One interesting experiment would be to render the scene with raymarching set to an unlit shader that displays the number of raymarching steps. This can be done using a post-processing calculation…
#define PostEffectOutput float4

// @block PostEffect
inline void PostEffect(RaymarchInfo ray, inout PostEffectOutput o)
{
    o = float4(ray.loop/ray.maxLoop, 0, 0, 1);
}
// @endblock
…which reveals that almost everywhere, the raymarching doesn’t get anywhere near the max; it’s only thin slivers where it just grazes walls that this becomes significant.
It may be possible to drop the max iterations much lower, there just needs to be some sort of effect to cover up the weird holes this introduces. Some sort of haze effect based on the number of iterations..?
One major cause of slowdowns is anything that errors to the console. I lost a bunch of time trying to work out what in my program was producing GC, only to finally notice that some sort of bug was causing an out of range exception in Latios’s OnCulling, which hit the console every frame with an error. This went away as soon as I restarted the editor.
So, what’s the effect of maximising the game pane as seen in the editor? The editor has two modes, Play Mode (which only measures stuff that’s in the PlayerLoop, and pauses whenever you pause the game) and Editor Mode (which measures stuff the whole editor is doing, so pausing the recording without flushing out all the useful info means you don’t pause the game, but pause the profiler instead.) The PlayerLoop takes just as much time in both small and large windows; the EditorLoop gets longer. If we switch over to Editor Mode, we get to peek at the Render Thread, although this proves unenlightening. After spending 8ms doing main thread stuff (player loop and updating the editor GUI), the editor loop waits for a signal (from the GPU, I presume) for 4ms.
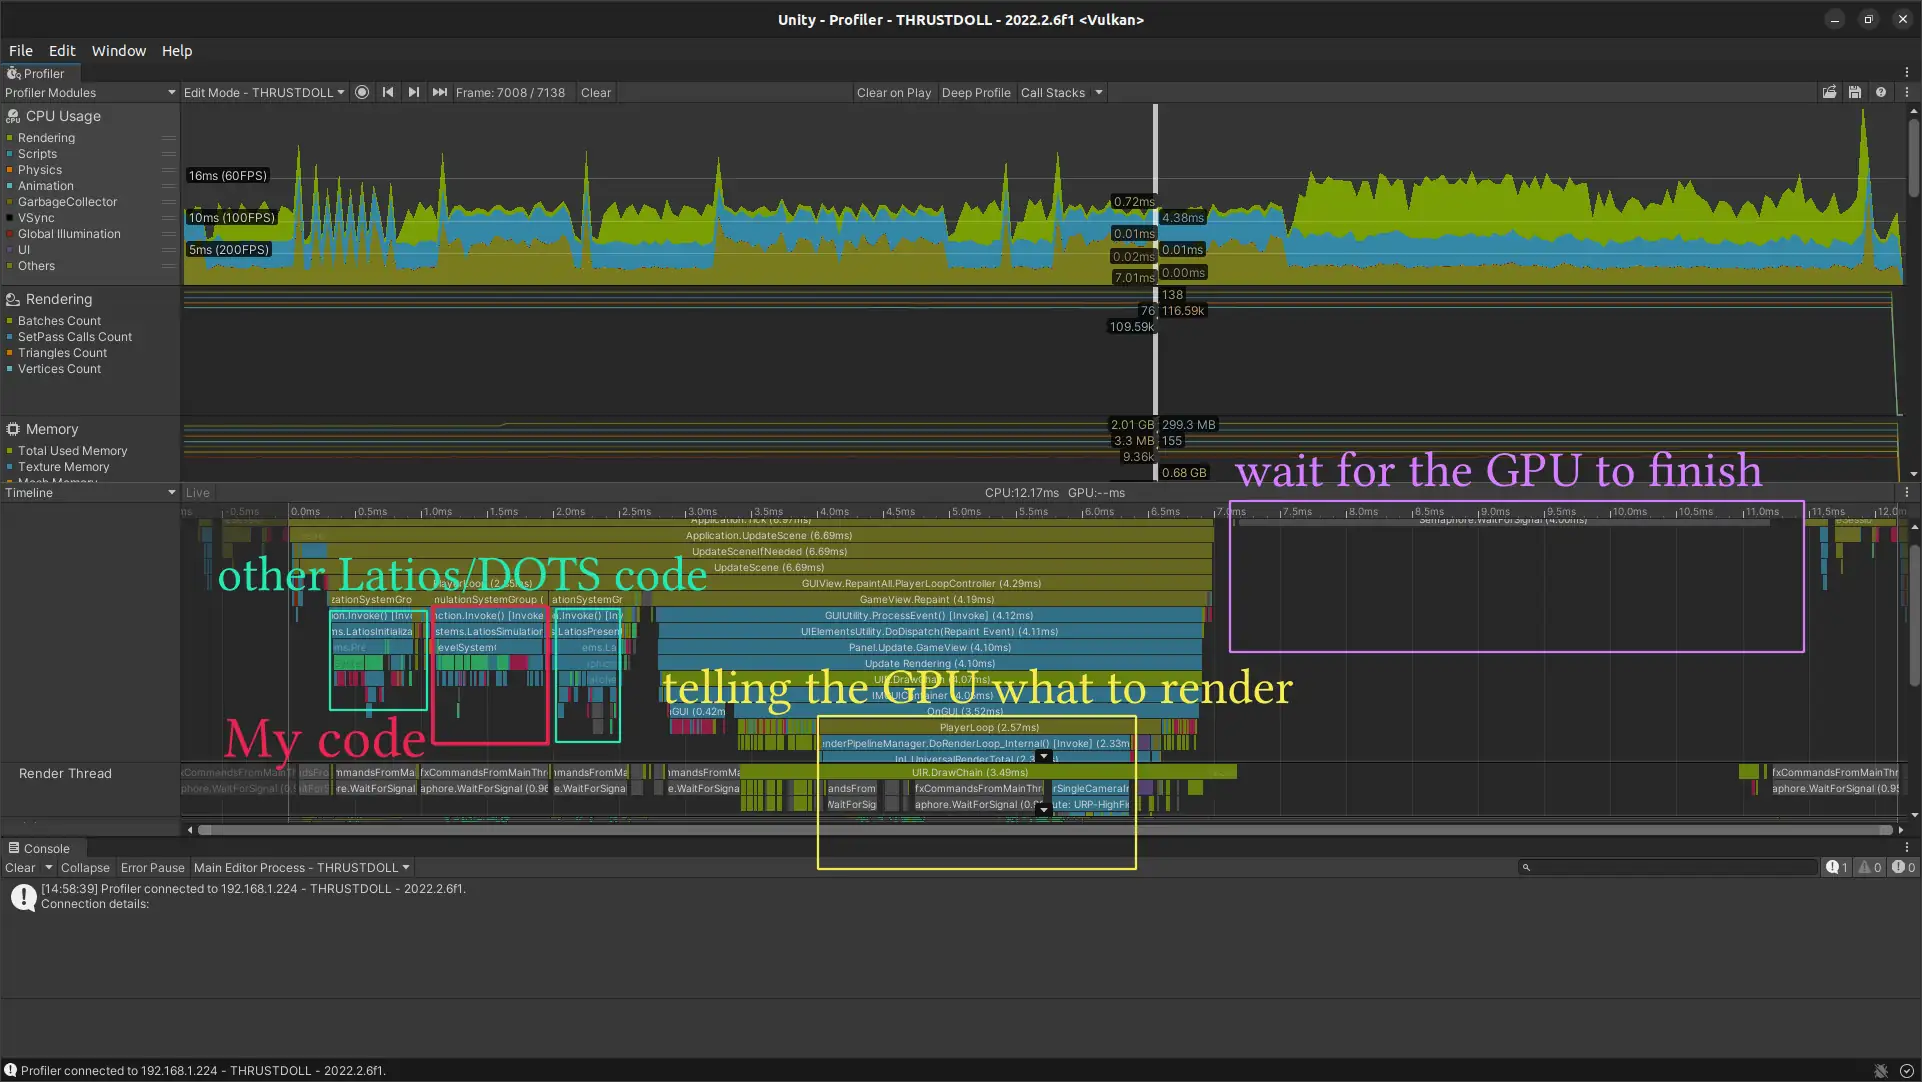
The render thread just seems to be waiting around during the simulation, so it may be possible to get better performance using an ‘N-1 render loop’, a concept covered here. That doesn’t look overly complicated, but it’s for a future devlog.
As for raymarching, to get more information, we’d have to go to… the GPU profiler! This amounts to adding the ‘GPU Usage’ tab in the profiler window, despite the warning of its overhead. Thereupon, we discover:
GPU Profiling is currently not supported when using Vulkan.
Sigh. (I have to use Vulkan because OpenGL causes a weird rendering bug.) Well, it’s not like it would give much useful information as far as raymarching is concerned anyway.
The other thing to investigate is the cause of the extra frame time when moving the camera. This is a little tricky, since I don’t have a mouse cursor when I’m moving the camera, and the shortcut to pause the game Ctrl-Shift-P requires some finger acrobatics to press before it slides off the side of the profiler. Lucky that keyboards have ctrl and shift keys on the right side as well as the left! Whatever it is, it falls under the ‘Others’ category of CPU usage, increasing the time spent on this category from about 4ms to about 6ms. I assume this has something to do with updating inputs when they change. However, scrolling up and down the different categories in the timeline, I can’t find anything that obviously increases in this case. The thing to experiment with is probably to go back to the event-based MonoBehaviour bridge rather than directly reading from the mouse, and see if that gets better performance.
I had a look at the ECS Network Racing Sample, and it seems that it does not use InputSystem, but instead the old input system. Take a look.
All in all, outside of slapping [BurstCompile] all over the relevant jobs for an essentially negligible speedup, this attempt to improve performance with the profiler was a bit of a wash. All the expensive stuff is happening in code outside of my control. However, there are some avenues to investigate in the future - the N-1 render loop especially seems promising.
We’re getting hit by too many bullets
I kept thinking that the doll was getting hit very often and I couldn’t see where the bullet that hit her had come from. Eventually I’d realised I’d made a silly mistake. The collider cast checks for collisions between the the current position translation.Value and a previous position translation.Value - velocity.Value. But that means the previous position is not the location of the doll on the previous frame, but one entire second behind. It could easily be a position the doll has never even been. It’s hard to dodge through bullets when bullets can hit your ghost from an alternate timeline.
The fix is just to multiply in the DeltaTime, i.e. translation.Value - velocity.Value * DeltaTime.
Rotating the dead
I think I’m reasonably happy with the death screen now. Some extra VFX would be nice, but I’ll do that later. The camera still being in free look is actually fine; it lets the player look around and see what killed them!
Next up is to actually reset the level. The InputReadingSystem continues to run just fine during the pause (since it doesn’t care about the time at all), so we can use this to get info about a click.
Here’s what needs to happen. Time comes back online, all the bullet firers are suspended, the camera flies over to the spawn point, a new doll is spawned, and then the timer starts over.
So, first of all we need to disconnect the previous doll, and give it over to a different animation system for animating corpses. This is as simple as removing the Character component, but that will make certain GetSingleton calls barf if it’s done immediately on death. As it turned out, there were only two, in CameraPivotTranslationSystem and ReticuleSystem. I applied state.RequireForUpdate<Character>() to both.
This has the interesting result that the camera pivot suddenly stops tracking the player, who zooms out ahead. I think this is a neat effect, and I’ll probably keep it. However, it would be good to mark the point of impact in some way so the camera doesn’t just seem to orbit a random point in empty space. Some sort of particle effect would do the trick—more on that shortly.
The deceased character still has components like CollidesWithSDF and AnimationTransitionSystem. FaceWallStartJob has already been set to require Character, so that won’t kick in. The same can be applied to other wallkick-related jobs.
However, it won’t do to have a dead character fly through a wall, so let’s add a new Corpse component, and a system to handle its collisions.
[WithAll(typeof(Corpse))]
partial struct CorpseHitWallJob : IJobEntity
{
    void Execute
        ( in SDFCollision collision
        , in CollidesWithSDF collider
        , ref Velocity velocity
        )
    {
        if (collision.Distance <= collider.InnerRadius)
        {
            velocity.Value = new float3(0);
        }
    }
}
It could not be simpler. The result of this will be dolls sticking out of walls at weird angles, but that will do until we can implement ragdoll.
An additional effect can add some rotation to the doll. This could be done randomly, but it would be cool to get the torque from the collision. ColliderCast returns a ColliderCastResult, which returns a value called hitpointOnCaster, which according to the comment ought to be in world space. To get a position relative to the doll’s origin, we can use the value distance to work out where the doll was where the collision occurred.
For the direction of the force we can take the bullet’s velocity, converted into the doll’s reference frame.
Then we can compute the angular velocity impulse. This can reasonably be applied all at once. I will set the impulse to the momentum of the bullet (as if the bullet had been entirely absorbed). The previously written AngularVelocitySystem will then kick in to continue rotating the doll with the defined velocity. Of course, it will look weird and rigid without ragdoll. Some kind of limited animation may help.
Here’s how it looks in code, added to PlayerProjectileCollisionJob. Since ComponentLookups and the signature of Execute can’t cover the same type in a job, I had to look up the velocity of the doll through the lookup.
float3 hitpoint = result.hitpointOnCaster;
float distance = result.distance;

float3 dollPositionAtHit =
    translation.Value
    - (1 - distance / math.length(velocity))
    * velocity;

float3 momentArm =
    hitpoint - dollPositionAtHit;

float3 bulletVelocity =
    VelocityLookup[layerBodyInfo.entity].Value;

float3 bulletVelocityInDollFrame =
    bulletVelocity - velocity;

float3 torqueImpulse =
    BulletMass
    * math.cross
        ( momentArm
        , bulletVelocityInDollFrame
        );
When the doll hits a wall, we will now need to zero out her angular velocity as well as her velocity. Also, some kind of angular velocity damping will be important or she’ll just spin forever if she doesn’t hit a wall which would just be super weird. Since damped rotation springs are out, I’ll add this damping now. Instead of the \(v^2\) drag I used for linear velocity, angular velocity will use a linear drag force, causing the angular velocity to decay exponentially. (I will treat the moment of inertia tensor as uniform, and not worry about precession or anything like that!)
[BurstCompile]
partial struct AngularDampingJob : IJobEntity
{
    public float DeltaTime;

    void Execute(ref AngularVelocity angularVelocity, in AngularDamping angularDamping)
    {
        angularVelocity.Value *= (1 - angularDamping.Coefficient * DeltaTime);
    }
}
Awkwardly, with the slowdown, it’s a little unclear if all of this actually works. Let’s move on to restarting the level and we might see what happens to corpses floating around.
Restarting the level
First we convert the player into a prefab. Then we instantiate it. The camera will instantly jump over to the new player. Pretty simple.
A cooler effect would pull the camera back over to the starting point. A straight line interpolation would be easy, but likely to pass through walls. There is probably a pathfinding algorithm that works on our metaball levels, but that would take a lot more work to implement. A cooler option would be to periodically store points on the doll’s path and fly along it in reverse. But if you bounce off walls a lot that would look weird. Instead, perhaps we could store the nearest metaballs and compute some sort of spline that passes near the centres of each of them…?
OK, that’s getting way too far ahead. Let’s get the level restarted.
RunStartSystem should do this job. Then we can start the player without a level and immediately have RunStartSystem launch a doll. The question then is, how do you restart a disabled ISystem from outside that system?
While it’s possible to get a handle on a system of a giving type from the WorldUnmanaged, and in this way set the Enabled flag, accessing systems this way is warned to be unsafe, and generally does not seem to be the way things are supposed to be done. Instead, it seems the correct approach is to have a RequireForUpdate, and set a component StartNewRun when we want that system to update, and have the system delete that component when it’s done?
Testing this with attaching StartNewRun, this seems to work. Next, spawning the doll. Ultimately, I would like this to be an animation where there’s a large spike with a spiraling rack of THRUST//DOLLS to pop one off the top. However, to begin with, I’ll simply plop the doll into the game. This can be done with one of Latios’s fancy Instantiate Command Buffers.
using Unity.Entities;
using Unity.Burst;
using Unity.Transforms;
using Latios;
using Latios.Systems;

[UpdateInGroup(typeof(PreSyncPointGroup))]
[BurstCompile]
partial struct RunStartSystem : ISystem
{
    LatiosWorldUnmanaged _latiosWorld;

    [BurstCompile]
    public void OnCreate(ref SystemState state)
    {
        _latiosWorld = state.GetLatiosWorldUnmanaged();

        state.RequireForUpdate<StartNewRun>();
        state.RequireForUpdate<SpawnPoint>();
    }

    [BurstCompile]
    public void OnDestroy(ref SystemState state)
    {

    }

    [BurstCompile]
    public void OnUpdate(ref SystemState state)
    {
        BlackboardEntity blackboard =
            _latiosWorld
                .sceneBlackboardEntity;

        blackboard
            .AddComponentDataIfMissing
                ( new LevelStats
                    { Deaths = 0
                    , BestTime = 1.0/0.0
                    }
                );

        EntityCommandBuffer ecb =
            _latiosWorld
                .syncPoint
                .CreateEntityCommandBuffer();

        ecb.RemoveComponent<StartNewRun>(blackboard);

        ecb.AddComponent
            ( blackboard
            , new Run
                { Start = SystemAPI.Time.ElapsedTime
                }
            );

        Translation spawnPoint =
            SystemAPI
                .GetComponent<Translation>
                    ( SystemAPI
                        .GetSingletonEntity<SpawnPoint>()
                    );

        Entity dollPrefab =
            blackboard
                .GetComponentData<Level>()
                .DollPrefab;

        _latiosWorld
            .syncPoint
            .CreateInstantiateCommandBuffer<Translation>()
            .Add(dollPrefab, spawnPoint);
    }
}
That works; now all that remains is to make it happen when the player clicks in the death screen. This has to be a managed system so it can talk to the UI GameObject.
using Unity.Entities;
using Unity.Burst;
using Latios;

[UpdateInGroup(typeof(LevelSystemGroup))]
[UpdateAfter(typeof(InputReadingSystem))]
[BurstCompile]
partial class RunRestartSystem : SubSystem
{
    protected override void OnCreate()
    {
        RequireForUpdate<RunEnd>();
    }

    protected override void OnUpdate()
    {
        Intent intent = SystemAPI.GetSingleton<Intent>();

        Entity blackboard =
            latiosWorld
                .sceneBlackboardEntity;

        EntityCommandBuffer ecb =
            SystemAPI
                .GetSingleton<EndSimulationEntityCommandBufferSystem.Singleton>()
                .CreateCommandBuffer(World.Unmanaged);

        if (intent.Thrust) {
            ecb.AddComponent<StartNewRun>(blackboard);
            ecb.RemoveComponent<RunEnd>(blackboard);

            GameEndScreen.Instance.HideDeathScreen();
        }
    }
}
where HideDeathScreen is…
public void HideDeathScreen()
{
    var oldTransitionDelay = _root.style.transitionDelay;
    _root.style.transitionDelay = new List<TimeValue> {0};
    _root.style.translate = new Translate(new Length(120,LengthUnit.Percent), 0);
    _root.style.transitionDelay = oldTransitionDelay;
    _expendedElement.style.color = Color.white;
    _deathCounterElement.style.opacity = 0f;
    _runTimeElement.style.opacity = 0f;
}
Temporarily overriding the transition delay like that is kinda goofy right? But it works.
By now you’re probably dying for a video of it all in action. So here we go. First, the new deaths:
(All recordings are at a much lower framerate than the game because space is limited, incidentally.)
You can see it’s not quite ‘there’ yet. VFX are necessary, which means probably looking into how to wire DOTS up to Unity’s particle systems to do particles on the GPU. But it might be fine to just have particles as more entities. Also, I can see no evidence the angular impulse is working, so that will need fixing.
And here’s a video of pure movement:
It is now almost a game. There’s still no objective.
What’s next?
Today was the last day of the Mastered game dev course. I had a meeting with my mentor Johannes, and he generally seemed to think well of the project. I’m proud of what I’ve been able to learn and accomplish in the last few months. I went from having never used Unity and being curious about the concept of Entity Component System and data-oriented programming, to having quite a lot of facility with DOTS, which is definitely one of the more esoteric parts of Unity. Obviously there is much still to learn before I reach the level of someone like Dreaming, but now comes the scary part: trying to find a job that’s neurotype-compatible, and working out how to organise my life around being a working girl while still doing the stuff I enjoy.
So that’s exciting.
Anyway, all being well, this project will continue, if perhaps not quite at the same furious pace it has been. I need to catch up on other stuff. But here’s what’s coming for this project…
- hitting the objective, ‘CORE STRIKE’. once that’s there I have an actual gameplay loop for everything else to fit into.
- visual pass. for far too long has this game lived with just default materials. it’s past time I got some nice shaders on the doll and on the walls.
- optimising the raymarching. this could include: culling metaballs that definitely aren’t in sight, and using spatial acceleration structures like BVHs to optimise the signed distance field computation. also, get fog working as a way to help put a cap on SDF steps.
- more movement mechanics! right now it’s just complete chaos since you only have one button and the rest of the time you’re just pinging off walls. it’s also hard to aim the doll, since your reticule is offset. so it’s not much good as a speed game.
- some amount of air steering. I don’t want the game to just become a flight sim, but a small amount of control will be helpful for compensating for mistakes
- grappling hook! this whole system is going to be a pretty complex thing to implement, but it’s a key part of the concept.
- iframe dodge. giving the player an option for dealing with bullets is vital. plus a chance to do cool NieR-style particles.
- creating the various upgrades. I suspended modelling to focus on programming, but there is a lot still to model. plus there are flaws with the current model. (e.g. the ‘crotch plate’ looks like shit.)
- integrate the character upgrade screen with the level proper
- more complex algorithms that don’t have a ready-made solution:
- ragdoll physics. this will be used for creating better looking death animations. It requires learning how to integrate physics with constraints—possibly Verlet integration. It also requires a deeper understanding of Kinemation’s constructs so I can get track collisions, momentum etc. per bone.
- IK. this has similar questions to ragdoll physics, plus I need to familiarise myself with IK algorithms. but it will help a lot with wall interactions, and it will be very important to grappling hook animations.
- ideally, I’d like to create these as new components for Latios. of course, that sets a demanding standard of optimisation
- more complex enemy logic: better bullet patterns, seeking missiles, etc.; a palate of elements to build levels
Alongside all of that, there will come a point to start creating content—actual levels to navigate rather than just a testbed. And if, by some miracle, all of that comes together, the next stage is to integrate it with a visual novel style story.
So, we’re not done here. Not by a long shot. See you in the next devlog…
Comments
MOREDEV (3a4339aea76f28f7438899fb8d204b21)
I NEED MORE
letsgo (afaeb310635ba3dbc730bd8d1eb55ef1)
you can do it!
canmom (742623938c762ec774109eebb1c42915)
Unfortunately, this project kind of died after I got a job! I hope to resurrect some of the ideas at some point now I know a lot more about game development - though most likely in another engine such as Bevy, I’ve had my fill of working in Unity by now.
However, I recently made an animation using the Doll model, which I released at the Revision demoparty, and you can watch here!