originally posted at https://canmom.tumblr.com/post/712492...
Towards the end of last year my vtuber friend Yuri Heart and I made a short film. In a week!
A very intense week.
I love talking about how stuff is made, so here’s an article about how we did it.
Contents
Contents
The basic idea
The Tale of the Little Witch is inspired by cutout animation and mechanical theatres.
Mechanical theatres, also known as automata, have been built from the 18th century to the present. They involve various scene elements being moved around on armatures powered by mechanisms such as cams and linkages. When they’re run—perhaps operated by a coin—the machine will run through a series of motions to tell a story. Check the box for some examples, old and modern…
Mechanical theatres
Cutout animation is one of the oldest styles of animation, involving moving and replacing paper cutouts in stop motion. It’s one of the oldest styles of animation, with notable examples including The Adventures of Prince Achmed by Lotte Reiniger, and the famous work of Soviet animators like Yuri Norstein (Hedgehog in the Fog, Tale of Tales), who even today labours on his forty-year magnum opus The Overcoat. In modern times, you might know of the incredibly stylish duo Gekidan Inu Curry, whose cutout collage style gave the witches in Madoka incredibly unsettling effect. Or maybe you just think of South Park. It’s a versatile method!
Our film took inspiration for this, but in Blender. I wanted to generally give the impression that the whole film would be running a mechanical theatre, one made with everyday materials like cardboard, foil and small light bulbs. Some of the motions in the film would be impossible to do with a mechanism (mainly the part where the Little Witch flies around!), so I imagine they were done with stop motion and the supporting armature painted out. But mostly… mostly we kept to this idea!
A combination of a cutout style and a ‘children’s book’ style narration is not entirely uncommon in animation, since you can get an appealing result with less effort than, say, traditional animation. The game NieR Automata provides some memorable examples over the course of the B playthrough, for example:
Given the incredibly tight frame though this was absolutely the way to go. But how to make it stand out? The answer: the power of lighting. Blender has an incredibly powerful path tracing renderer called Cycles, which allows light to bounce naturally around the scene, creating all sorts of beautiful intermixing of colours, soft shadows, bounce lighting etc. In a path tracing renderer, everything reflects everything, resulting in a scene that feels very natural and well-integrated. It is, however, much slower than Blender’s other rasterisation-based renderer, Eevee. Getting renders that were both fast and clean with Cycles was a whole challenge.
So, the idea took shape: the story would be told in a mechanical theatre using cutouts. To add a little interest to the cutouts, we used a ‘line boil’ effect, where three very similar drawings are alternated. Behind the characters is a screen showing slides of Japanese text, and 2D animations of magic effects.
Originally this backdrop was going to be paper slides, but we hit on the idea of a projector in the back of the theatre that would shine on the back screen. We did this in a really cool way—we are actually simulating the projector.
The rest unfolded over the week…
Audio
Since the animation in this film is so tightly coupled to the music and narration, we started with sound.
Yuri wrote the script for the narration really quickly, and composed the music in a matter of hours. It was deeply impressive. Our narrator, Roubharb, recorded the narration on one of the first nights, giving a viable backing track that we could start animating to.
Audio isn’t my field (yet), so I can’t tell you what tricks she pulled to mix and balance the recording or how she went about composing the music. It seems like dark magic to me! The result was amazing though and it does so much to set the vibe of the short.
Building the stage
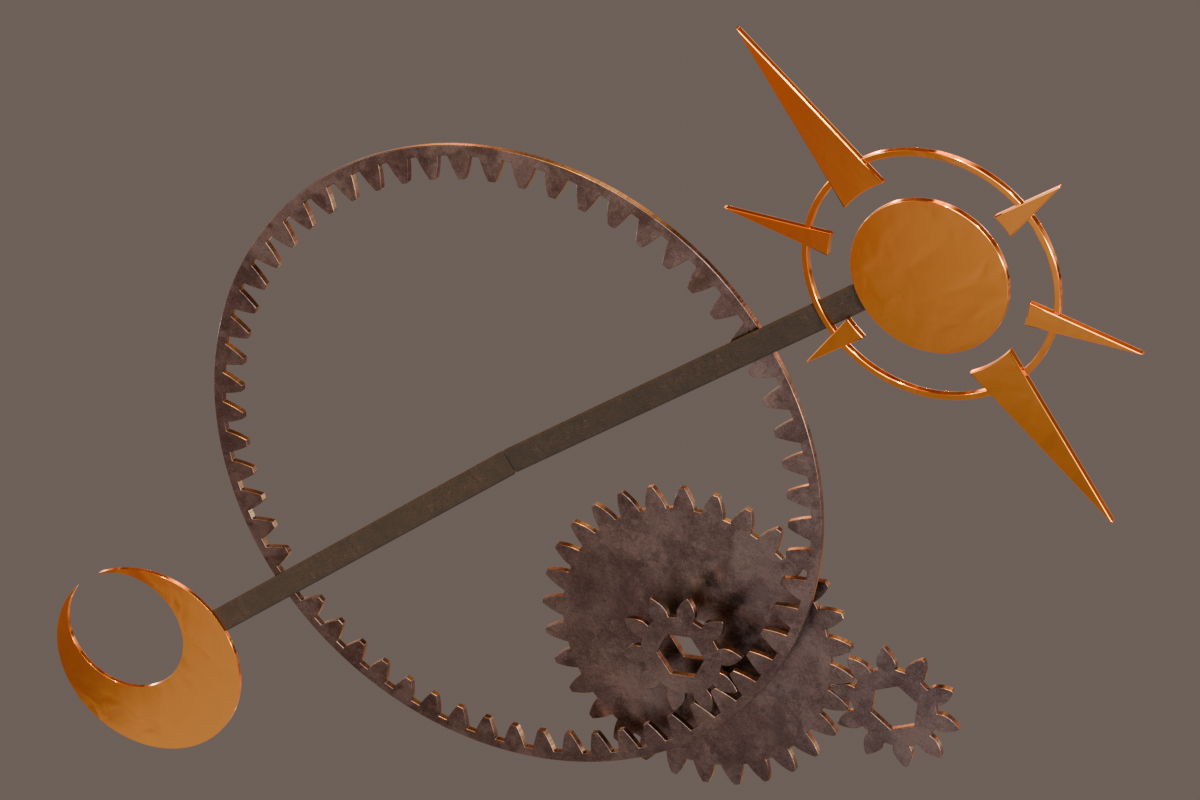
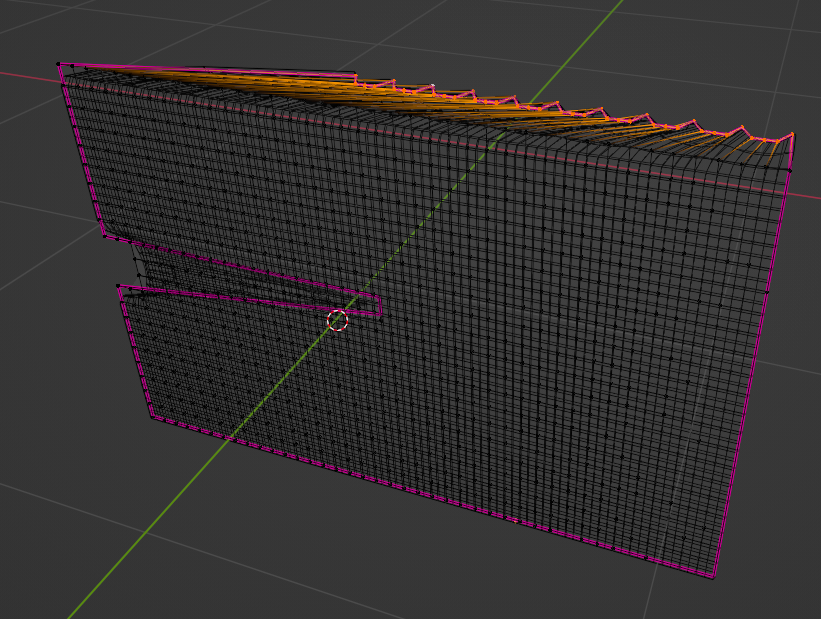
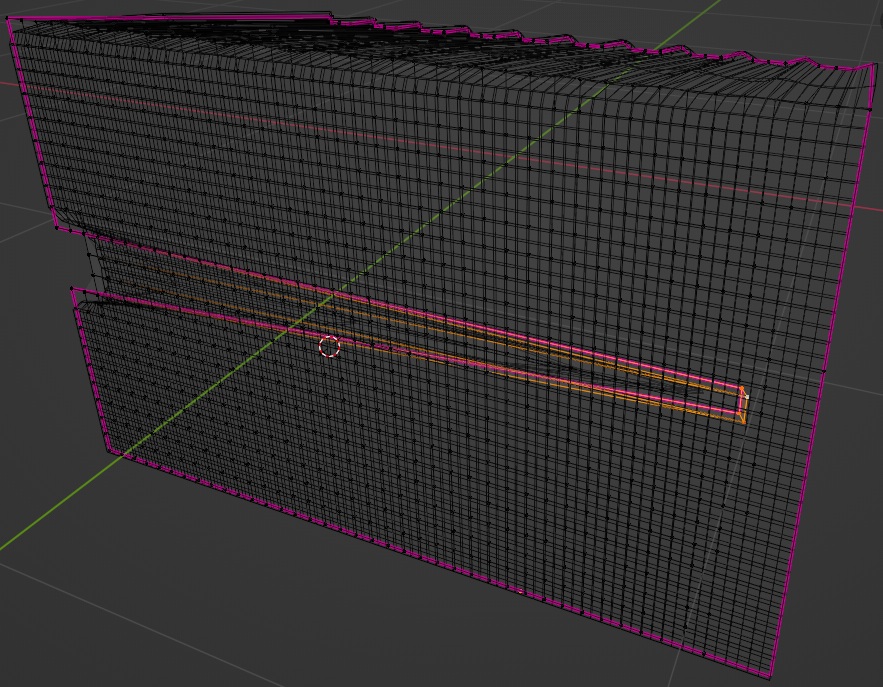
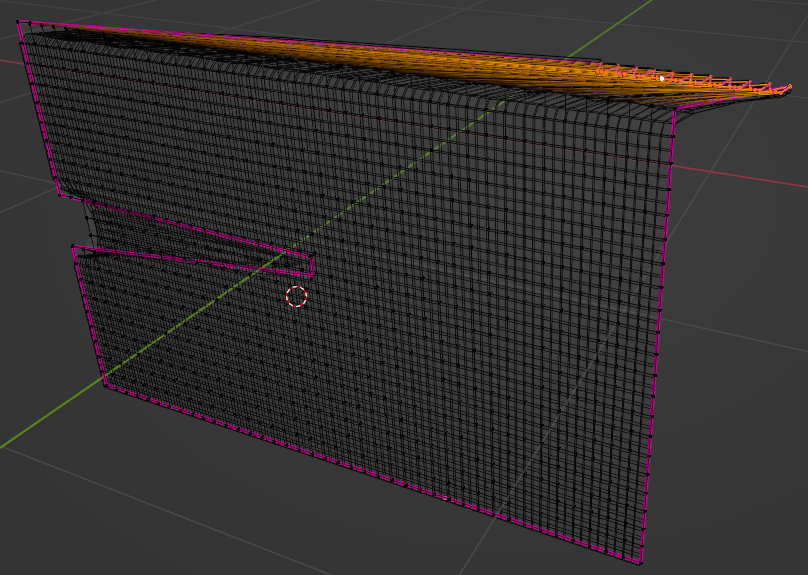
The mechanical theatre model is actually incredibly simple: it’s just a wedge shape with a box around it. Why a wedge? It helps the side walls feel more visible, and lets us use a 4:3 aspect ratio on the projector screen. It also introduces an element of forced perspective.
On top of this I applied solidify and bevel modifiers—a non-destructive technique which made it very easy to modify the theatre if I needed to. The only tricky part was setting up the UVs to avoid stretching and make sure the wood grain would always go in the right direction. (There are a lot of grooves cut in the theatre for paper elements to slide in and out, but I did these at the very last minute, once the animation was finalised. So I’ll come to that later!)
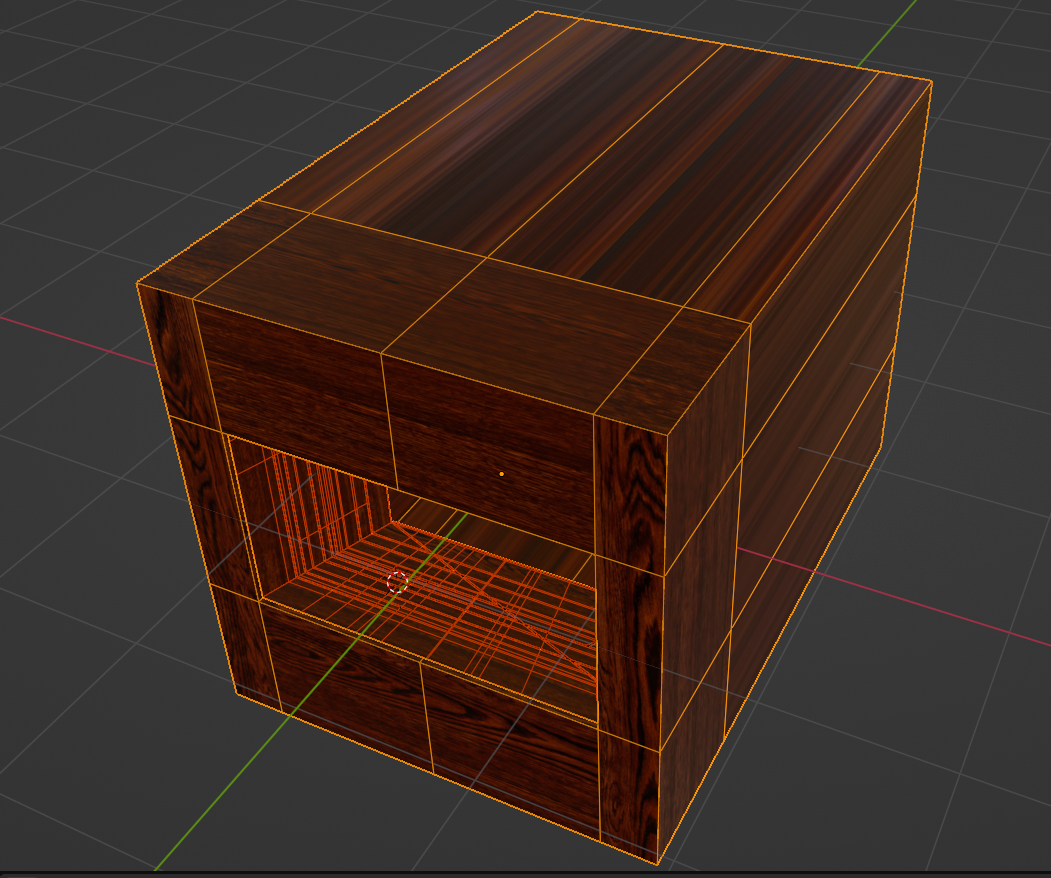
If you’re following along at home, note the solidify modifier was applied and superfluous edgeloops removed.
To make the stage look really good I needed nice physics-based materials to texture it with. Fortunately, there are a great many libraries of free PBR texture maps out there nowadays. One of the major ones is PolyHaven, and a lot of our materials came from there. Using PBR textures and the Principled shader makes things incredibly easy: you get all the realistic speculars and Fresnel effect just like that.
I used the wood material pretty much as-is, but other materials took some modifications. Let’s talk about the projector, because it’s definitely the coolest one in the scene!
The projector
I wanted to have the projector physically be shining through the back of the paper screen. The projector itself consists of a spotlight with an image texture. If you want to adjust the mapping settings for a spotlight, you don’t use UV coordinates as with a mesh, but instead use the Geometry node’s ‘incoming’ field, and transform it from world to object space. You can then feed this into a mapping node like a usual texture. In this case, I needed to flip the image horizontally and adjust the aspect ratio.
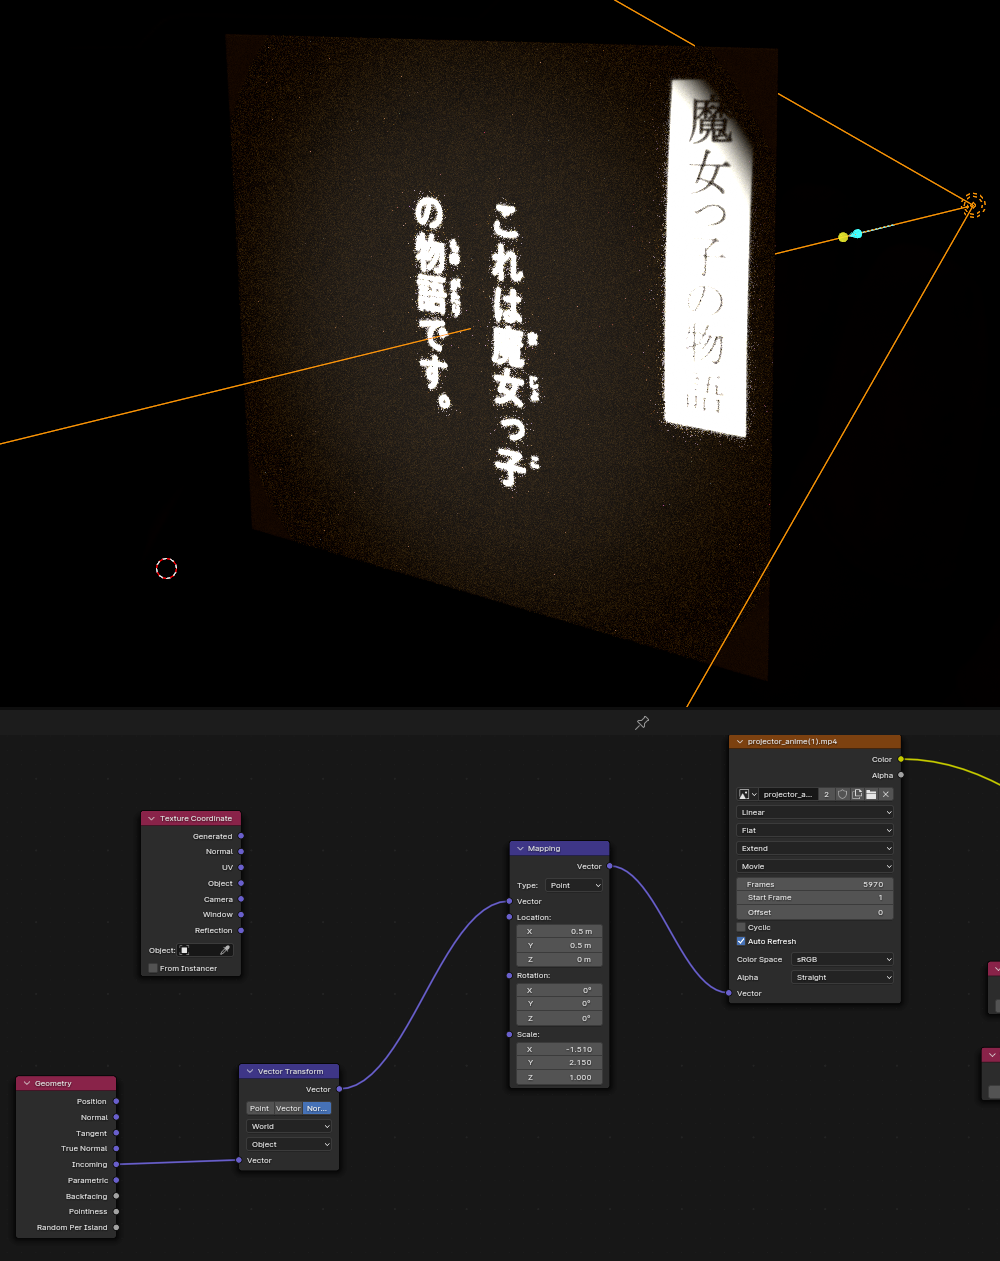
I also remapped the brightness of the video to make the dark slightly brighter than pure black, causing a nice glowing spot in the centre of the projector screen. Due to clipping, the brightness appears to fall off very rapidly at the edge of the bright parts. However, this works pretty well in this case - it’s a less-than-perfect projection.
The screen itself is simply a plane with a solidify modifier. Although the solidifier modifier adds very little physical thickness, it’s actually tremendously important for the light to pass through two faces for proper calculation of the subsurface scattering. This is because, in the raytracing, the incoming light ray is converted into a subsurface scattering ray. It needs to hit another face of the same material to convert back into a regular light ray.
If you increase the thickness of the screen, you can get some very interesting and beautiful effects, with the subsurface scattering spreading out and blurring the light—just as with a real paper screen!
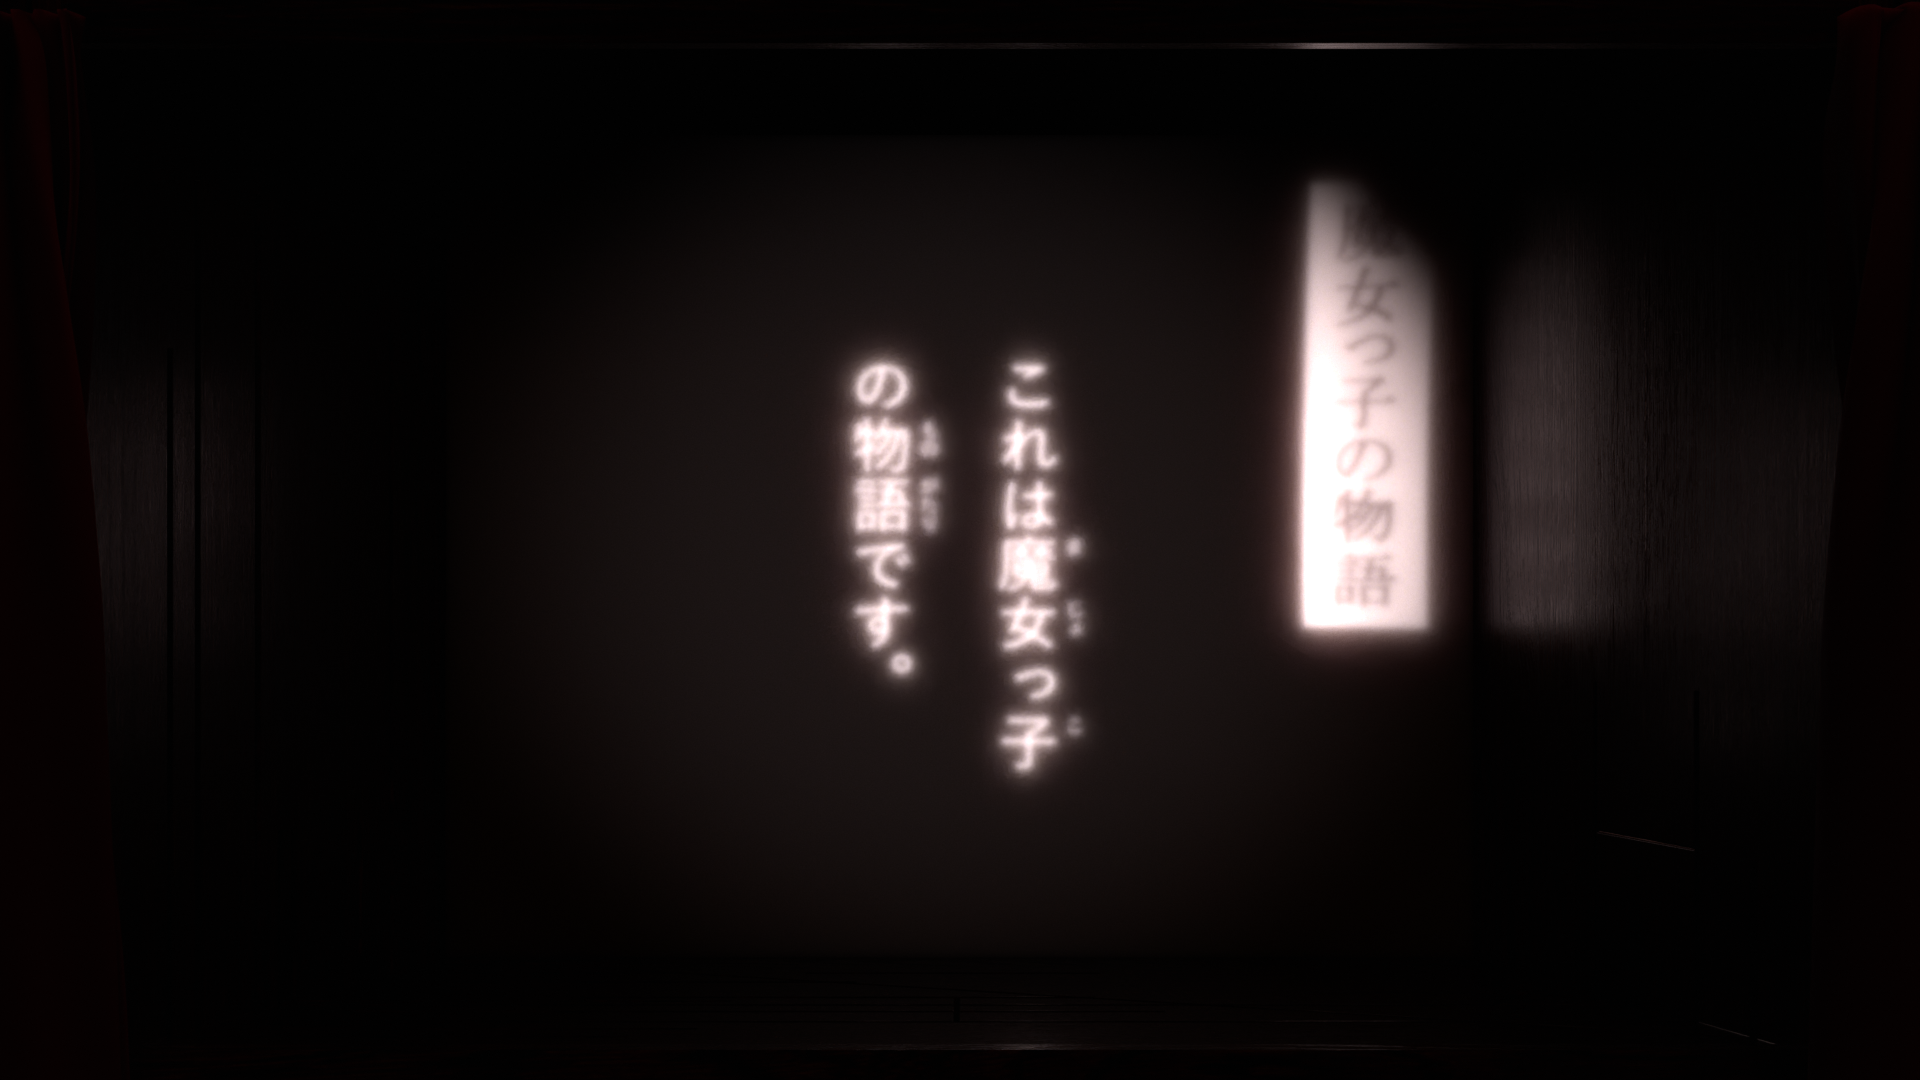
(I also darkened the whites of the spotlight a bit for this one to make the white less overwhelming.)
However, we kept it nice and thin to keep the text clear and readable.
The subtle gradients across the projector screen actually caused no end of trouble at the encoding stage. But more on that later.
The content of the projector
At the outset, the projector simply displays the narration translated into Japanese. Later… my lips are sealed. Yuri created this on her side and exported it as a video file I could use as an animated texture. She did an amazing job with the typography and layouts, which I proceeded to mangle by passing it through a distorted projector ;p
For the most part, almost all the animation in this project was done in Blender. However, for the ‘weave her soul into the very fabric of the universe’ part, and a couple of other effects, Yuri made a 2D animation with the lines weaving together and morphing into fish. My side of this was super easy, it’s just part of the projector video file.
The other lights
The projector spills light quite nicely into the scene, but everything else needs to be lit from the front. We went for a scheme with four coloured lights at the corners of the stage. These are simple area lights. The lower lights use a warmer orange colour, and the upper lights use a cyan colour. In the control rig—hold on, I’m getting to it!—I set up drivers so the brightness of all these lights could be easily controlled using bones.
In addition to that, there is a spotlight which shines in the centre of the stage. Another driver controls both the size and brightness of this spotlight, giving it the appearance of opening an aperture.
On top of all these lights are the house lights, which are created by an HDRI image from PolyHaven. I turn down the brightness of this HDRI at the beginning as the curtains open, which gives us a glimpse of the normal map on the back screen.

This is what the stage looks like from the projector’s side, showing the four stage lights and the HDRI in the background (with bokeh).
These four lights, which could all be turned on and off individually, proved a suitable combination for lighting the scene. The four front lights can be turned down all together, or individually, allowing specific areas of the stage to be lit up. And you get a really pretty gradient from top to bottom with the different colours.
The coloured lights aren’t directly visible from the front of the stage, but they reflect brightly in the metallic surfaces, primarily the sun and moon. Tuning this to not be overwhelming took some work, but it led to a really cool effect.
The characters and scenery
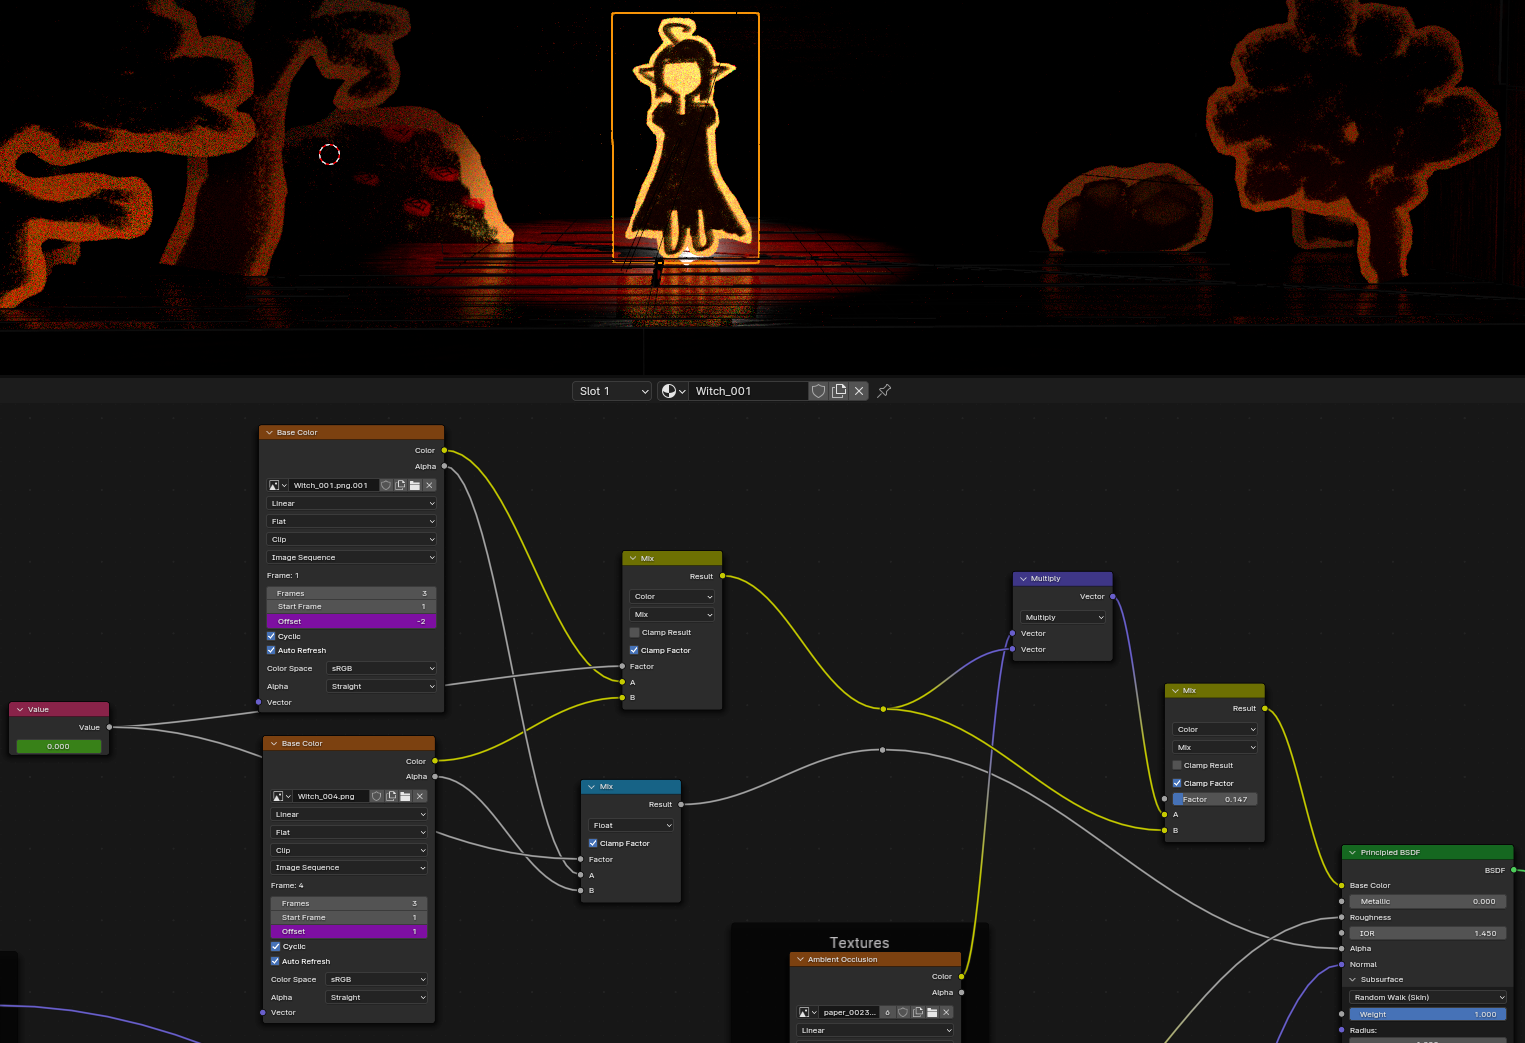
Yuri’s sprites are added using the Images As Planes addon, which comes packaged with Blender. I modified the material to add a small amount of SSS and a subtle normal map, and to create the line boil effect. Each one is simply a quad with an alpha channel mapped to the principled shader’s alpha input (not transmission).
The line boil on the characters is accomplished by rotating through the three different images cyclically. Unfortunately, the way Blender’s image sequence node works makes this a bit harder than it needs to be. Essentially, the image sequence will advance every frame no matter what, there’s no way to control this directly. In our case, we wanted a slower line boil effect, every 10 frames (1/3 of a second at the target 30fps, equivalent to 8 frames if animating at the traditional 24fps). Luckily, this can be achieved with some driver magic using the modulo operator. Put the following expression into the driver for the ‘offset’ field…
-((frame - 1) % 3)+((frame % 30)//10)
The first part of this expression cancels out the automatic frame advancement, the second part then sets it to the frame number that we want, changing every 10 frames instead of every 1. This is used for the diffuse colour, while the AO, roughness, displacement and normal textures all come from a paper material on Poliigon. Honestly, these maps likely made little difference compared to a regular diffuse material.
The Witch actually has an additional stage which blends between her initial sprites, and the tired version that she assumes during the ‘building the machines’ part of the story. This is what the node set up ends up looking like…
Obviously you couldn’t have a ‘line boil’ effect in a mechanical theatre. You totally could in stop motion though. In a sense, our short is CGI pretending to be stop motion pretending to be a mechanical theatre…
The sun-moon gears
One feature I really liked was the geared device which shows the sun and moon above the stage. I actually planned to have lots more geared mechanisms attached to the motion of various elements that would be faintly visible in the background, but there was not time for this in the end. Still, the sun/moon was p strong on its own!
I mostly did not put a lot of effort into texturing this, since it needed to stay dark to avoid distracting from the rest of the scene. The gear train uses a simple dirty metal texture, and the spars holding the sun and moon a dark wood. The sun and moon themselves are given a kind of gold foil texture—the idea was that the person who made the mechanical theatre simply wrapped gold foil around cardboard shapes. The normal map added a lot of visual interest to the reflections of the bright lights at the top of the theatre.
I modelled the moon first, and then when we came to do the later scene where we wanted to imply time is passing, hit on the idea of the sun being on the other end of the arm. This led to a number of problems, since the sun and moon had a nasty habit of clipping through the walls of the theatre. I had to do some finicky animations to avoid visible clipping. However, it was totally worth it.
The gear train is modelled and animated using the Precision Gears addon by Maker Tales. This addon is actually designed for making real gears in a CAD setting, so the shape of the teeth is actually the mathematically correct shape for optimal power transfer. For my purposes though, it also gives you a very convenient way to set up a tree of dependent gears. The backend runs on Geometry Nodes.
With this setup, I could use a driver to connect the first gear in the train to the sun/moon system, allowing the gear train to move realistically as if it is driving the sun and moon. It’s the kind of detail that nobody would be able to tell without watching the film very closely, and this gear train with its giant ring gear is honestly kind of complete nonsense from an engineering standpoint, but I think it adds a lot. I imagine that the creator of the mechanical theatre found some old gears in a rubbish dump and put them into this project.
We had some performance issues with this system. At first I thought it was the geometry nodes, but no, geometry nodes is fast. Instead I think it turned out to be a problem with the gears having ginormous amounts of vertices—great if you’re doing CAD and you need things to be incredibly accurate, not great for animation purposes. Slapping a ‘weld’ modifier on each gear brought the vertex count down to a much more reasonable level.
When animating the gears (and everything else), I made sure to do a lot of overshoot and settle, as if a mechanism is clicking into place. More on that later.
The train
The train is built the same way as the other sprites, but it has emission set on its windows so they glow. It’s bright enough to trigger the bloom effect, which looks very pretty. It also has a small spotlight at the front.
The train exits through a door that swings up at the edge of the stage. I made sure to give it a bit of a bounce when it swings back down. This ended up looking so nice that I had it come back across the stage during the credits.
The curtains
The curtains were actually one of the first things I made. They are of course simulated—Blender has a good cloth sim engine. The question is, how do you actually animate cloth? The answer is with great difficulty that you use a pinning group and shape keys.
The actual cloth model is nothing more than a grid with a subdivision surface. (It’s often a good idea to simulate at a lower resolution and then use subsurf to smooth the result.) I assign the top row of vertices and a couple of vertices in the middle edge to the pin group with max weight, everything else gets weight zero.
A computer cloth sim essentially treats all the edges in a model as springs and all the vertices as weights. If the springs are stretched out, a force will pull the vertices in that direction. A pinning group is a set of vertices that aren’t affected by the sim. So, if you animate the vertices of a pin group, it will stretch out the springs and tug the cloth with it during the simulation.
The cloth is animated in three stages. Firstly, for the ‘open curtain’ stage, starting from before the first frame, we animate the pin group along the upper edge of the curtain into a zigzag shape. This is a standard technique for making a curtain.
This part takes place before the beginning of the actual film. Unfortunately, starting before frame zero caused problems with Blender’s ability to store a point cache between sessions. This meant I’d have to re-simulate the cloth every time I closed and reoopened Blender. This was annoying, but luckily as long as the inputs are the same, the cloth sim is deterministic.
To prevent the two curtains from clipping into each other, I added a cube with collision that would block off each one from the other curtain’s side. These each lived in their own collection so I could toggle them on and off quickly for re-sim. The cloth also collides with the stage.
For the actual animation, there are two stages. We start by moving a small cluster of vertices at the inner edge of the curtain outwards, as if there is a hidden string tugging the curtain open. That looks like this:
In another shape key, we squeeze that zigzag shape at the top of the curtain, and move it over slightly…
We animate the third shape key with a slight delay compared to the second shape key. With the right timing, this creates a convincing impression that the hidden string is pulling the curtain open. (Since the light is very dark, I didn’t add any more visible details, like a curtain rail or string. But more complex cloth sims are definitely possible by extending this method.)
I called these shape keys ‘hang’, ‘draw’ and ‘quarter’.
The grooves in the floor and walls
One simple thing that does a lot to sell this as a physical artefact is all the grooves that have been cut in the floor and walls. Viewed from above, they look like this:
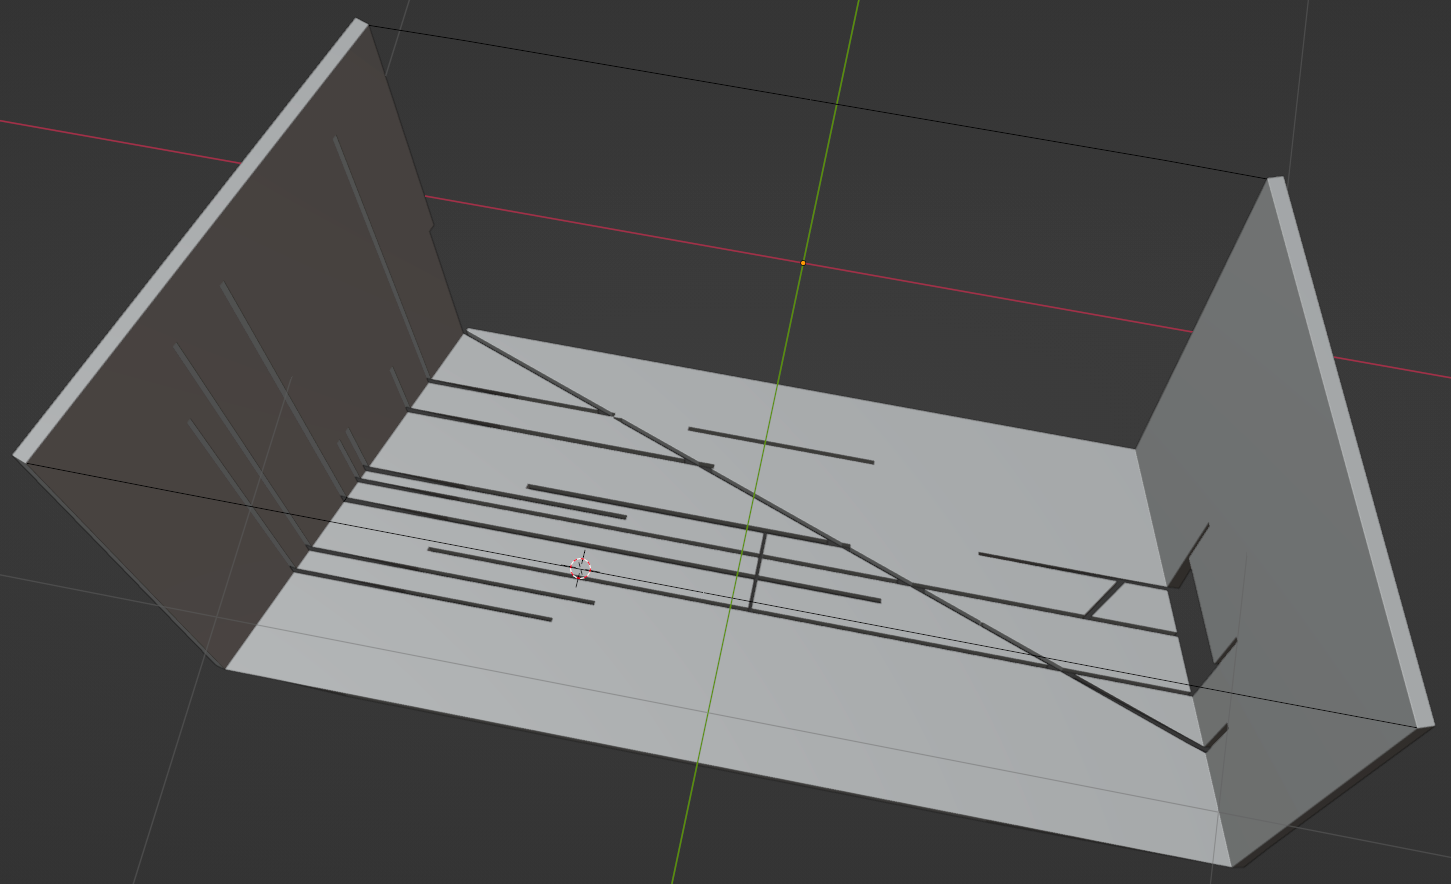
The tricky part about cutting these was keeping the UVs clean. I absolutely could not move vertices, since that would result in UV stretching. Instead, I used the Loop Cut and Knife tools to split edges, creating a bunch of extra topology, then deleted faces wherever wood would need to be removed to accomodate some character or scenery.
Of course, this had to come right at the end, after all the animation had been finalised. I tweaked the animation a bit to make things use the same grooves as much as possible, then got cutting.
I imagine the person who made this mechanical theatre sitting there with a router cutting out lines with a great deal of satisfaction.
The house
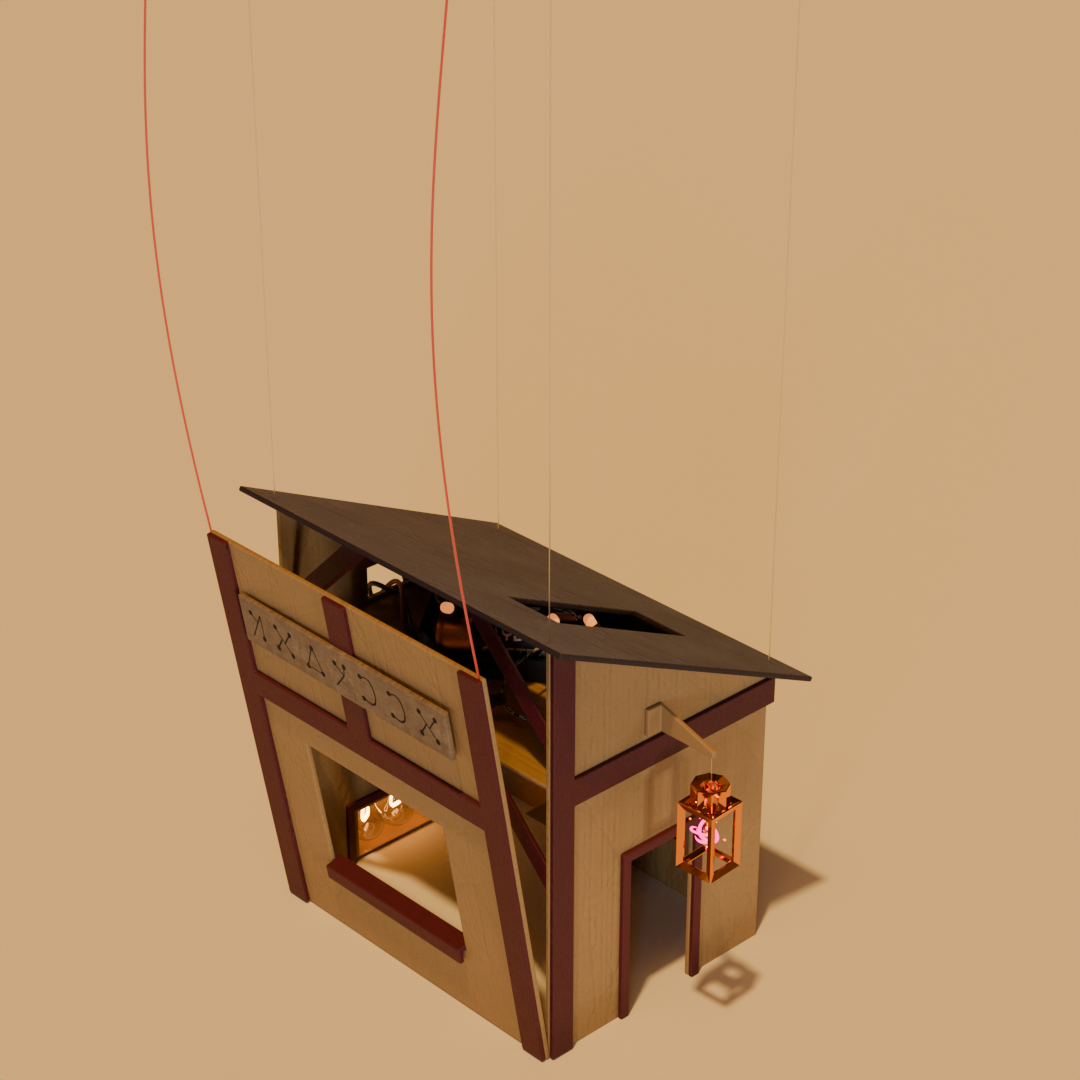
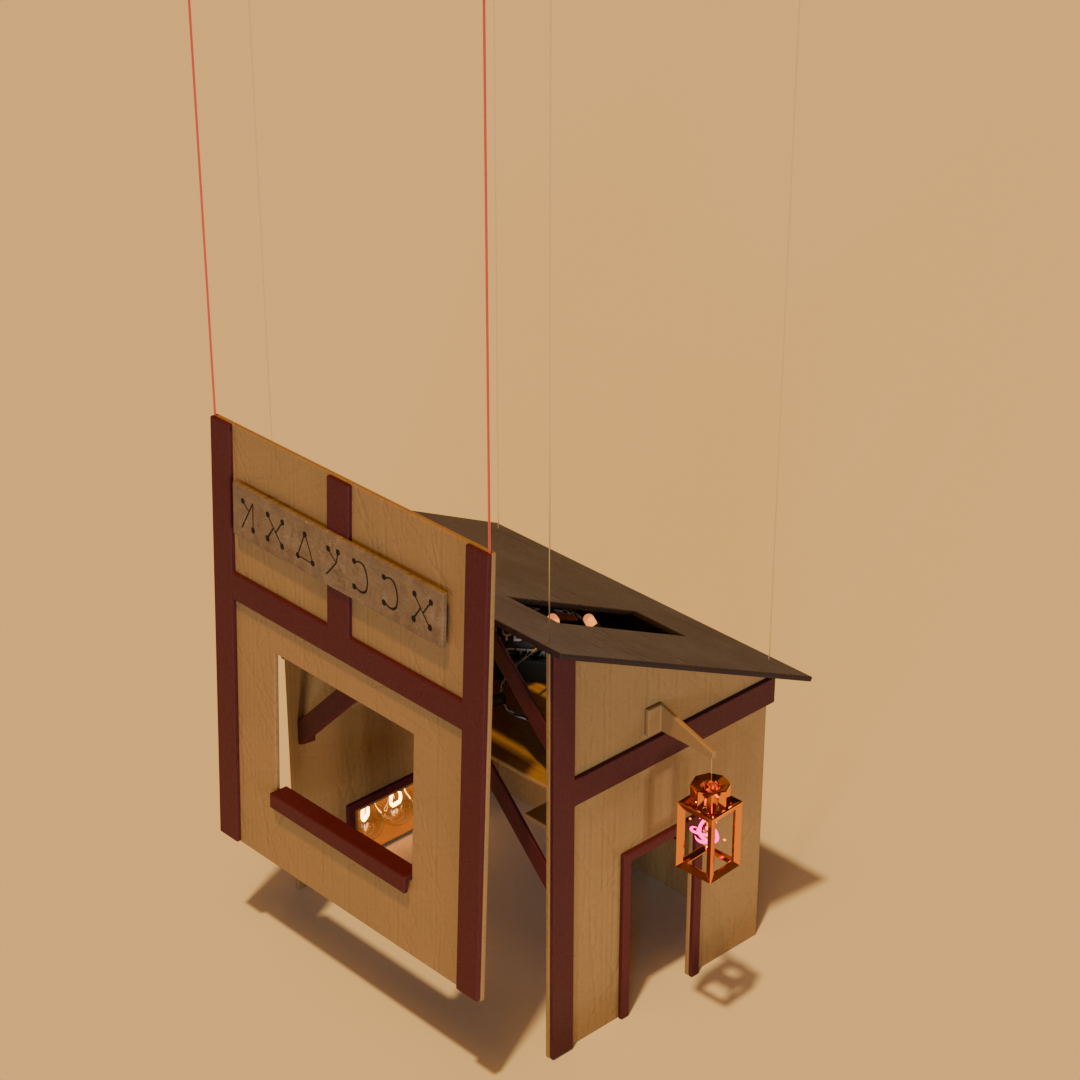
We animated the short pretty much in order, beginning to end. As we reached the part where the Witch goes into seclusion to make her machines, Yuri suggested the house could be made in 3D. This was an exciting challenge for me, and I set about making the house out of virtual cardboard.
Here’s a render of the house out in the open under bright lighting conditions.
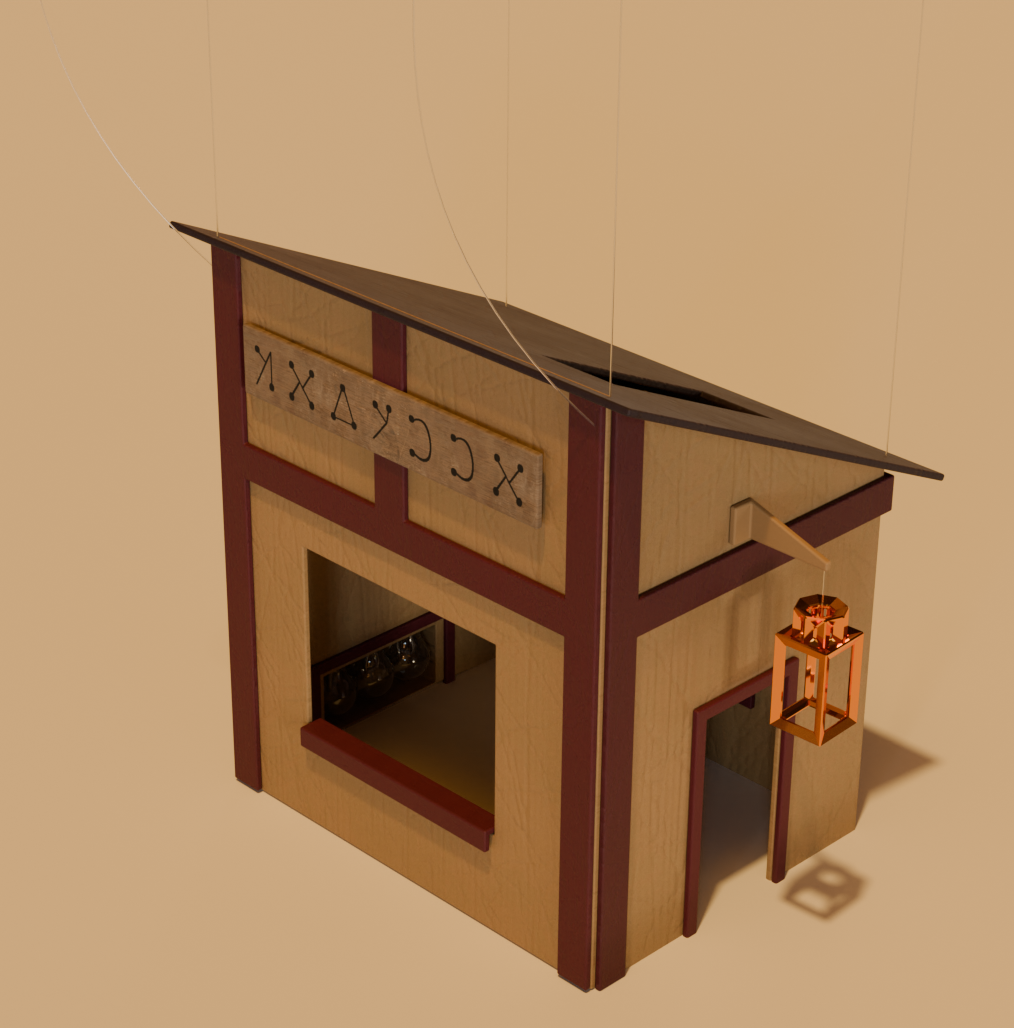
I polymodelled this using, once again, the good old solidify and bevel modifiers to go from flat polygons to solid surfaces. I tried to imagine it being made out of actual cardboard and glue. All the elements have tabs that connect them together—this can be more easily seen from underneath…
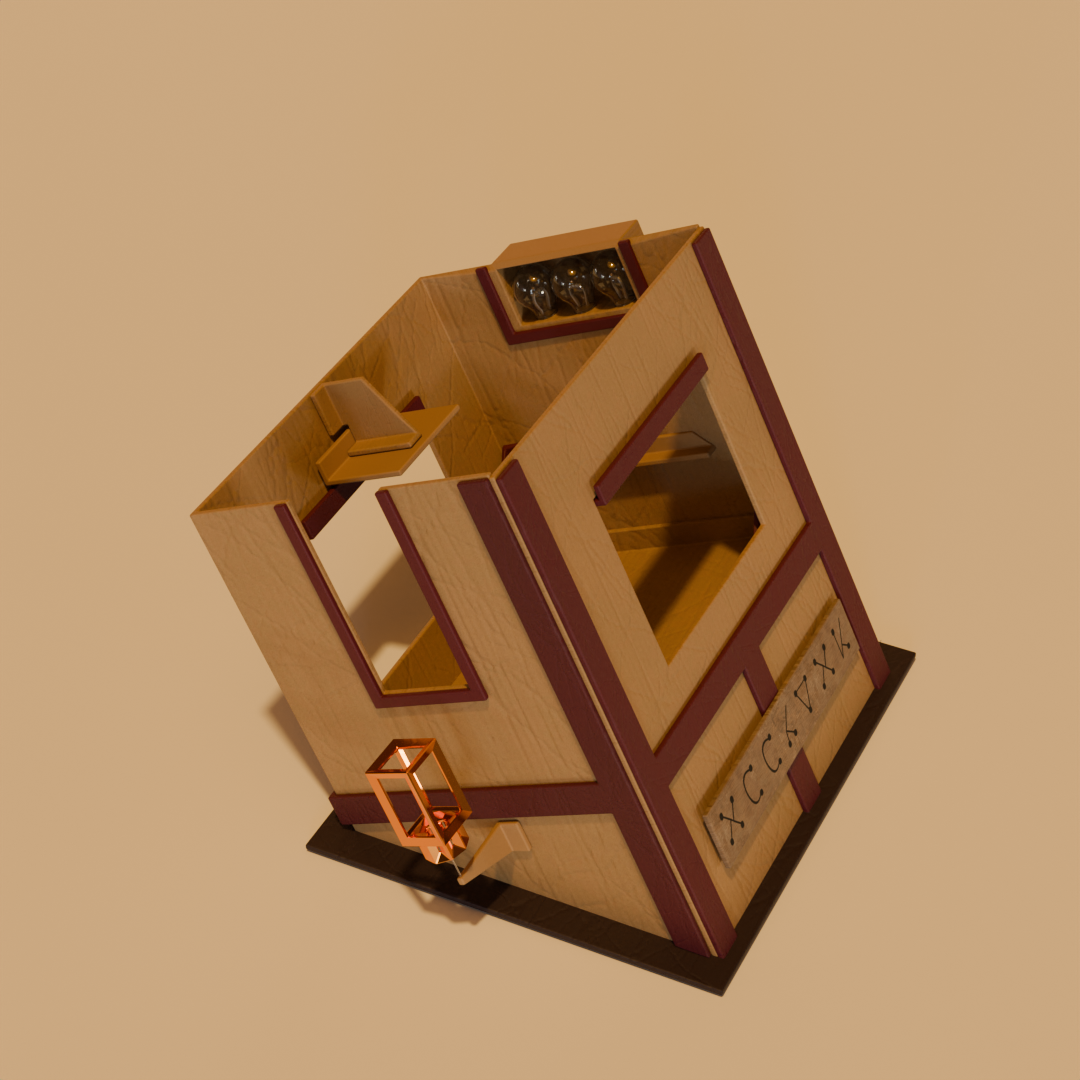
The cardboard actually only uses one material, but I multiply the base colour with a vertex colour, allowing me to colour different parts of the card. In this case, I only went for bare card and purple card. The sign uses a different material, a wood texture from—you guessed it!—poliigon. I put the base colour through a gamma 0.6 function to lighten the wood, and subtracted out the value of the text’s alpha channel.
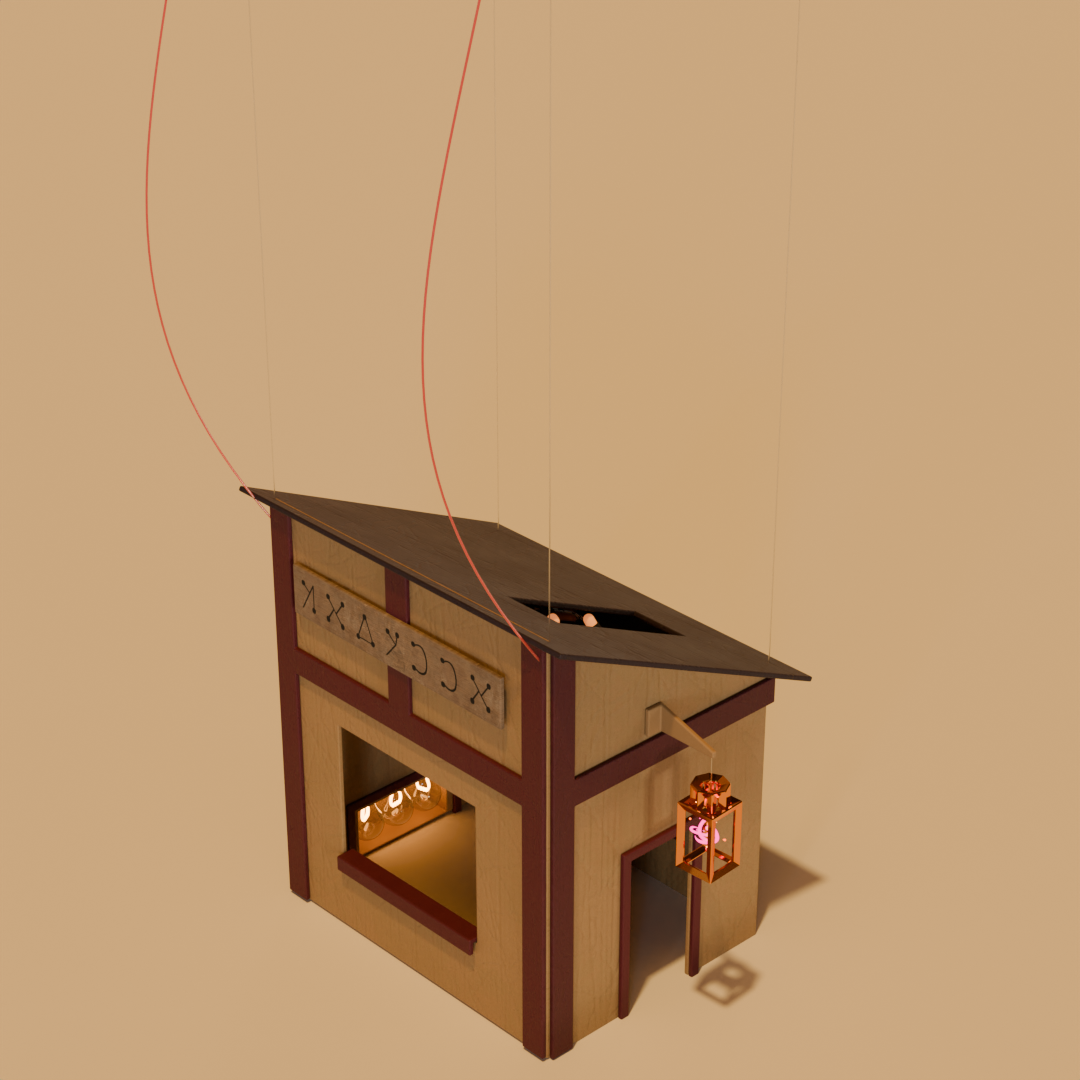
You might notice the faintly visible strings holding the house as it’s lowered onto the stage. I’m really proud of these. The main strings are simple enough, just straight-line curves with a circular profile attaching to four corners of the house, and a nearly-transparent material so all you will see is specular reflections. But the really cool part comes in the two lines which attach to the front panel. Their job is to lift it back off the stage after the house comes down to reveal the interior.
Let me make them a bit more visible, and show you how it works…
At first, the strings are slack. The slack and taut shapes are shape keys on the curve. A driver controls the blending, which is connected to a bone in the control rig.
I animate the front panel tilting forwards, and at the same time, make the strings more taut. The strings are attached to empties using a ‘copy location’ constraint. The empties are parented to points on the front panel. Using this method, the strings will always attach to the right spots, and point straight up.
As the string becomes taut, I animate the front panel lifting up. I make it swing back and forth a bit to give it a sense of weight.
The result ended up feeling very natural, without the strings being distracting.
The light bulbs
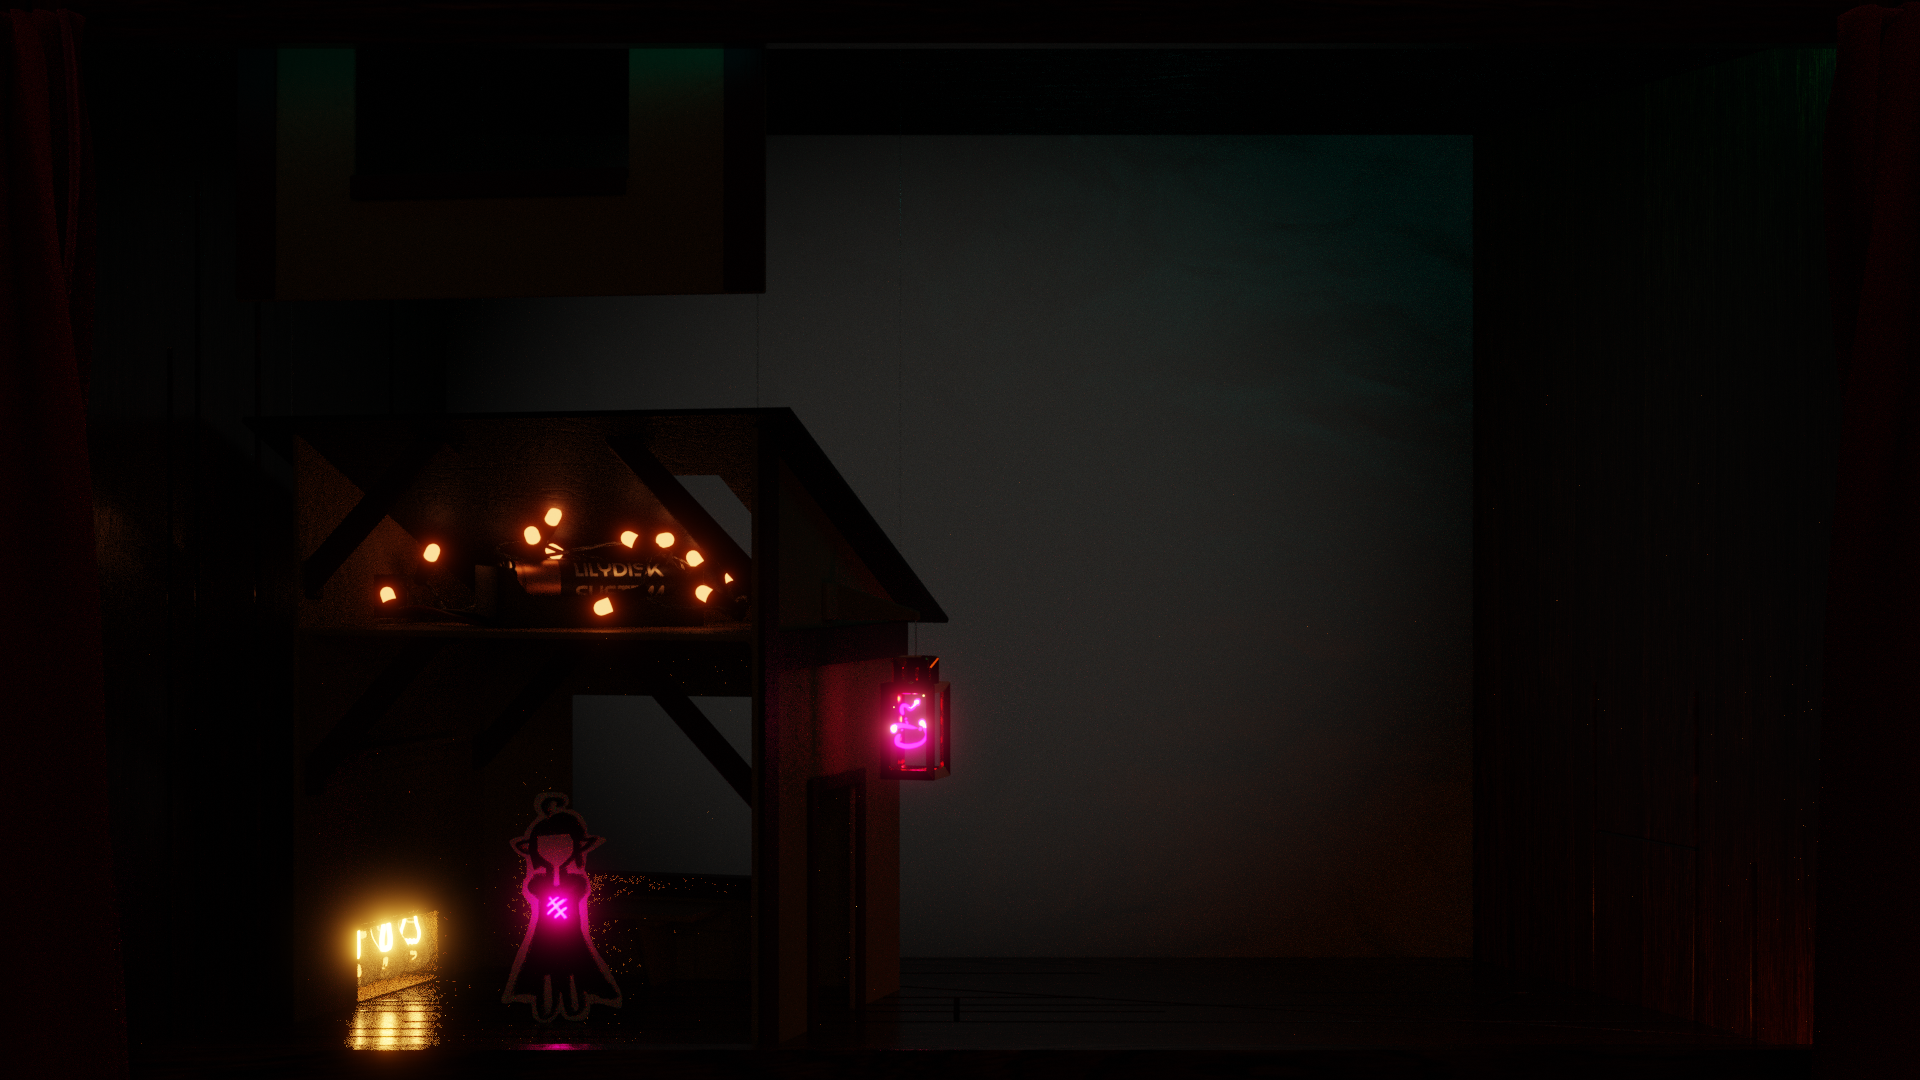
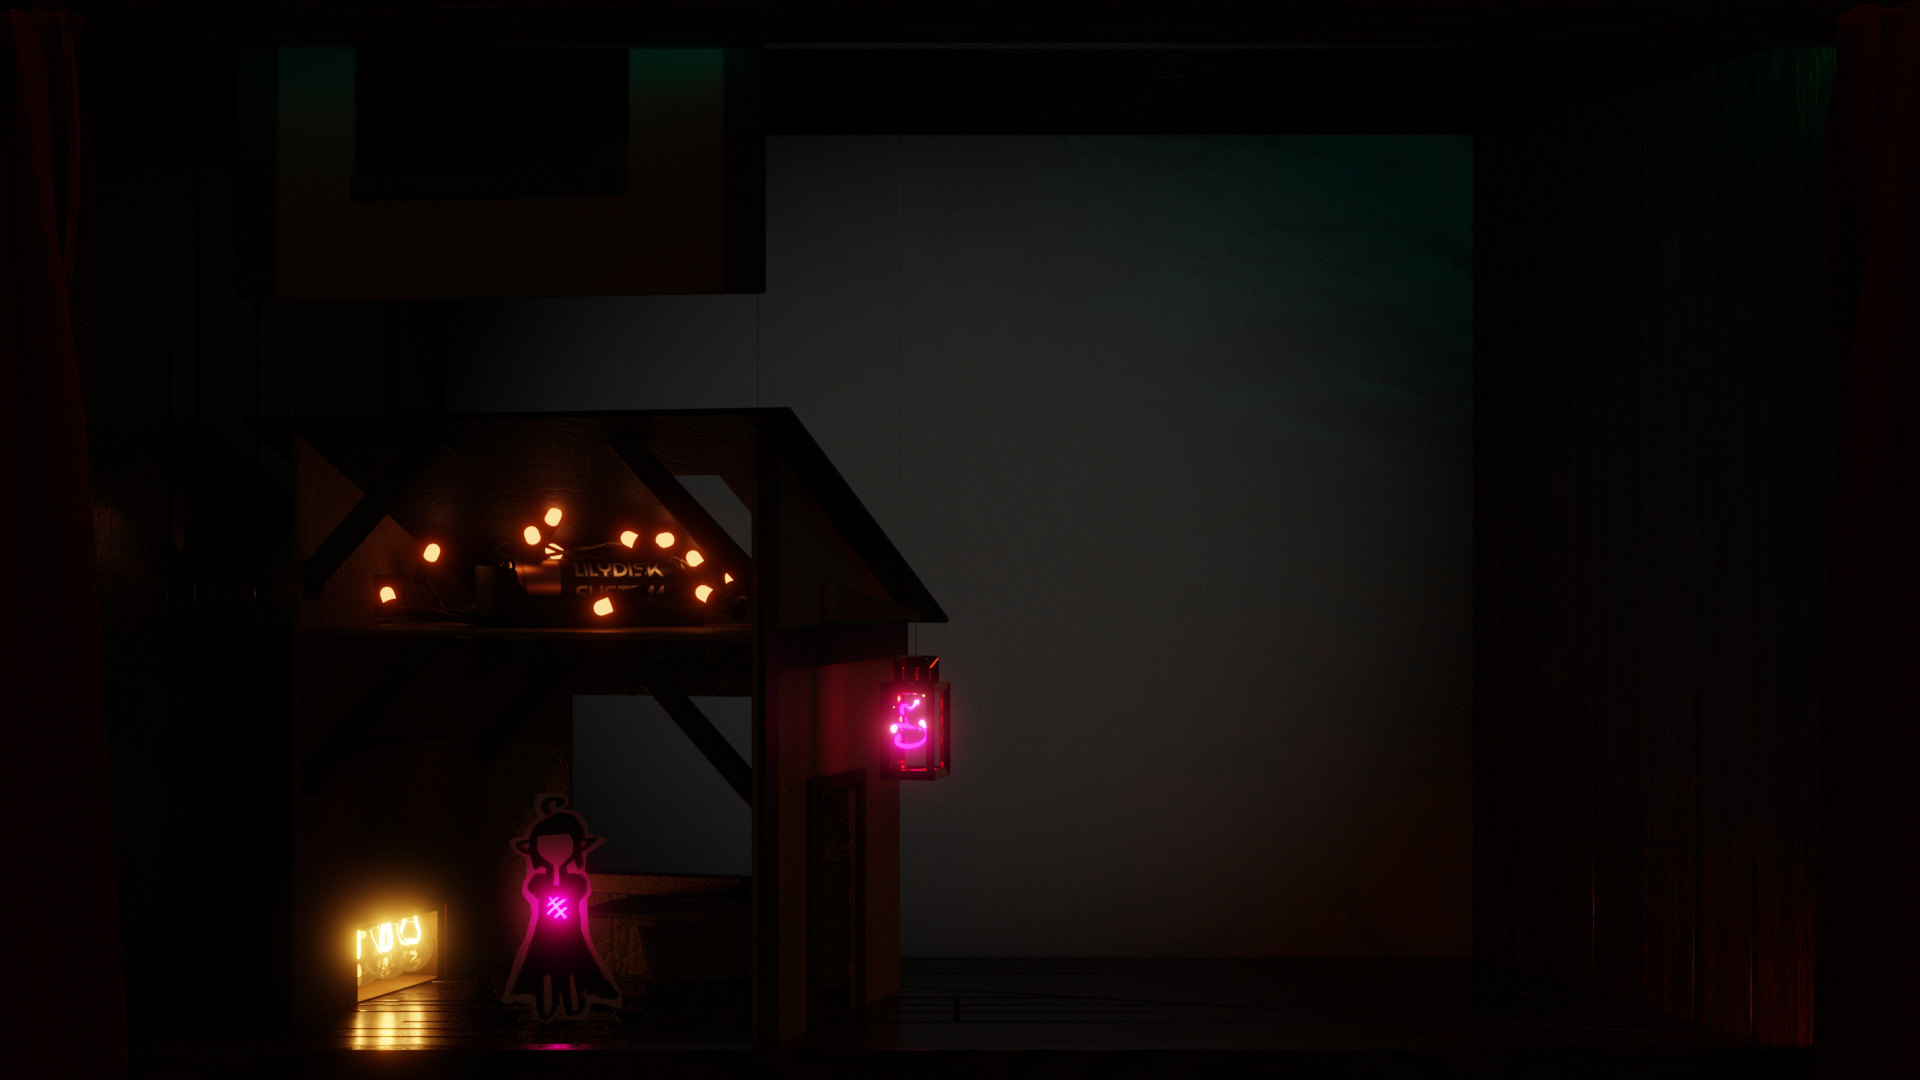
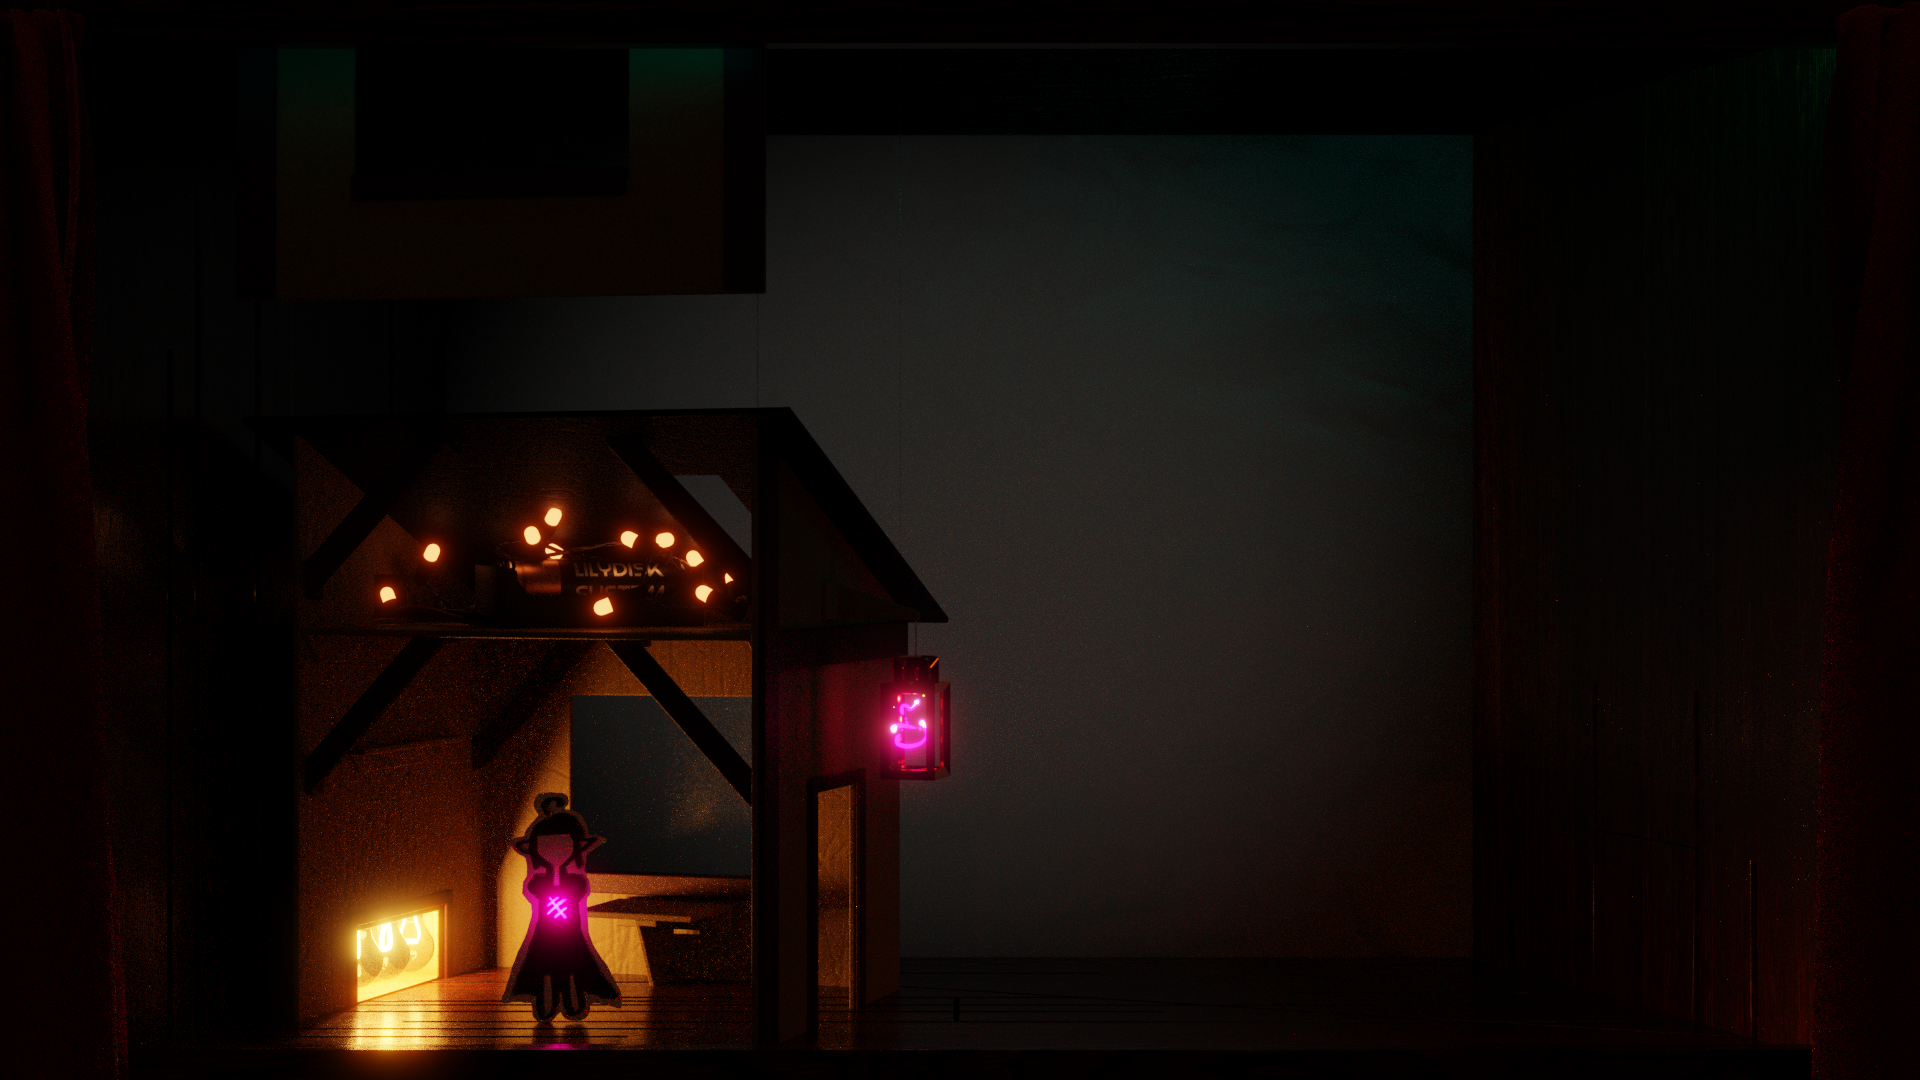
The house has several lights attached to it. The main one is the three lightbulbs in the fireplace. There is also a magic lantern on the outside of the house, and the fairy lights in the attic.
The light bulbs caused no end of trouble. I wanted to model real light bulbs with filaments. However, when I did this, the render would become incredibly noisy and take much much longer. Even with the AI denoiser (discussed later), we were getting nowhere near acceptable results.
Eventually, I found the solution was to make the bulbs invisible to shadow rays. It turns out that somehow, when a ray passed through a layer of glass, it would mess with the light transport algorithms in Cycles and, when the light bulbs were the main light source in the scene, the render would take much longer to converge. This is because every light ray had to go [emissive filament] -normal ray-> [into glass] -transmission ray-> [out of glass] -normal ray-> hit something -> camera. Those extra steps at the beginning threw a huge spanner in things.
But, by preventing the light bulbs from casting shadows, light rays could pass straight through them as if the glass isn’t there to cast light on the scene. In this case, the render would converge much, much faster than the refracted rays, and the loss in realism at the bulbs is pretty minimal—you only notice it if you’re looking for it.
Here are some comparison renders:
A render with the same 1024 samples and higher noise threshold as we used in the final film, but no AI denoising, and glass shadows enabled. The light has barely even begun to scatter through the scene at this point.
A comparison render with 65536 max samples per pixel, and a much lower noise threshold. This is close to a ‘ground truth’ accurate render with the light passing through the glass before it gets further into the scene.
With shadows disabled on the glass, the scene is generally brighter, and it converges much much faster, giving a usable render even at 1024 samples. However, we’ve lost the complex refractions in the light bulbs.
If I’d been very clever, I could have combined a render of just the light bulbs and full refractions over the last of those renders to get a kind of ‘best of both worlds’ approach. But that would be too much work.
You might notice the last image is still pretty noisy! More on denoising in the rendering section.
The fairy lights
We talked about possible things to go in the attic, and eventually settled on the idea of having fairy lights, plus the battery that’s powering the whole house. A string of LEDs on a wire smells just like ‘instancing objects along a curve’ to me.
Back in the old days of Blender, you could instance an object along a curve by animating it to follow the curve, then using the ‘dupliframes’ button. That’s not a thing in modern Blender—nowadays we have a much more flexible and powerful system called Geometry Nodes.
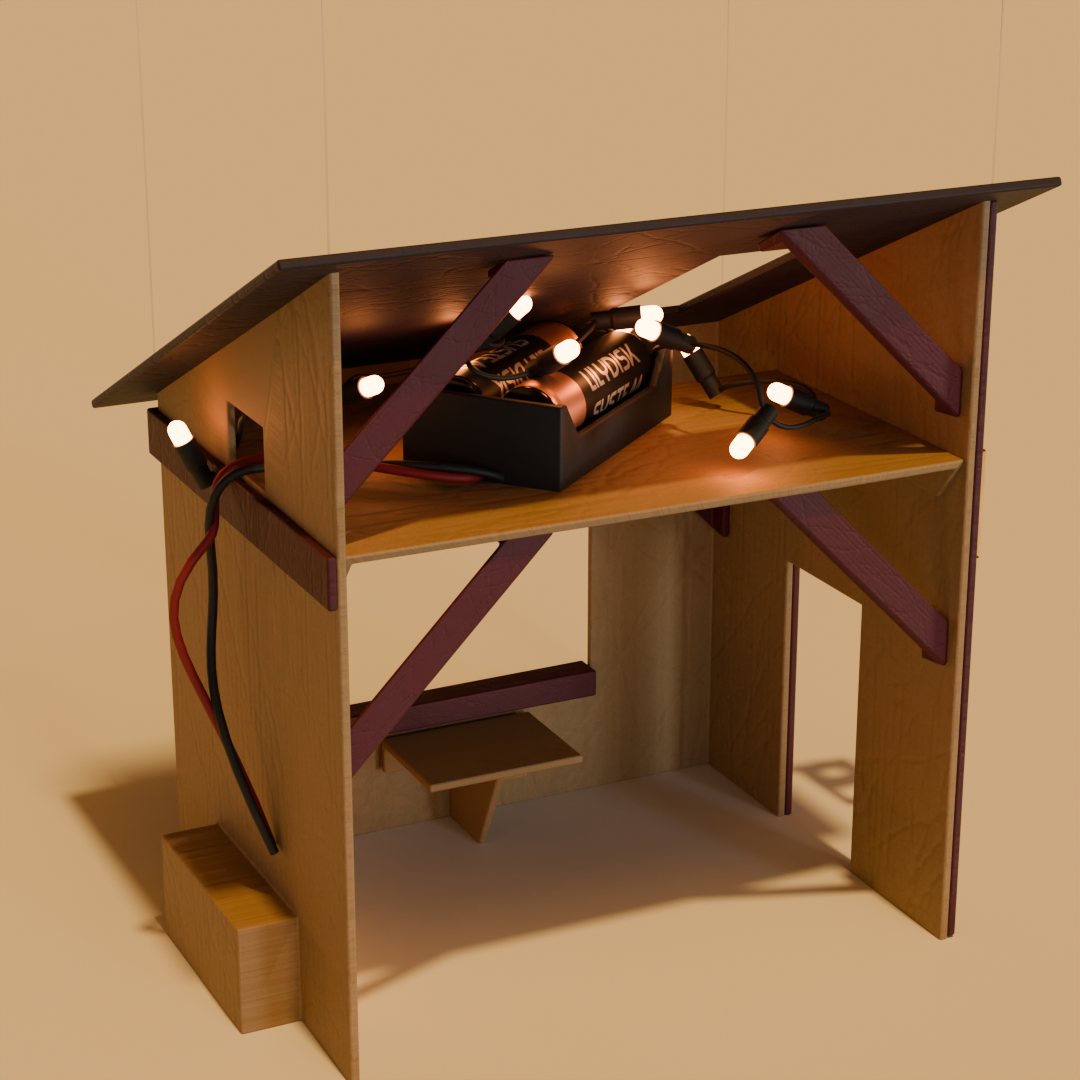
Here, I’ve turned up the brightness of the fairy lights so you can see into the attic.
Geometry Nodes is essentially a graphical system for functional programming. We start with a curve object, convert it to a series of points along the curve, and then instance the LED model at each point, rotated to follow the curve.

I could rotate individual fairy lights by selecting points along the curve and then hitting Ctrl-T to tilt them, i.e. rotate around the direction of the curve. Creating an aesthetic arrangement of fairy lights took quite a bit of fine-tuning. What made it fiddly is that I was rotating control points, not individual instances, and these didn’t necessary match up 1:1. If I were to make this effect again, I might try to come up with a method that gives me better control on a per-fairy-light level.
The lantern over the door
The lantern was simply modelled using a mesh with the ‘wireframe’ modifier to create a triangular-profile frame. It doesn’t look pretty up close, but it’s small and in the dark, and that hides a lot!
The little magic sparkle in the lantern is a looping animation drawn by Yuri. I animated it using the same method as the line boil effect, and set it to be emissive. The size of the spark can be animated using the control rig, so we could make it light up when the Witch enters her house, and extinguish when she leaves.
Next time
So with a set in hand, how do we go about animating it and making it into a video? That’s the subject of the next article…
Comments