originally posted at https://canmom.tumblr.com/post/712492...
This is the second part in a series of how my friend Yuri Heart and I made a film in a week! Here’s the film again!
Last time, I talked about how we built the mechanical theatre for our film to take place in. Set, lights, backdrop, and characters to inhabit them. Now we gotta bring them to life.
Contents
Contents
The big rig
Initially, I planned to simply animate each element individually on the timeline. However, an issue soon emerged: Blender assigns each object its own animation data in something called an ‘action’. It would be fiddly to have to keep jumping between actions in order to synchronise effects, and even more problematic if I wanted to move a whole group of animations at once. As it turned out there was really only one point where I had to move a whole group of animations later.
The solution I came up with was to control the entire scene from a single armature. This armature would have bones for every scene element, it would have bones to turn the lights up and down, it would have bones to move the spotlight. Nearly everything would have a bone. This is a very normal thing to say if you’re a 3D artist and sounds absolutely deranged if you’re not.
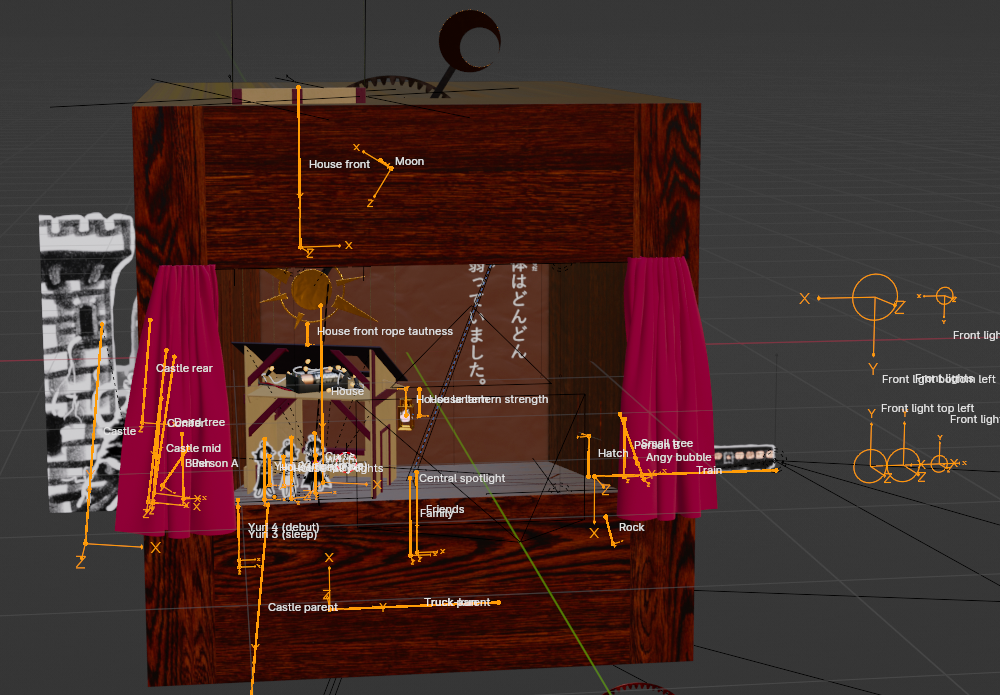
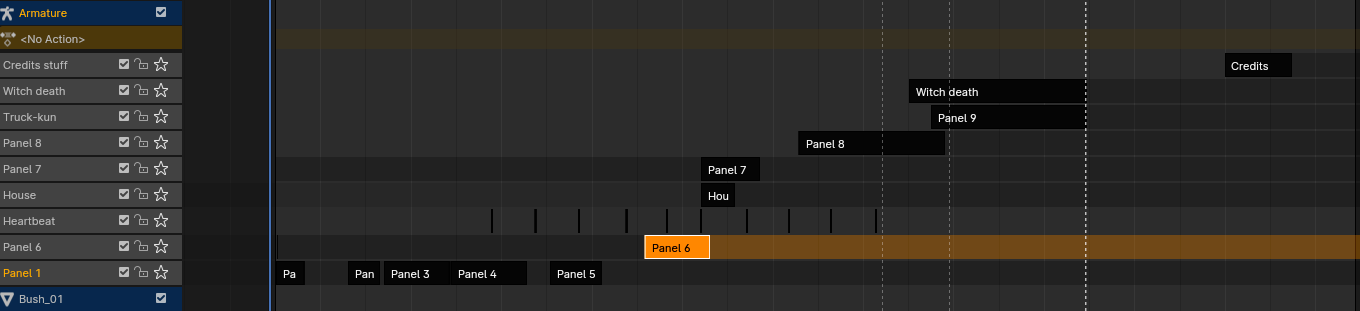
With this approach, I could split everything up into strips on the Non Linear Animation editor, and move them around as I pleased. The NLA editor is something like a nonlinear video editor, but instead of video clips on your timeline, you have animations. Ours looked like this…
This was probably the biggest mistake I made in the whole project!
The reason is that nonlinear animation strips interact in unexpected ways forwards and backwards in the timeline. If a channel is keyed in a given NLA strip, so for example if there is animation data for a particular bone, it will by default carry on in that state until it is overriden by a later strip, or overriden by a strip higher on the stack. It can also do this backwards if it is in ‘hold’ mode rather than ‘hold forward’, and I did not realise at first that I had strips in ‘hold’ mode.
Cue all sorts of headaches where I’d add a bone and start animating it later in the timeline only to find that it had screwed up my animation earlier on, or that I’d need to go back and add keyframes in every earlier strip.
And that’s not to mention the difficulties of having two different animations split between two overlapping strips. You gotta remember which channel lives in which strip. Switch if necessary. Oh, remember, when you’re editing a strip it overrides everything else, so…
Suffice to say that Yuri became very used to the phrase ‘nonlinear animation bullshit’ by the end of the project.
Now I understand how it works, I don’t hate the NLA editor, but for my use case, it probably would have been wiser to have skipped the big scene control rig and just animated everything directly on the same timeline.
Nevertheless, having chosen this path, I set about animating…

This is what I was looking at for most of the project.
It’s time for… animation!
Cutout animation in this style is very limited. You can only move the sprites around. A lot of stuff like squash and stretch and secondary motion and solid drawing and all that jazz is just not relevant. But. Some of it really is. Even more so in fact, because it has to carry the whole animation.
Just about everything that moves in this animation has a bit of overshoot and settle, usually a few rounds of it. The idea is that it should feel like a mechanism clicking into place. This does a lot to add life to the paper cutout animation. It’s also very easy to do. You move and/or rotate it past the target point and keyframe it. Then you move or rotate it back slightly a few frames later and keyframe it again. If it goes too far, tweak the keyframes.
Although that was often enough, sometimes it wasn’t and you had to get into the IPO curves. IPO is short for ‘interpolation’, and it defines how objects move in between keyframes. You can choose from a variety of easing functions or create your own curve with Bézier handles. For bigger motions, it can be essential to adjust the IPO curves to get good arcs and spacing.
The ‘motion paths’ tool can be enabled inside an armature to get a kind of onion-skin like effect for bones. This is very useful as a way to preview your animation curves and check spacing without having to play back the whole animation. You could also consider the mesh onion skins addon. I didn’t use it in this project, but it’s been useful in others!
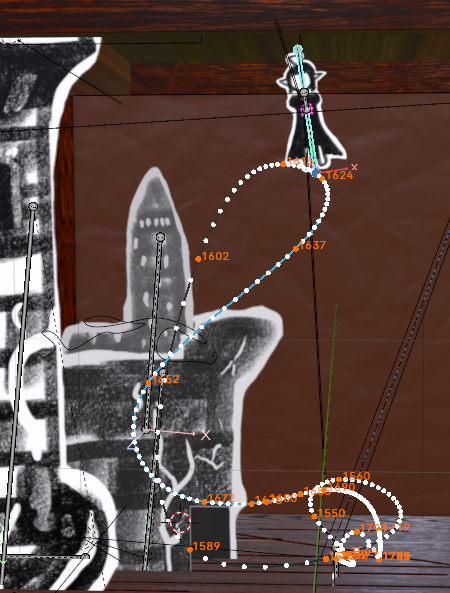
It was often better to use automatic easing with few keyframes than to try to set the handles myself. It’s fast, and also often led to more natural result. However, if you take this approach, it’s very important to know when to use ‘automatic’ and when to use ‘automatic clamped’—one option can overshoot in certain ways, one won’t. For example, in the bit where the witch flies up and around, because she makes some abrupt turns and I needed to make sure she wouldn’t disappear behind the scenery, I mostly used ‘automatic clamped’ to keep her in the right zone.
In general, making the picture-book elements feel good depended on moving to hit the strong beats of the song, and overlapping multiple motions in a ripple-like effect.
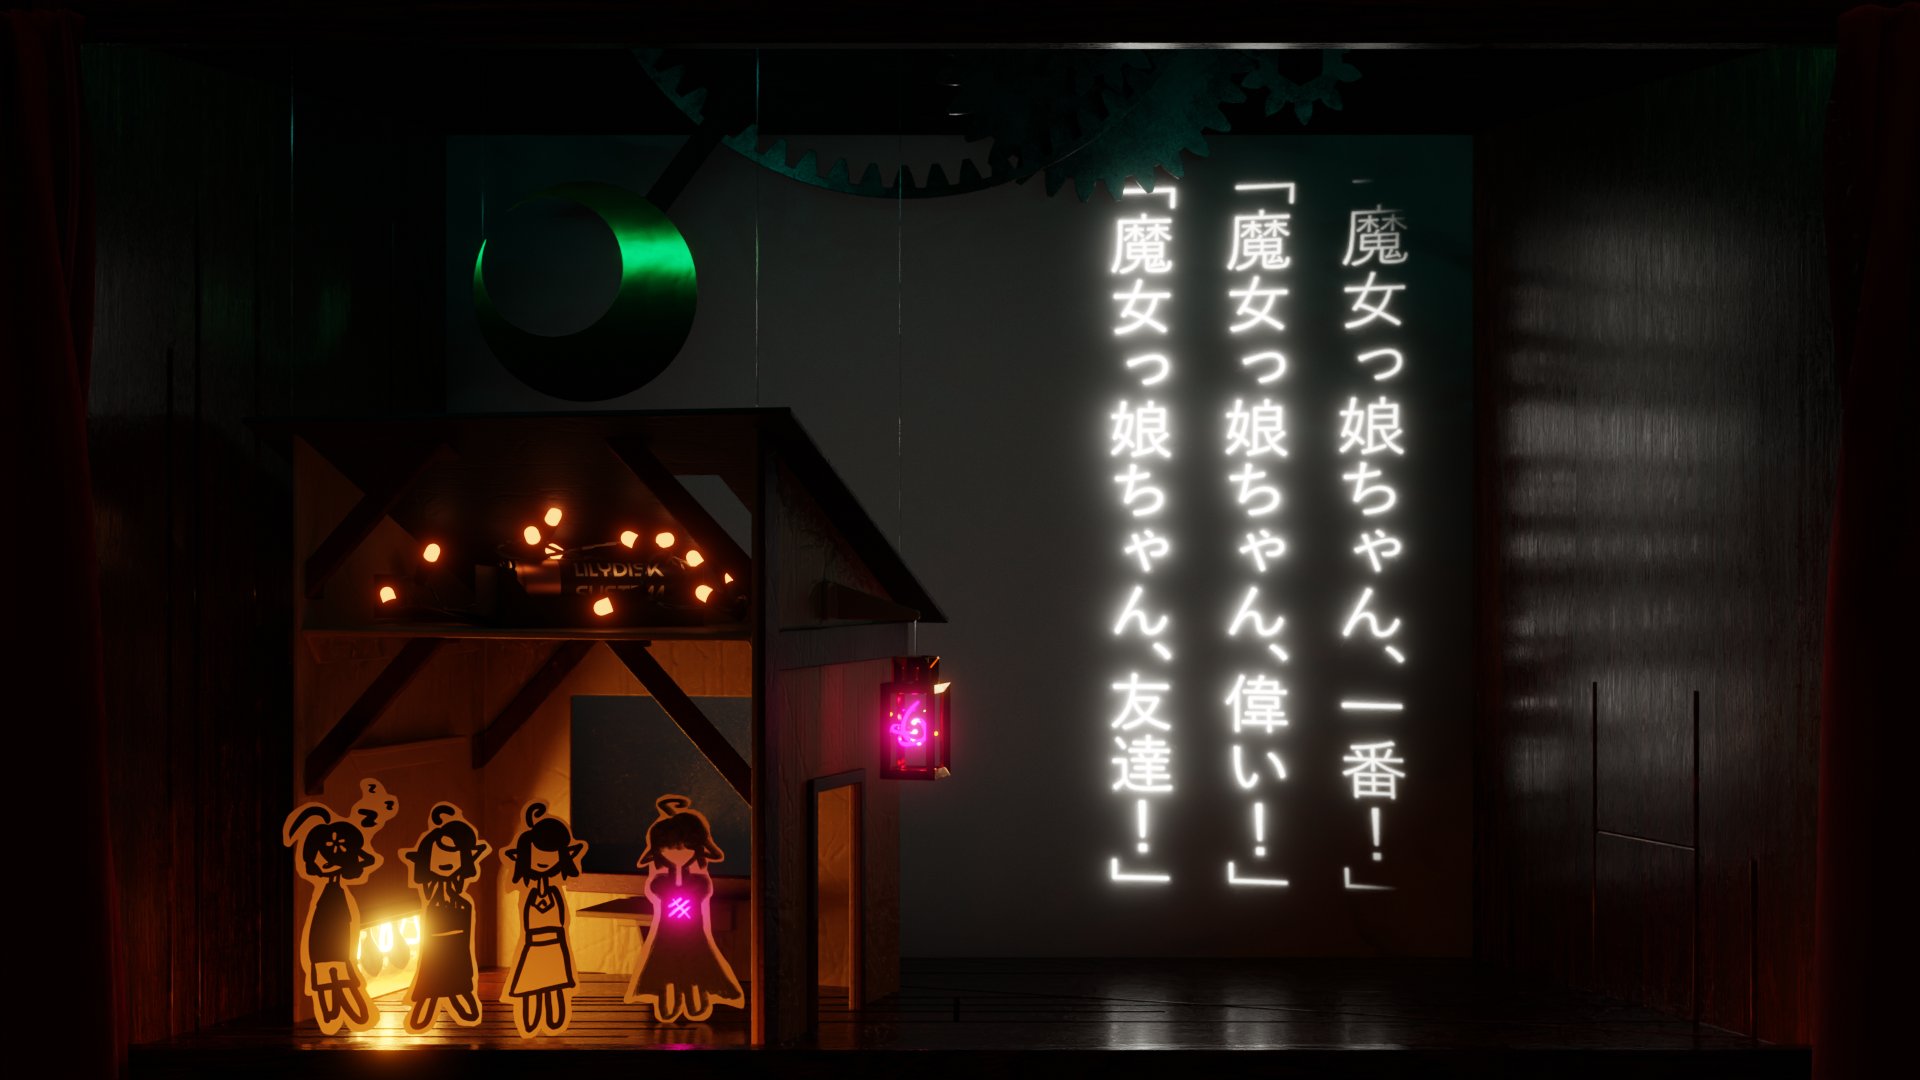
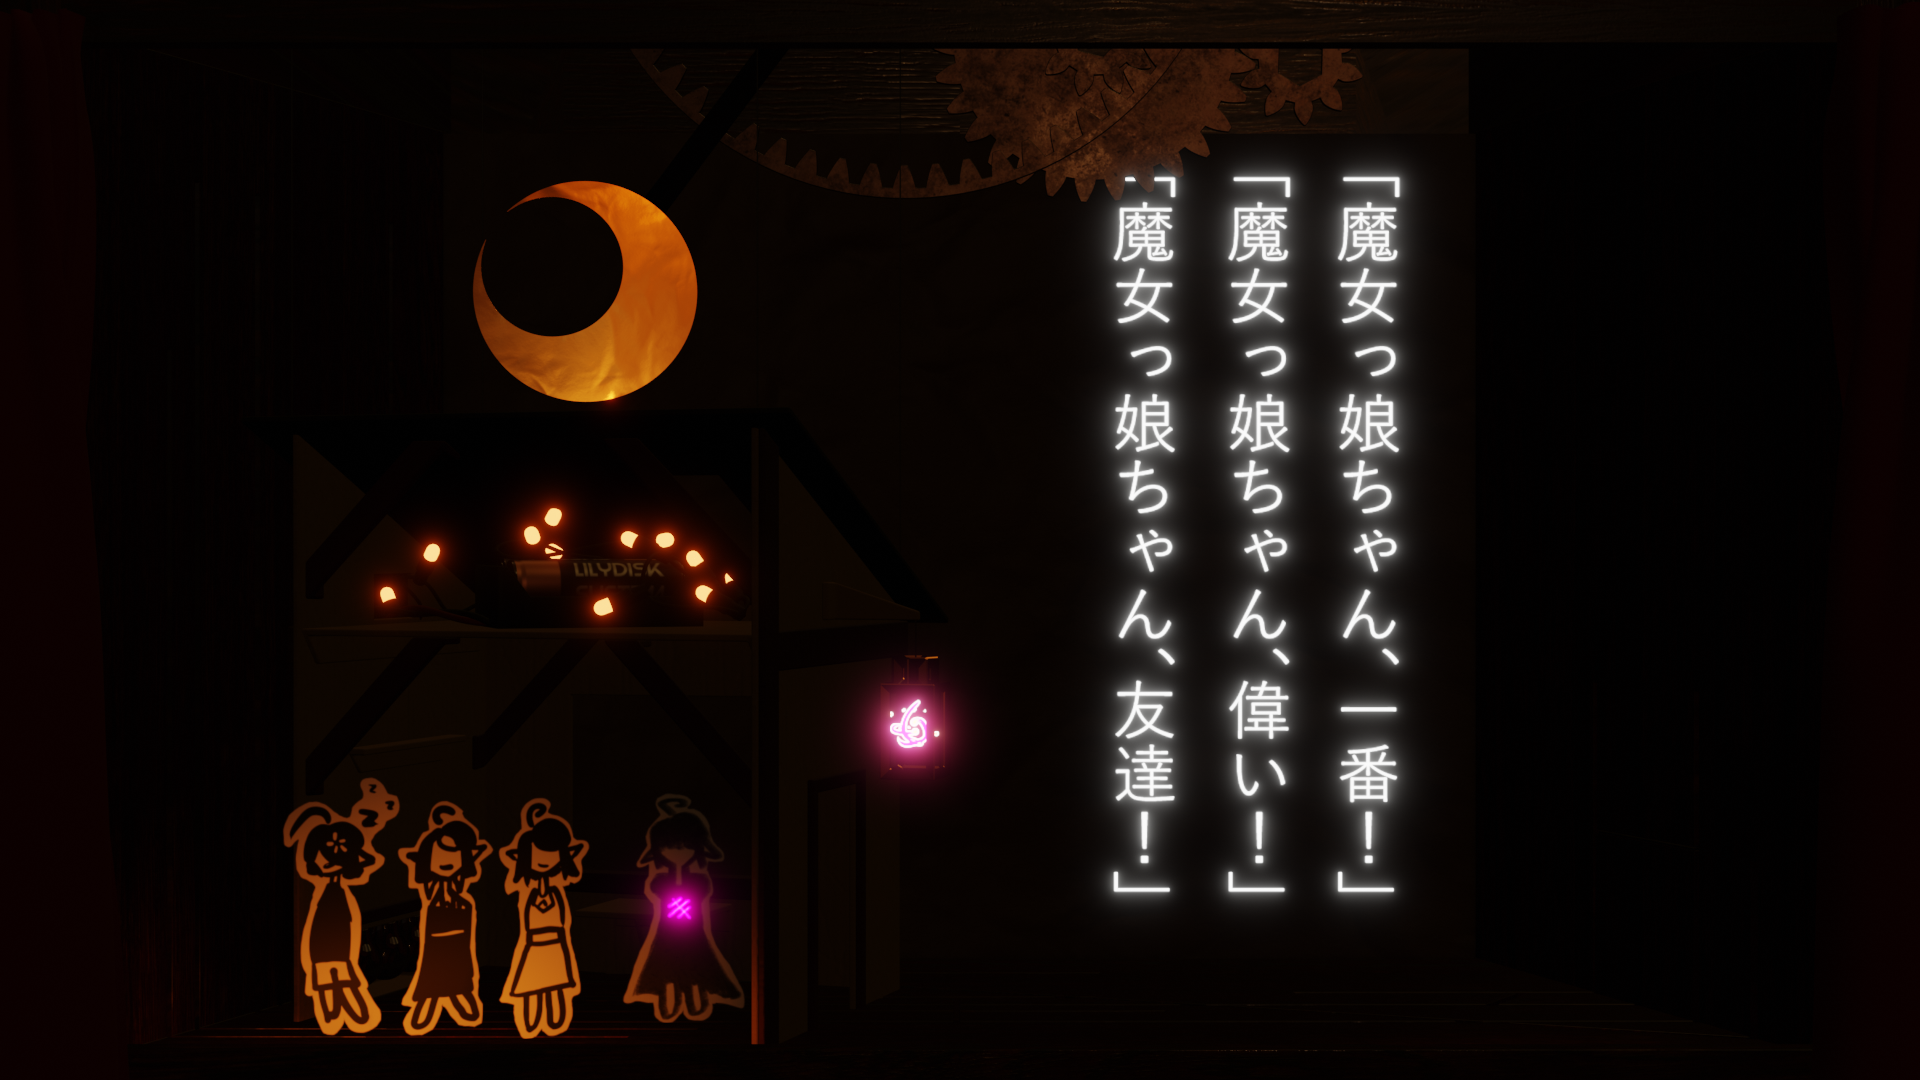
One of the most interesting moments from an animation perspective is the point where the Witch constructs her four friends. While everything else in the animation was supposed to feel a little organic, this part needed to be very mechanical. The machines had to rise up in sync to the same beat, and they would rock back and forth in sync as well, feeling like a conveyor belt. There is very little easing in this part. This was Yuri’s idea, and it worked great.
(do you recognise these friends? if not, why not go and watch a few of Yuri’s VODs~ ;P )
Eevee
Blender has two render engines, Cycles and Eevee. Eevee is a real-time rasterisation-based engine with a similar PBR model to Cycles, so while it doesn’t support certain features like subsurface scattering, it can be pretty good for getting a preview of how things look in near-real time, without waiting for a Cycles render.
However, without SSS, there’s no projector shining through the back. The solution I came up with was a textured plane… but we wouldn’t want that to get in the way in Cycles. How to solve this? You can disable all its ray visibility settings. These settings are ignored by Eevee, so we had an object that only Eevee could see, not Cycles.
Here’s a shot in Cycles.
Here’s the same shot in Eevee. Doesn’t look as good somehow, does it? But it rendered near instantly.
The curse
The curse symbol that appears over the Witch’s heart beats in time with the music. Actually lining this up was a bit fiddly because the music does some pretty creative things with tempo and my musical knowledge is pretty limited. I calculated roughly the right places to put each heartbeat, and then moved them around a bit to line up with noticeable musical ideas.
Every time the heart beats it shrinks down for one frame of anticipation before popping big and settling back.
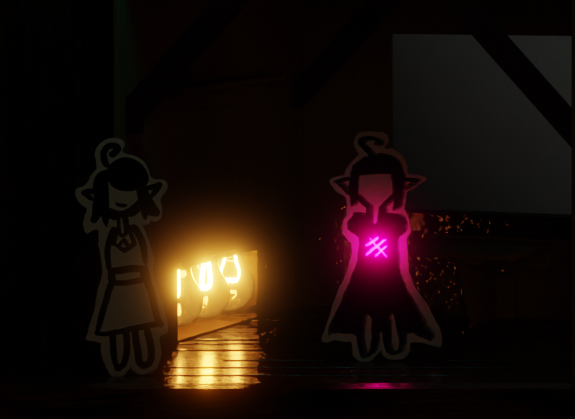
The first heartbeat is special, because that’s the one with the particle effect. It comes in on a very impactful beat of the music, and the particles bounce around all over the stage and change colour.
Setting up the sim was pretty easy—they’re all sprayed out from an icosphere on the same frame. The tricky part was getting the elongated spark look. This could have been done with motion blur, which would be the most accurate way to do it, but I didn’t want to use motion blur elsewhere in the animation.
Instead, each particle instances a tiny little needle-shaped object that is aligned to the direction of motion. We simulate rotation, so these particles roughly aline to the direction of motion. With so many particles flying around, it works reasonably well.
The particle shader is very simple. It just takes the particle’s age divided by its lifetime and uses this to interpolate from the bright magenta colour of magic down to a cyan colour. The emission strength is animated in the same way. The stage is set to act as a collider so it will bounce around for a bit.
It’s not a super complicated particle effect, much more advanced stuff is possible, but still plenty effective in combination with the reflections from the stage.
The truck
So at the end of the animation, the witch is run down by a truck.
The truck zips across the screen very quickly without any easing at all. For just one frame prior to the impact we dim all the lights to near zero, creating an impact frame; then we turn them all on to maximum brightness, and gradually dim it. The curse, which represents the witch’s life, gradually shrinks away. There’s another brief flash at the very end as the witch is consumed by the curse.
In terms of effort to animation time, this part of the animation was by far the most favourable ratio—and I can’t deny, we were running very low on time when we got to that part. But I like the result. The stillness provides contrast to the very busy animations earlier, and gives the music and narration space to breathe.
Credits
After that, we roll credits on the projector! Yuri drew some great character sketches of me and Roub. For the final version of the animation, I added a couple of extra animations to the credits to give it life—Yuri steps in and takes a bow, and the train comes back in.
Compositing
The compositing effects were pretty minimal in this case. I used a Glare node set to ‘Fog Glow’ to apply a bloom effect. I adjusted the threshold and size until it looked good (which for me was 0.2 threshold, size 8, high). This helped the various bright lights and magic effects in our scene pop.
For tonemapping, I used the Filmic view transform. Blender has now moved away from Filmic to something a bit closer to ACES, where bright saturated colours move towards white instead of staying super saturated, closer to how real cameras and eyes work. However, Filmic was actually exactly what we wanted, since we wanted the magic effects to be very bright and saturated.
One thing that really threw a wrench in things was that I was using a wide gamut monitor which I had not calibrated (cue screams from anyone who knows what that means). Luckily I caught this mistake and calibrated my monitor before the final release—see canmom’s notes on fixing the colours for the ins and outs of that saga. The main consequence was that, because the gamma on my monitor was too bright, I had effectively made the film too dark. It also turned out that rec.709 would give a warmer shade of red on the curtains than I’d originally thought, but I can live with that.
Rendering
On my computer—which is a pretty beastly one, with a 4070Ti—GPU compute renders with CUDA took generally in the realm of 25-50 seconds, depending on which part of the animation.
To get it down this low and have a usable render, we needed to use OpenImageDenoise. The reason is that a path-tracing renderer like Cycles converges only gradually on the final ‘correct’ image by shooting out light rays at random from the camera and following them backwards until they reach a light source. Although there are many techniques to speed this up, it still means that two adjacent pixels might end up looking quite different after the first few rays, depending on whether those rays happen to go one way or another. Over time, the renderer shoots out more and more rays and explores more of the scene, and the average of all those rays gradually gets closer and closer to the true average you’d get with real light. But, unless you’re prepared to wait forever for that asymptotic convergence, you will probably still have some noise in your render.
Blender’s got built into it a tool called OpenImageDenoise, which removes noise from the render using a neural network trained on noisy and clean renders. OpenImageDenoise is a smart denoiser which takes the scene’s albedo and normals into account, to try to preserve these high frequency details. However, it’s not perfect. A render that’s too noisy will come out weirdly blotchy and generally pretty ugly. For example…
With glass casting shadows, the noisy image generated by even 1024 samples results in a splotchy image as the denoiser tries to make sense of a useless input.
So, when I was tuning the render samples, I needed to give enough time to the actual rendering give OpenImageDenoise something to work with. Luckily, once I’d figured out the glass thing, everything was looking decent enough.
Even at 30 seconds per render, rendering all 5970 frames in the animation was not a small task. Assuming 30 seconds per frame, rendering the full animation would have taken two full days on my computer, during which time the GPU would be running flat-out and I would not be able to use the computer for much else. As time ticked closer and closer to the debut, we realised we wouldn’t have time to do it that way, especially if we caught any mistakes that would require retakes after rendering.
Luckily there was another option: a render farm!
Using a render farm
I have never used a render farm before, so it was very exciting. After searching about a bit, I settled on GarageFarm. I contacted them to check whether the various drivers in my project would be able to run on the render farm computers and they got back to me incredibly quickly. So kudos to those guys.
A render farm is basically a company with a lot of powerful computers who sell time on those computers. The work of rendering the animation is split up into parallel jobs which are distributed in parallel. Rendering a movie is what they call an ‘embarassingly parallel’ task, which means there are no bottlenecks, it just straight up gets faster the more computers you throw at it. In the end, I’m pretty sure it took less than two hours for us to get the whole render done, even on the lowest priority tier.
GarageFarm gives you a certain number of free credits when you sign up, and after that you pay for it. They do their best to estimate how many credits it will take, but in my case because the easier frames were at the beginning of the animation, this turned out to be a bit of an underestimate. Nevertheless, it was totally worth it to get the render done on time.
I rendered all frames in the OpenEXR format, which is a ‘scene-referred floating point’ representation of colour - that means no tonemapping or gamma correction, it’s just the raw values that come out of Cycles, which makes it great for doing further processing later. I did the encode on my own computer. I used Blender’s Video Sequence Editor to compose the frames, since I knew it would know exactly how to handle OpenEXR files produced in Blender.
Using OpenEXR is highly highly recommended. It will give you by far the most freedom to adjust the colours, apply additional compositing effects, fix issues, and generally do all the things you might want to do without fear of introducing colour banding and other issues like that. The only drawback is that OpenEXR files tend to be pretty huge. Although they’re compressed using e.g. DEFLATE, it doesn’t go very far when the raw data is 96-bit-per-pixel floating point data. So make sure you’ve got a good few gigabytes to spare.
After a few test runs with small samples of the frames which confirmed everything looked pretty good, I pressed the button. I felt like a wizard commanding an army of ghosts to go forth and do my bidding.
Encoding
Once we had our frames, the next step was to encode them to a video.
Initially, I did the encode in Blender’s built-in ffmpeg wrapper. However, this is quite limited. Notably, it only works in 8-bit colour, so if you want to encode a 10-bit video, you’re out of luck. So later I would switch to using Hybrid, an impressively versatile GUI wrapper over a variety of different encoding tools. More on that in a bit.
Patches, so many patches
However, once we got the frames back from the render farm, we started spotting issues. Places with clipping, that kind of thing. Luckily, I hit on a very convenient way to fix this quickly: I could render out part of the frame, creating a patch that would be applied over the original render in the Video Sequencer (Blender’s built-in nonlinear video editor). This can be toggled by ticking the ‘render region’ box in the Output tab in Blender, right under where you set the resolution. Once you tick it, you get a box you can resize when you’re in the camera view to designate the region to render.
We found a few issues at first, and then after the debut, rather a lot more issues. Sometimes I would, for example, find an issue with the curtains—and that would mean I’d need to re-render the curtains for the entire animation. Or we’d spot something clipping through a wall, so I’d need to cut a new slot in the wall, and re-render the area around the slot in every frame. Sometimes we’d only have to modify a few frames to fix a specific animation. Here’s what the editor looked like at the end of it all…
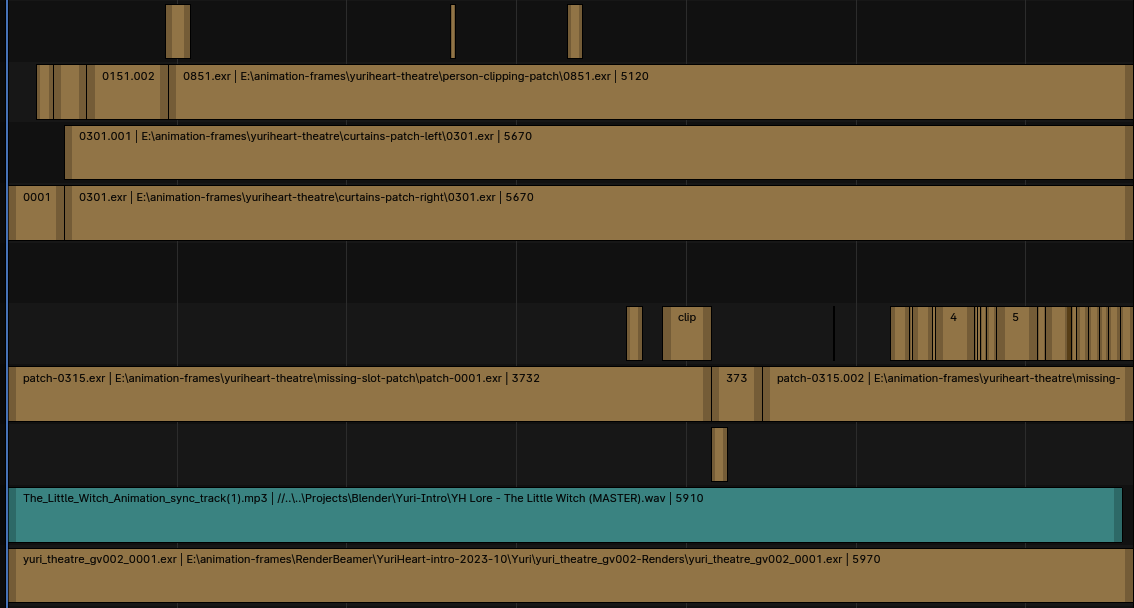
Definitely something of a Frankenstein’s monster at that point. It got even worse when I resorted to fixing certain issues by trying to splice encoded video at keyframes. (I abandoned that approach later when it became necessary to encode the video differently.) By the time we finished, I was on ‘final encode candidate 18’, although that is in truth an undercount because I didn’t always increment the number.
I discovered various pitfalls of using these kinds of patches. In theory, if nothing is being reflected, rendering a region should line up pixel-perfectly with the stuff around it… and generally speaking that’s true, except for the fact we were using a bloom effect in the compositor and I had unwisely decided to apply that at render time instead of over the top of the sequencer footage.
This meant that if there were pixels in or near enough to the patch to cause bloom, I’d need to make sure the bloom region was big enough to include those pixels. Luckily, pixels bright enough to cause bloom were rare enough that it was usually possible to expand the patch a small amount to address this issue.
The colour wars
If you look at my tag canmom vs video encoding, you can witness my woes as I tried to figure out how to get something halfway decent out of Youtube.
Basically, the issue is this. Modern video encoders such as H264, VP9 and even AV1 are based on something called ‘macroblocks’. The video is split into small chunks, and the encoder applies a number of tricks to have to save as little information about each chunk as possible. Your video has something called a ‘birate’, which is how many bits of data it uses per second. The lower the bitrate, the more information the encoder must discard.
Online video on Youtube is generally speaking quite heavily compressed. Certain types of scenes compress better than others. A well-lit scene which moves in generally consistent ways, like a pan, will often compress well. A darkly lit scene with a lot of subtle gradients, or lots of small particles such as snowflakes or confetti moving in different directions, is likely to have issues.
Guess which one we’re dealing with here.
That projector screen proved to be my downfall. If we uploaded the original 1080p video to youtube, the video would be beset by big, chunky macroblocks. Silhouettes would be eaten away by compression artefacts. Lots of things would look blurry.
Youtube’s encoding is unavoidable, but there are some tricks we could use. Mainly, Youtube is much more generous to 1440p and 4K videos. It gives them higher bitrates and uses the more efficient VP9 codec instead of H264. So, if video quality is a serious concern, you may have to do something evil. You may have to upload a 1080p video… upscaled to 4k.
They would shoot you for that on nyaa.si.
To make a very long story short, here’s the eventual recipe I came up with.
- make sure your monitor has calibrated gamma. Choose a ‘look’ preset and gamma adjustment in Blender that you like.
- using the Blender sequencer reencode the exr files to 16-bit TIF or PNG files. This allows you to continue to use high bit depth colour further down the chain.
- Blender will not apply dithering to 16-bit colour images. If you view it in a program that does not apply dithering but instead truncates down to 8 bits, you will see colour banding.
- in Hybrid, import your TIF/PNG sequence as an image sequence. set your audio to ‘custom’.
- set the video encoder to x265 and the container to MP4.
- we want to do two encodes: a 10-bit encode and an 8-bit encode. The 10-bit encode is the definitive version, the 8-bit encode is for youtube. So toggle between these on the x265 tab as needed.
- in the Crop/Resize tab, increase your resolution to 3840*2160 (4K resolution). Set the upscale mode to Lanczos. This is a horrible hack to force Youtube to give a higher bitrate. (if you’re feeling fancy, use one of the Vapoursynth upscalers.)
- put the bitrate mode to specific filesize/bitrate (2-pass) and set the bitrate to something horrendous like 15Mbps. You probably won’t actually use that much with VBR. But you want the most near-lossless file you can before you feed it into the Youtube mangler.
- HDR is a whole can of worms I don’t intend to go into here. It probably won’t make your video look less bitstarved though.
All being well, you should end up with a hefty but manageable video file with no visible encoding issues. (Ours weighed in at about 363MB at 10bit, and only a few MB less at 8bit, for a few minutes of video.) Now, watch your video. Sigh wistfully at the beautifully smooth gradients, nicely dithered with no visible banding. Weep with joy, for there is nary a macroblock to be seen.
You will not see such perfection again. Not where you’re going.
Upload your video to youtube. Watch it in 1080p. Sob. Watch it in 4K. Sob a bit less. It is probably OK-ish at 4K. Look resentfully at the channels that are big enough to unlock AV1 encodes. One day that will be you.
Now you just need subtitles.
Subtitles
Youtube’s internal SRV3 subtitle format is not officially documented anywhere. But luckily someone has broken it down unofficially. It’s an XML-based format, loosely based on the TTML standard. It supports a lot of nice features such as coloured text, positioning and fonts. And with some creativity, you can even recreate effects like fades.
I don’t recommend writing it directly, though. Instead, the authoring workflow I ended up using goes like this.
- time your subs in Aegisub. This is hands down the best free subtitling program out there, widely used by anime fansubbers, and it gives you lots of nice features like showing you the waveform to time your subs exactly down to the millisecond if you so desire. Only problem: it generates the Advanced Substation Alpha (.ass) format. This is a pretty powerful format, but it’s not supported by Youtube. So…
- use this Python script to generate a YTT file from the ASS file. It’s decent enough but if you use advanced features like certain types of karaoke sub, it can break, or just look different from how the ASS file renders. so, you might need to…
- crack open that YTT file in a text editor. with some judicious find and replaces, you can clean split the lines into something a bit more readable. make any edits you need to.
- on Youtube, upload the subtitle file. do not edit it in the web-based editor or it will strip all the formatting (thanks, Youtube!).
- open your video page or refresh it to see the subtitle.
You will see that YTSubConverter achieves a lot of effects, like karaoke subs and fades, simply by writing the same sub out multiple times back to back with slightly different formatting. For example, here’s how a karaoke effect with a fade looks:
Example subtitle fade effect
<p t="137020" d="67" wp="1" ws="1"><s p="3"> “</s><s p="11">Please! </s><s p="4">Let me be reborn as a...” </s></p>
<p t="137087" d="67" wp="1" ws="1"><s p="5"> “</s><s p="12">Please! </s><s p="4">Let me be reborn as a...” </s></p>
<p t="137154" d="67" wp="1" ws="1"><s p="6"> “</s><s p="13">Please! </s><s p="4">Let me be reborn as a...” </s></p>
<p t="137221" d="66" wp="1" ws="1"><s p="7"> “</s><s p="14">Please! </s><s p="4">Let me be reborn as a...” </s></p>
<p t="137287" d="67" wp="1" ws="1"><s p="8"> “</s><s p="15">Please! </s><s p="4">Let me be reborn as a...” </s></p>
<p t="137354" d="67" wp="1" ws="1"><s p="9"> “</s><s p="16">Please! </s><s p="4">Let me be reborn as a...” </s></p>
<p t="137421" d="100" wp="1" ws="1"><s p="10"> “</s><s p="17">Please! </s><s p="4">Let me be reborn as a...” </s></p>
<p t="137521" d="1368" wp="1" ws="1"><s p="2"> “</s><s p="18">Please! </s><s p="4">Let me be reborn as a...” </s></p>
<p t="138889" d="67" wp="1" ws="1"><s p="2"> “</s><s p="18">Please! </s><s p="19">Let </s><s p="4">me be reborn as a...” </s></p>
<p t="138956" d="100" wp="1" ws="1"><s p="2"> “</s><s p="18">Please! </s><s p="20">Let </s><s p="4">me be reborn as a...” </s></p>
<p t="139056" d="67" wp="1" ws="1"><s p="2"> “</s><s p="18">Please! Let </s><s p="21">me </s><s p="4">be reborn as a...” </s></p>
<p t="139123" d="66" wp="1" ws="1"><s p="2"> “</s><s p="18">Please! Let </s><s p="22">me </s><s p="4">be reborn as a...” </s></p>
<p t="139189" d="67" wp="1" ws="1"><s p="2"> “</s><s p="18">Please! Let </s><s p="23">me </s><s p="4">be reborn as a...” </s></p>
<p t="139256" d="67" wp="1" ws="1"><s p="2"> “</s><s p="18">Please! Let me </s><s p="21">be </s><s p="4">reborn as a...” </s></p>
<p t="139323" d="66" wp="1" ws="1"><s p="2"> “</s><s p="18">Please! Let me </s><s p="22">be </s><s p="4">reborn as a...” </s></p>
<p t="139389" d="67" wp="1" ws="1"><s p="2"> “</s><s p="18">Please! Let me </s><s p="23">be </s><s p="4">reborn as a...” </s></p>
<p t="139456" d="67" wp="1" ws="1"><s p="2"> “</s><s p="18">Please! Let me be </s><s p="11">reborn </s><s p="4">as a...” </s></p>
<p t="139523" d="67" wp="1" ws="1"><s p="2"> “</s><s p="18">Please! Let me be </s><s p="12">reborn </s><s p="4">as a...” </s></p>
<p t="139590" d="66" wp="1" ws="1"><s p="2"> “</s><s p="18">Please! Let me be </s><s p="13">reborn </s><s p="4">as a...” </s></p>
<p t="139656" d="67" wp="1" ws="1"><s p="2"> “</s><s p="18">Please! Let me be </s><s p="14">reborn </s><s p="4">as a...” </s></p>
<p t="139723" d="67" wp="1" ws="1"><s p="2"> “</s><s p="18">Please! Let me be </s><s p="15">reborn </s><s p="4">as a...” </s></p>
<p t="139790" d="67" wp="1" ws="1"><s p="2"> “</s><s p="18">Please! Let me be </s><s p="16">reborn </s><s p="4">as a...” </s></p>
<p t="139857" d="100" wp="1" ws="1"><s p="2"> “</s><s p="18">Please! Let me be </s><s p="17">reborn </s><s p="4">as a...” </s></p>
<p t="139957" d="66" wp="1" ws="1"><s p="2"> “</s><s p="18">Please! Let me be reborn </s><s p="24">as </s><s p="4">a...” </s></p>
<p t="140023" d="67" wp="1" ws="1"><s p="2"> “</s><s p="18">Please! Let me be reborn </s><s p="25">as </s><s p="4">a...” </s></p>
<p t="140090" d="100" wp="1" ws="1"><s p="2"> “</s><s p="18">Please! Let me be reborn </s><s p="16">as </s><s p="4">a...” </s></p>
<p t="140190" d="67" wp="1" ws="1"><s p="2"> “</s><s p="18">Please! Let me be reborn as a...</s><s p="3">” </s></p>
<p t="140257" d="67" wp="1" ws="1"><s p="2"> “</s><s p="18">Please! Let me be reborn as a...</s><s p="5">” </s></p>
<p t="140324" d="66" wp="1" ws="1"><s p="2"> “</s><s p="18">Please! Let me be reborn as a...</s><s p="6">” </s></p>
<p t="140390" d="67" wp="1" ws="1"><s p="2"> “</s><s p="18">Please! Let me be reborn as a...</s><s p="7">” </s></p>
<p t="140457" d="67" wp="1" ws="1"><s p="2"> “</s><s p="18">Please! Let me be reborn as a...</s><s p="8">” </s></p>
<p t="140524" d="67" wp="1" ws="1"><s p="2"> “</s><s p="18">Please! Let me be reborn as a...</s><s p="9">” </s></p>
<p t="140591" d="100" wp="1" ws="1"><s p="2"> “</s><s p="18">Please! Let me be reborn as a...</s><s p="10">” </s></p>
<p t="140691" d="467" wp="1" ws="1"><s p="2"> “</s><s p="18">Please! Let me be reborn as a...</s><s p="2">” </s></p>
Here, the p attribute selects from a series of styles defined at the beginning of the document with varying opacities. These are automatically generated by YTSubConverter.
All in all
If you want to make a short film in a week, I hope this helps! If you want to make a short film in longer than a week, you’re more sensible than me. I also hope this helps!
Here’s the fruit of our labours, one more time…
This project was so much fun to work on. Just one of those times when you and the other person get each other fired up, bouncing ideas back and forth and feverishly making a thing. The cutout style proved perfect: complex enough to provide something to get our teeth into, but restricted enough to get it done in the time.
What’s next after The Tale of the Little Witch? Why not go and watch a few of Yuri’s streams, and you’ll be the first to know ;)
Resources and tools we used
- Blender - 3d modelling, shading, rigging, animation, rendering, compositing and editing
- Precision Gears - modelling and animating gears [requires money but cheap]
- PolyHaven - PBR textures and HDRI
- Ableton Live - music composition [requires money]
- Clip Studio Paint - 2D drawing and animation [requires money - Krita is a great free, open source alternative!]
- Hybrid - video encoding
- GarageFarm - rendering [requires money]
- Aegisub - subtitling
- YTSubConverter - converting subtitles for Youtube
Comments
Mae (adb6eda07d380dbed34d6cc943c50837)
Hey, great posts, very cool!