Hello, welcome back to the THRUST//DOLL devlog! It’s been a busy month, and the ‘configurator’ portion of the game is almost finished at last. But this has introduced problems along the way.
UI interactions
Following from the previous devlog, I was able to raycast mouse positions against models in the scene, and create a damped spring animation system to animate the interface elements.
The design of the system has changed a bit. At the point this was recorded, I was still using a GameObject to pass UI data into a dynamic buffer. I later learned a managed system could accomplish the same thing more simply. Every frame, we pass the current position of the mouse as a raycast input and also whether the mouse was clicked.
The new mouse handling code
Mouse handling MonoBehaviour which logs mouse interactions:
using System.Collections;
using System.Collections.Generic;
using UnityEngine;
using UnityEngine.InputSystem;
using Unity.Entities;
using Unity.Physics;

public class ClickHandler : MonoBehaviour
{
    public InputAction ClickAction;
    public InputAction PointerMoveAction;
    public Camera Camera;

    private Entity Entity;
    private World World;

    private void OnEnable()
    {
        // set the callback for the click action
        ClickAction.performed += OnClick;
        ClickAction.Enable();

        PointerMoveAction.performed += OnMove;
        PointerMoveAction.Enable();

        Camera = Camera == null ? Camera.main : Camera;

        World = World.DefaultGameObjectInjectionWorld;
    }

    private void OnMove(InputAction.CallbackContext context)
    {
        CheckEntityExists();

        World.EntityManager.GetBuffer<MouseMove>(Entity).Add(new MouseMove() { Ray = Ray(context)});
    }

    private void OnClick(InputAction.CallbackContext context)
    {
        CheckEntityExists();

        World.EntityManager.GetBuffer<MouseClick>(Entity).Add(new MouseClick() { Clicked = true });
    }

    private void OnDisable()
    {
        ClickAction.performed -= OnClick;
        ClickAction.Disable();

        PointerMoveAction.performed -= OnMove;
        PointerMoveAction.Disable();
    }

    private RaycastInput Ray(InputAction.CallbackContext context) {
        Vector2 screenPosition = context.ReadValue<Vector2>();
        UnityEngine.Ray ray = Camera.ScreenPointToRay(screenPosition);

        return new RaycastInput() {
            Start = ray.origin,
            Filter = new CollisionFilter
            {
                BelongsTo = (uint) CollisionLayers.ClickEvent,
                CollidesWith = (uint) CollisionLayers.Toggleable
            },
            End = ray.GetPoint(Camera.farClipPlane)
        };
    }

    private void CheckEntityExists() {
        if(World.IsCreated && !World.EntityManager.Exists(Entity))
        {
            Entity = World.EntityManager.CreateEntity();
            World.EntityManager.AddBuffer<MouseMove>(Entity);
            World.EntityManager.AddBuffer<MouseClick>(Entity);
        }
    }
}

public struct MouseMove : IBufferElementData
{
    public RaycastInput Ray;
}

public struct MouseClick : IBufferElementData
{
    public bool Clicked;
}
Mouse handling System:
// using UnityEngine;
using Unity.Burst;
// using Unity.Collections;
using Unity.Entities;
using Unity.Physics;
using Unity.Physics.Systems;

[UpdateInGroup(typeof(FixedStepSimulationSystemGroup))]
[UpdateAfter(typeof(PhysicsSimulationGroup))]
[BurstCompile]
partial struct MouseHandlingSystem : ISystem
{
    [BurstCompile]
    public void OnCreate(ref SystemState state)
    {
        state.EntityManager.AddComponent<UISingleton>(state.SystemHandle);
    }

    [BurstCompile]
    public void OnDestroy(ref SystemState state)
    {
    }

    [BurstCompile]
    public void OnUpdate(ref SystemState state)
    {
        PhysicsWorldSingleton physicsWorld = SystemAPI.GetSingleton<PhysicsWorldSingleton>();
        UISingleton uiSingleton = SystemAPI.GetComponent<UISingleton>(state.SystemHandle);

        foreach(var inputBuffer in SystemAPI.Query<DynamicBuffer<MouseMove>>())
        {
            foreach(var mouseMove in inputBuffer)
            {
                Entity currentHover = uiSingleton.CurrentHover;
                bool hitConfirmed = physicsWorld.CastRay(mouseMove.Ray,out var hit);
                if (hitConfirmed && hit.Entity != currentHover) {
                    //if we have moved from hovering over one target to another
                    if (SystemAPI.Exists(currentHover)) {
                        SystemAPI.SetComponentEnabled<Hovering>(currentHover,false);
                    }
                    SystemAPI.SetComponentEnabled<Hovering>(hit.Entity,true);
                    SystemAPI.SetComponent<UISingleton>(state.SystemHandle, new UISingleton { CurrentHover = hit.Entity });
                } else if (!hitConfirmed) {
                    if (SystemAPI.Exists(currentHover)) {
                        SystemAPI.SetComponentEnabled<Hovering>(currentHover,false);
                        SystemAPI.SetComponent<UISingleton>(state.SystemHandle, new UISingleton { CurrentHover = Entity.Null });
                    }
                }
            }
            inputBuffer.Clear();
        }
        foreach(var inputBuffer in SystemAPI.Query<DynamicBuffer<MouseClick>>())
        {
            foreach(var mouseClick in inputBuffer)
            {
                if (SystemAPI.Exists(uiSingleton.CurrentHover)) {
                    SystemAPI.SetComponentEnabled<On>(uiSingleton.CurrentHover,!SystemAPI.IsComponentEnabled<On>(uiSingleton.CurrentHover));
                }
            }
            inputBuffer.Clear();
        }
    }
}
The new system stores ‘which object the mouse is hovering over’ by enabling a “toggled” component on the hit entity. Clicks do not perform any additional raycast, but simply apply on whichever element is hovered.
The Hovering and On enableable tag components are then read by the UIToggleSystem, which animates the UI elements accordingly:
UI Toggle System
using System;
using Unity.Burst;
using Unity.Entities;
using Unity.Transforms;
using Unity.Collections;

[BurstCompile]
//[UpdateAfter(typeof(MouseHandlingSystem))]
partial struct UIToggleJob : IJobEntity
{
    public float DeltaTime;
    [ReadOnly] public ComponentLookup<Hovering> HoveringLookup;
    [ReadOnly] public ComponentLookup<On> OnLookup;
    [ReadOnly] public ComponentLookup<LocalToWorld> TranslationLookup;

    void Execute([ChunkIndexInQuery] int chunkIndex, ref UIToggleAspect uiToggle)
    {
        bool hovering = HoveringLookup.IsComponentEnabled(uiToggle.BelongsTo);
        bool isOn = OnLookup.IsComponentEnabled(uiToggle.BelongsTo);

        //set the target for animation
        uiToggle.StateTarget = hovering ? 1f : 0f;

        //displacement for use in LERP; 0 to 1 with overshoots possible
        float disp = uiToggle.StateDisplacement;

        uiToggle.Opacity = isOn ? 0.6f : 0f;
        uiToggle.Scale = 0.01f + 0.02f * disp;
        //uiToggle.Thickness = hovering ? 0.2f : (isOn ? 0f : 0.6f);
        uiToggle.Thickness = isOn ? 0f + 0.2f * disp : 0.6f - 0.4f * disp;
    }
}

[BurstCompile]
partial struct UIToggleSystem : ISystem
{
    [BurstCompile]
    public void OnCreate(ref SystemState state)
    {

    }

    [BurstCompile]
    public void OnDestroy(ref SystemState state)
    {
    }

    [BurstCompile]
    public void OnUpdate(ref SystemState state)
    {
        var uiToggleJob = new UIToggleJob
        {
            DeltaTime = SystemAPI.Time.DeltaTime,
            HoveringLookup = SystemAPI.GetComponentLookup<Hovering>(true),
            OnLookup = SystemAPI.GetComponentLookup<On>(true),
            TranslationLookup = SystemAPI.GetComponentLookup<LocalToWorld>(true)
        };
        uiToggleJob.ScheduleParallel();
    }
}
This schedules a job in parallel, although this is unlikely to actually be saving any time and may in fact be slower given the small number of entities and overhead. I just wanted to practice writing parallel jobs.
The actual animation is handled by a damped spring, whose data is stored in another component. Here’s the system that updates that:
State spring system
using Unity.Burst;
using Unity.Entities;
using Unity.Mathematics;

[BurstCompile]
partial struct StateSpringSystem : ISystem
{
    [BurstCompile]
    public void OnCreate(ref SystemState state)
    {
    }

    [BurstCompile]
    public void OnDestroy(ref SystemState state)
    {
    }

    [BurstCompile]
    public void OnUpdate(ref SystemState state)
    {
        var config = SystemAPI.GetSingleton<StateSpringConfig>();

        var stateSpringJob = new StateSpringJob
        {
            // Time cannot be directly accessed from a job, so DeltaTime has to be passed in as a parameter.
            DeltaTime = SystemAPI.Time.DeltaTime,
            Stiffness = config.Stiffness,
            Damping = config.Damping
        };
        stateSpringJob.ScheduleParallel();
    }
}

[BurstCompile]
partial struct StateSpringJob : IJobEntity
{
    public float DeltaTime;
    public float Stiffness;
    public float Damping;

    void Execute([ChunkIndexInQuery] int chunkIndex, ref StateSpring spring) {
        //semi-implicit Euler integration
        spring.Velocity += ((Stiffness * (spring.Target - spring.Displacement)) - (Damping * spring.Velocity)) * DeltaTime;
        spring.Displacement += spring.Velocity * DeltaTime;
    }
}
By having just one spring, all the animated values are kept in sync.
The final step in getting the animated UI looking how I wanted was to adjust my shader to take into account the four states.
Having achieved the tricky part of the UI, and gotten a trial by fire in DOTS, I needed a model to place into this configurator.
Modelling
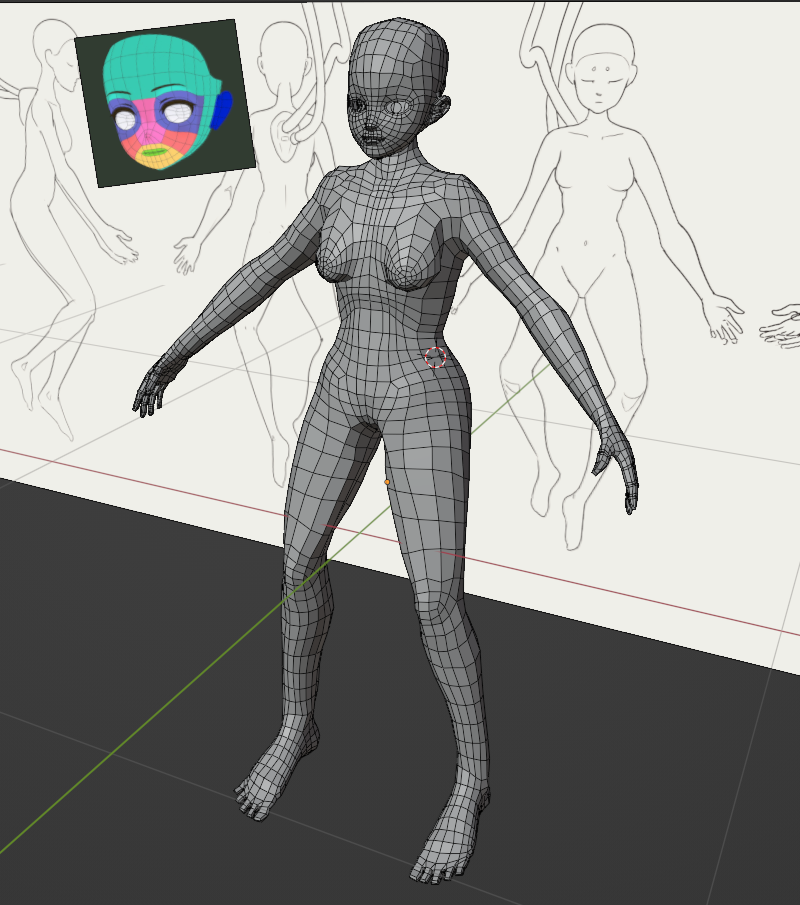
The biggest task this month was constructing a model of the Thrust//Doll itself. This was I believe my third time serious attempt at modelling a human figure, and this one went a lot better than the previous ones. Rather than starting with a sculpt, since I wanted to work quickly, I used a workflow of polymodelling and hopping into sculpt mode to smooth things out and move geometry around. My biggest priority was good topology, and I’m immensely indebted to Dikko’s video series Modeling for Animation for explaining the most important edge loops for deformation, and explaining how to make a good joint.
The project began by sketching four view of the character from different sides.
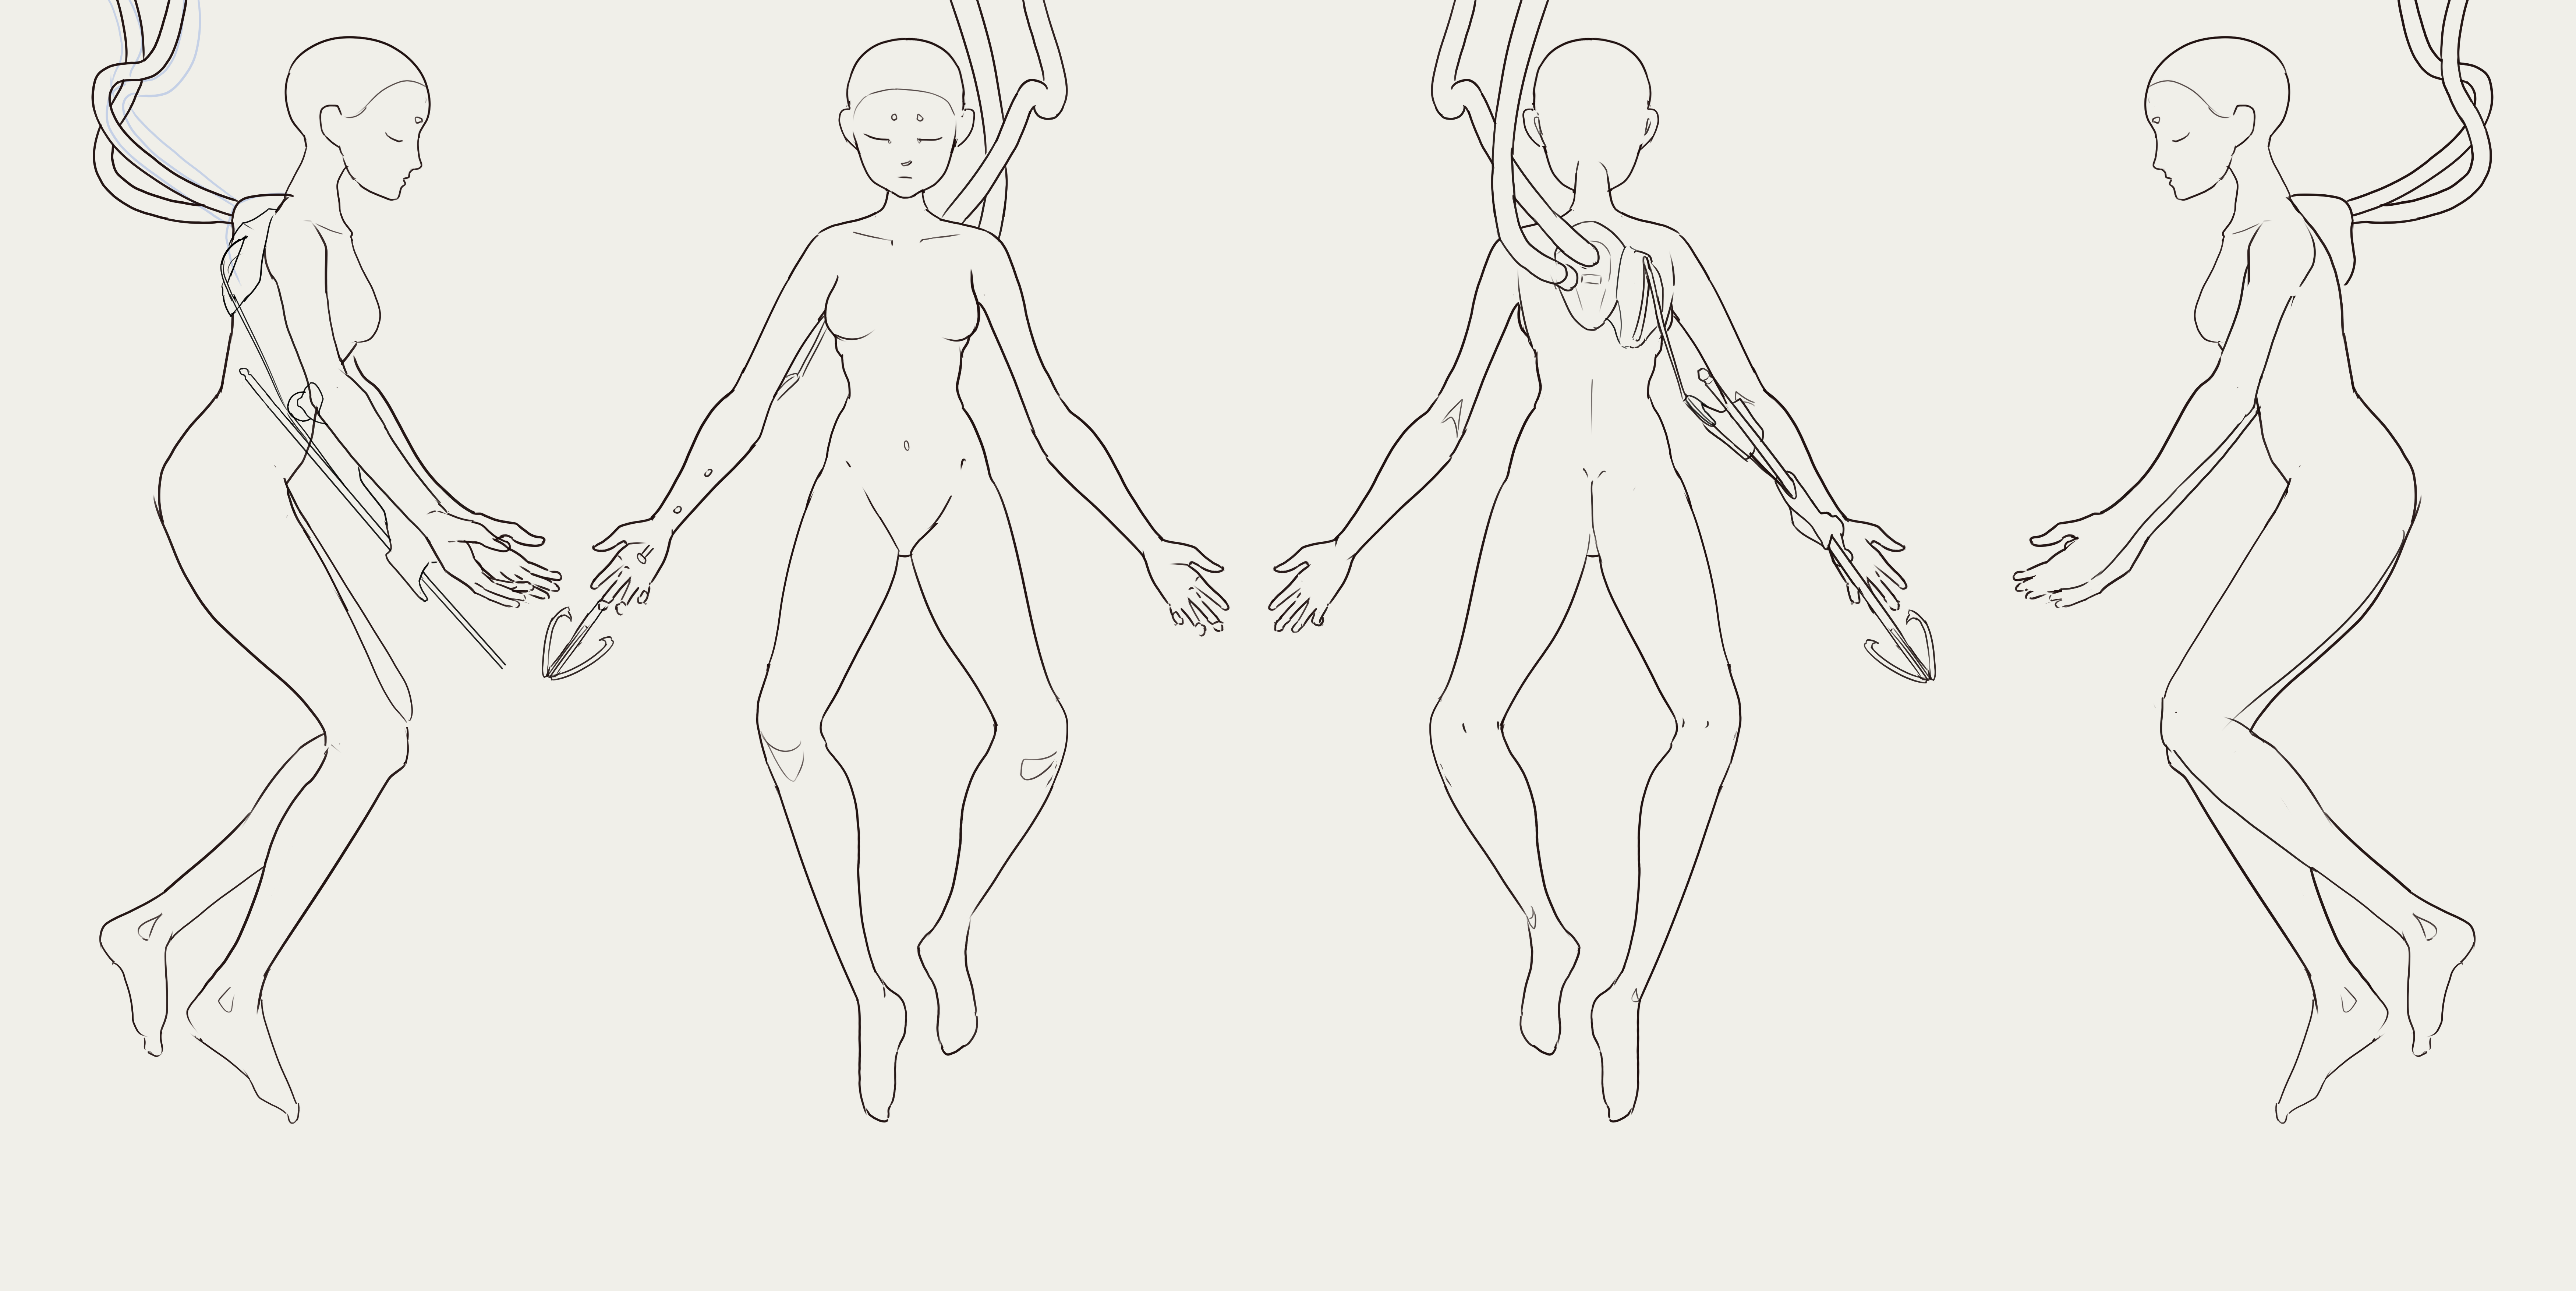
I drew the sketch in the pose I intended to use in the game, rather than a good pose for modelling, which was a mistake and led to proportion issues throughout the modelling process… but became useful later on when it came to posing and animating the model.
Here are some work-in-progress screenshots…
14 Jan 2023. The anatomy is off to a decent start here, but my initial topology would end up revised after watching Dikko’s videos. The biggest issue is the topology where the leg joins the torso, which is missing a crucial loop around the top of the leg.
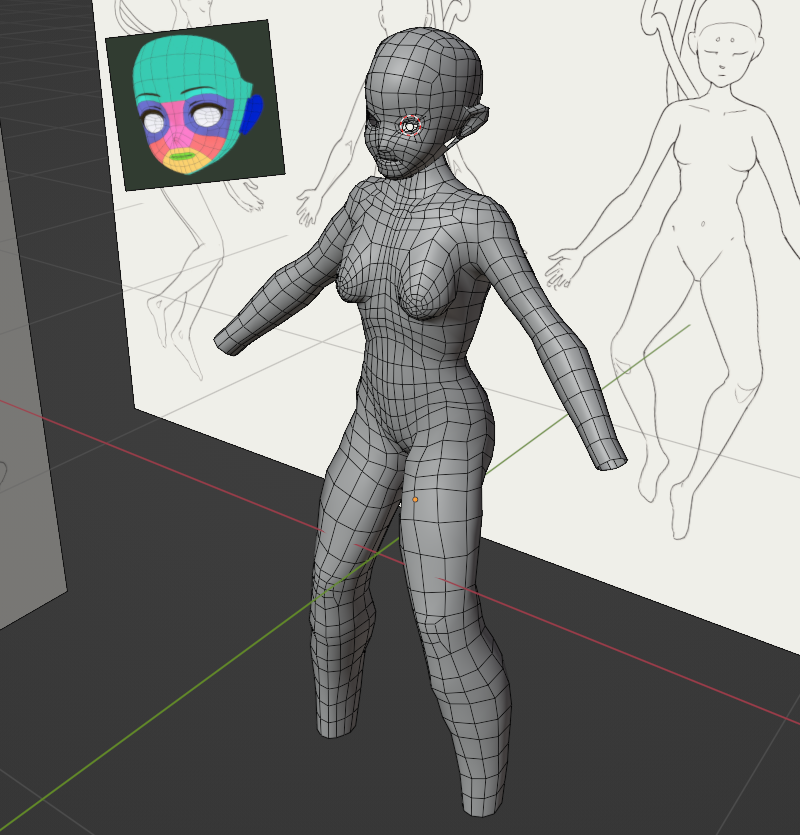
16 Jan 2023. I’ve improved definition of the ribcage and breasts, and made a first attempt at modelling the head and face. You can see a topology reference I used next to the model.
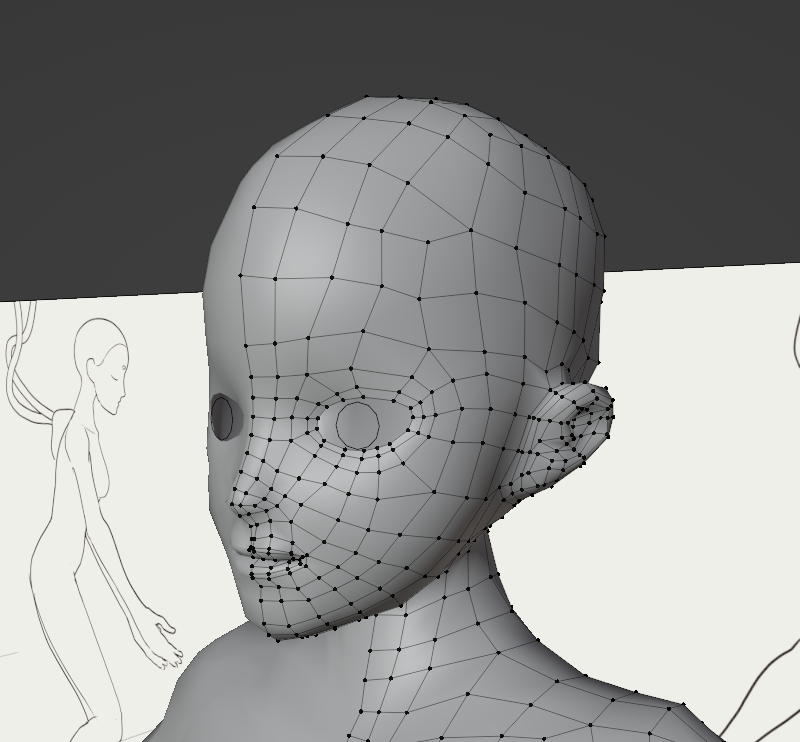
17 Jan 2023. I would end up modifying this topology later to get better deformation at the eyes and moth, but the basic structure was defined here.
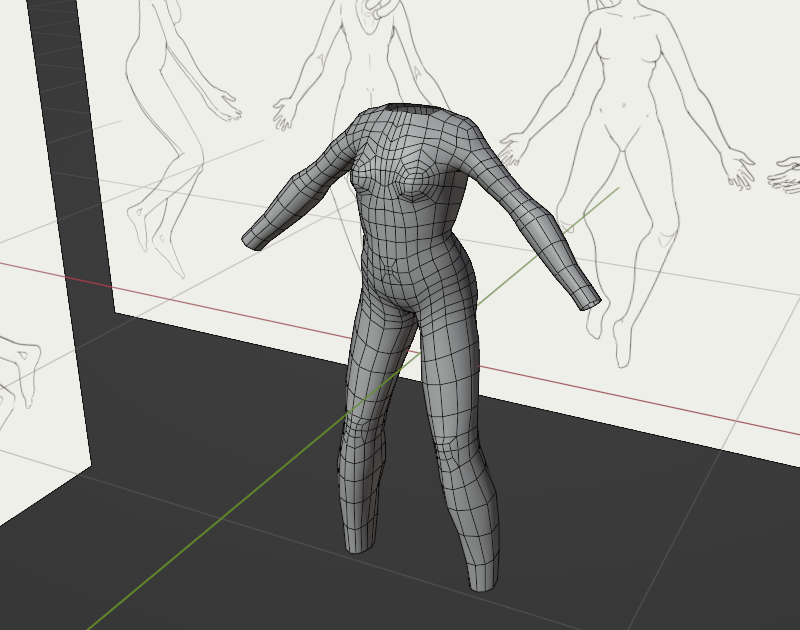
17 Jan 2023. At this point I was introduced to Dikko’s videos, and I retopologised the knees and elbows, and finished modelling hands and feet on the character.
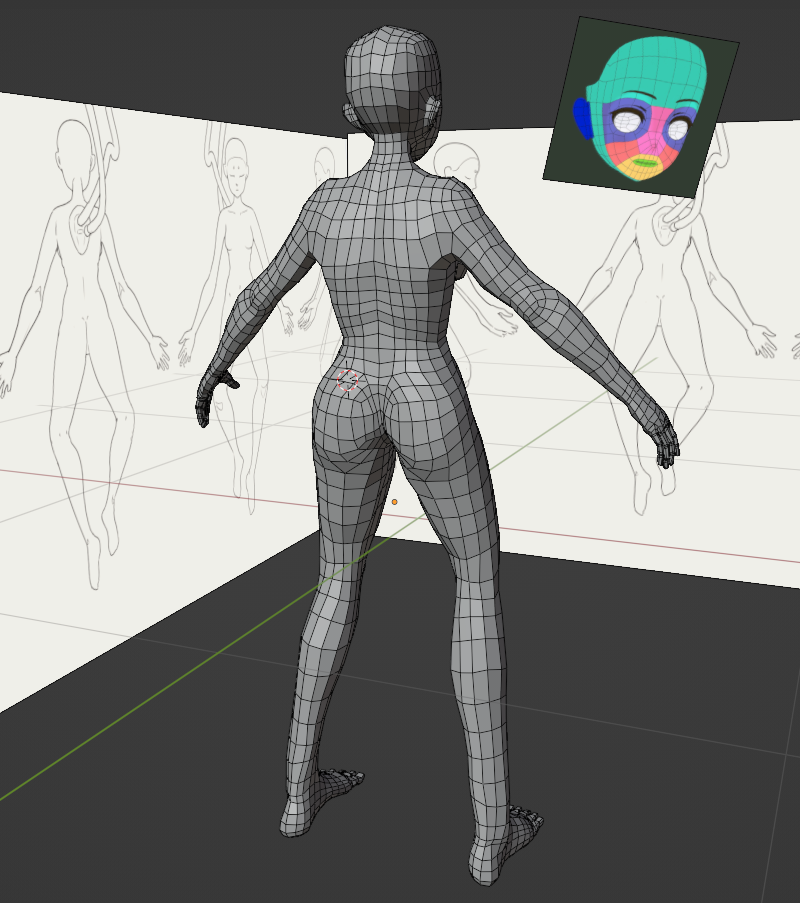
17 Jan 2023. Back view of the model in the previous picture.
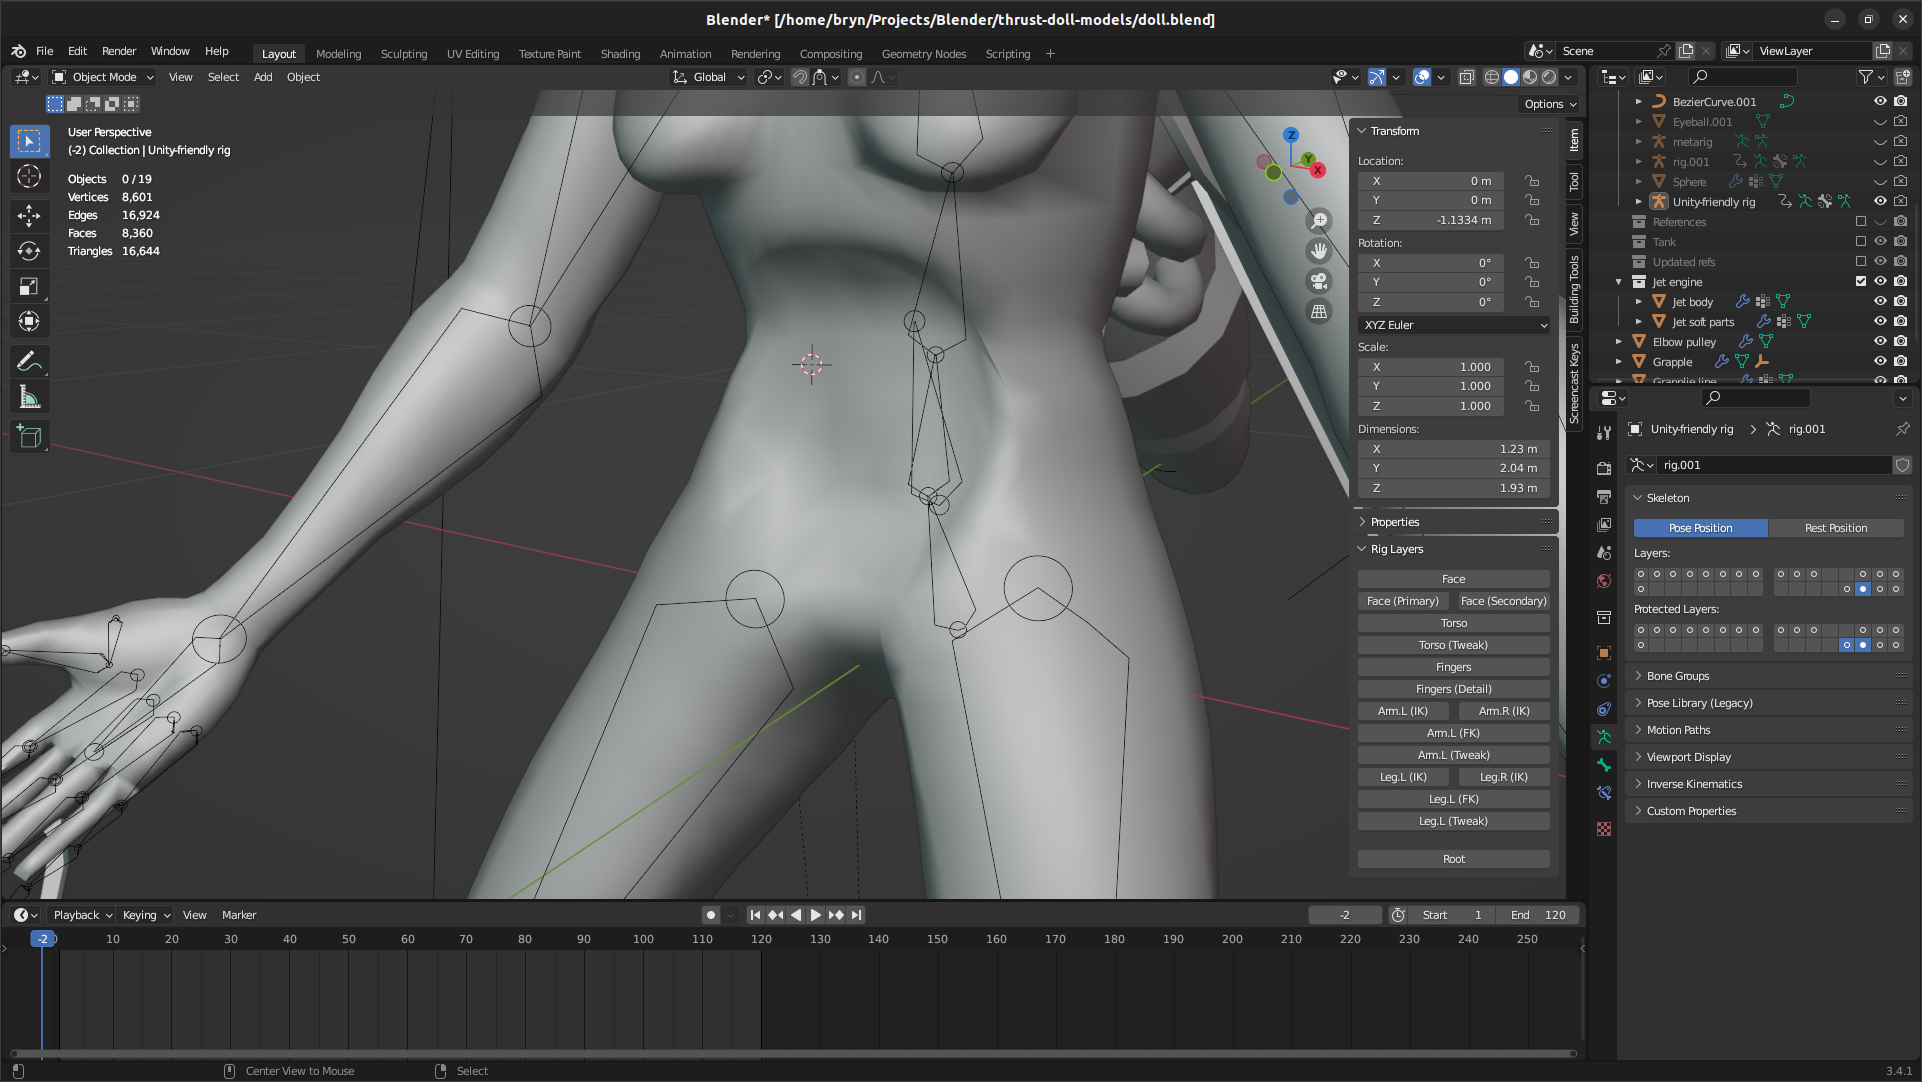
At this point, I began testing the doll with Blender’s Rigify addon. This addon is amazing - it gives you a well-designed rig with a lot of great features (FK/IK switches, intuitive controls for fingers, helpful models to indicate how various parts of the rig can move, bendybones, automatic volume preserving squash and stretch) with almost no effort. Unfortunately most of these features are not supported in Unity. I used the Rigify to Unity addon to convert the rig before importing, although I believe this addon is slightly outdated.
I started with automatic weight painting. This went through a number of iterations of testing - I needed to do a bit of weight painting at the hips, and later the wrist and ankles once bendybones were disabled. Here’s an early test of Rigify.
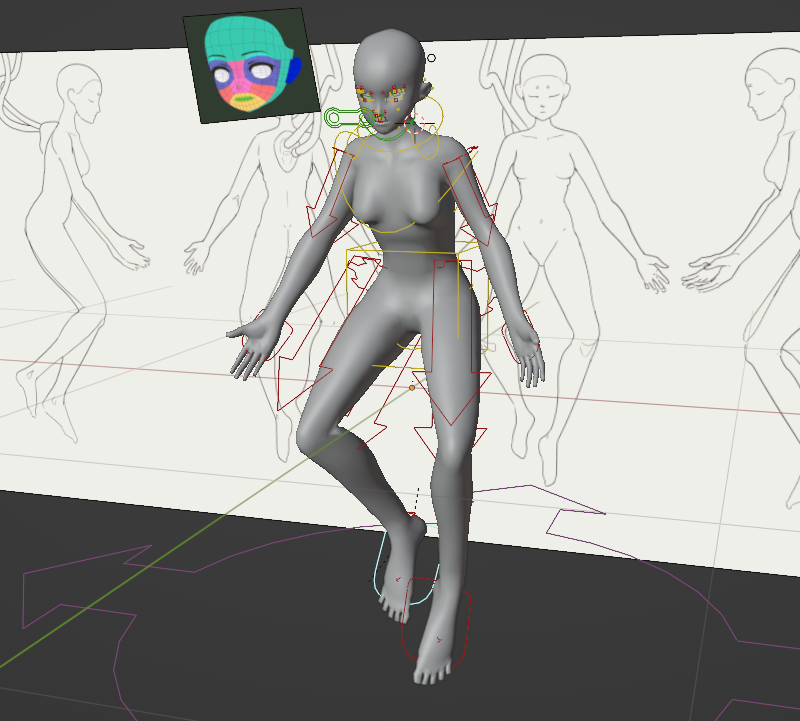
19 Jan 2023. An attempt to place the doll in the intended animation position using Rigify’s IK system. There are deformation issues at the hips, and proportion issues in general.
I also tested my model in Adobe’s Mixamo system to try it with some premade animations. I had persistent issues with hands clipping through the legs in sitting or crouching positions, which made me suspect that my proportions were off, and I made a few attempts to adjust the model—necessitating remaking the Rigify rig and recalculating automatic weights each time.
The doll has an odd slouching posture here, but mostly the rig worked surprisingly well out of the box
I also tried importing the rigged model into Unity. At first everything seemed promising, with the model successfully being instantiated with a SkinnedMeshRenderer… but then I tried dragging it into my DOTS subscene to see if it could convert into an ECS representation, creating a shader with a ‘compute deformation’ node as the documentation suggested. Immediately, this happened…
If nothing else, if I need a cool alien from another dimension, I can use this.
Worse, Unity frequently crashed. It was clear that, whatever the documentation said, Unity’s Entities Graphics wasn’t yet ready to handle skinned meshes. I needed another solution.
Introducing… Latios Framework
Around this time, I came across Latios Framework. This is a third party developer Dreaming381’s set of DOTS tools, designed around high performance and smoothing over API issues in Unity’s core ECS packages. There is a lot of fascinating writing on the site about squeezing maximum performance out of DOTS. Crucially, Latios Framework has a package called Kinemation, which has its own implementation of skinned meshes as an alternative to the unfinished com.unity.animation package.
Converting to Latios Framework introduced a problem: the current version of Latios (0.6) depends on version 1 of Unity’s Transforms package. Dreaming is working on a new Transform package which will replace both Transforms V1 and V2, since V2 apparently lacks good support for non-uniform scaling? In the meantime, though, I needed to convert my Transforms V2 code back to Transforms V1, which mostly involved replacing TransformAspect with direct references to the various components. I hit a small hurdle in that it turned out Latios seemed to be replacing the Scale component, which contains a single float, with a NonUniformScale component with three floats.
Setting up a skinned mesh in Latios Framework could hardly be easier—you just apply the default Skinned Mesh Renderer component, with some slightly tweaked settings, and Latios’s authoring tools will convert it into a representation suitable for DOTS.
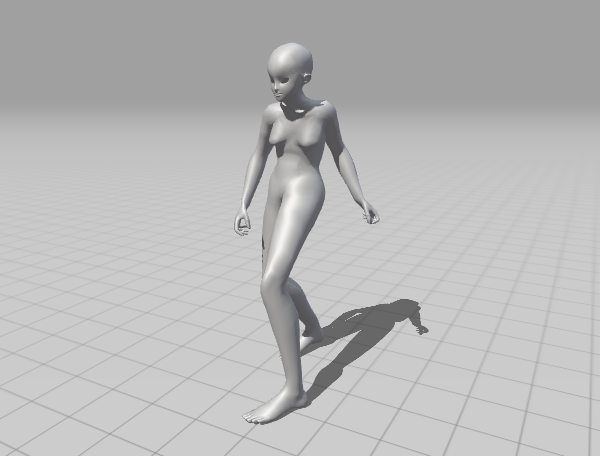
I tried this and was delighted to find it worked perfectly almost immediately. I created an animation in Blender for the doll, baked it into an FBX (which resolves all the IK and clever rig features into simple FK animations) and loaded it in Unity. Then I created a system to animate the skeleton. This system is directly copied from the examples in the Kinemation documenation.
Single Clip System
using Latios;
using Latios.Kinemation;
using Unity.Entities;
using Unity.Jobs;
using Unity.Mathematics;
using Unity.Transforms;

[UpdateBefore(typeof(TransformSystemGroup))]
public partial class SingleClipSystem : SubSystem
{
    protected override void OnUpdate()
    {
        float t = (float)SystemAPI.Time.ElapsedTime;

        Entities.ForEach((ref Translation trans, ref Rotation rot, ref NonUniformScale scale, in BoneOwningSkeletonReference skeletonRef, in BoneIndex boneIndex) =>
        {
            if (boneIndex.index == 0)
                return;
            var singleClip = SystemAPI.GetComponent<SingleClip>(skeletonRef.skeletonRoot);

            ref var clip     = ref singleClip.blob.Value.clips[0];
            var     clipTime = clip.LoopToClipTime(t);

            var boneTransform = clip.SampleBone(boneIndex.index, clipTime);

            trans.Value = boneTransform.translation;
            rot.Value   = boneTransform.rotation;
            scale.Value = boneTransform.scale;
        }).ScheduleParallel(this.Dependency);
    }
}
Despite a couple of crashes while trying to adjust settings, I finally had what I wanted: an animated, skinned mesh in DOTS.
I’ll comment on the thruster model later!
Now all I needed to do was attach the toggleable parts to the model. I asked Dreaming, since attacking rigid parts to bones isn’t clearly explained in the documentation. As it turns out, it’s as simple as parenting to the relevant GameObject. There’s an issue with exposing the necessary bones in optimised skeletons, which I haven’t investigated yet, but shouldn’t make things too difficult.
Now I hit a new problem… Unity’s DOTS Physics package will automatically unparent any GameObject with a Physics Shape component during baking. This is very annoying, since I was using DOTS Physics to raycast UI interactions.
The hacky solution would be to write a system to re-parent the clickable part to the skeleton after baking and then shut itself down. However, another solution would be to use another element of Latios Framework, the Psyshock physics package. This has some advantages, e.g. you can define collision layers with a normal entity query rather than using the enum in the Unity Physics framework. It also promises to potentially beat Unity Physics in terms of speed, although this isn’t really a concern yet.
But of course, this means learning another API.
Modelling the thruster
Also around this time, I started modelling cyborg parts for the doll. The thruster is the most important element—exactly how it fits into the body of the doll wasn’t really clearly specified in my design sketches. I had an idea that it might punch through the doll’s chest but I struggled to figure out how to make that look good; another idea was that it could be a handheld item integrated into the spear.
As it turns out, after a little bit of sketching, I came up with an insectoid design that I liked:
I didn’t fully finish this sketch, just enough to get to modelling.
With a little effort, I was able to model a reasonable approximation of this design, and also experiment with some Blender shaders for the doll. I may revisit this model later.
I think the silhouette could be stronger, but for now it suffices for a proof of concept.
The thruster model makes use of Blender’s ‘auto smooth’ setting and edges set to shade hard to create creases in a smooth surface without additional polygons. The doll is using basic cel shading. I will definitely come up with something cooler once it’s in Unity, this is just for testing.
Setting up UI raycasts in Psyshock
So, how to raycast in Psyshock?
The documentation is unfortunately a little incomplete, but looking at the actual code shows the API pretty clearly. The Latios.Psyshock.Physics.Raycast methods, overloaded with variants for different colliders or an entire collision layer, work very similarly to standard Unity DOTS Physics. The new step needed is creating the collision layer.
The collision layer building process takes an entity query and a reference to the owning system, and uses it to build Axis Aligned Bounding Boxes and process all the data into a form that’s ready for ultra-fast physics queries. This means you can be as specific as you like about what collides with what, with all the power of the entity query system, without relying on setting the right ‘collides with’ and ‘belongs to’ collision flags on every collider. Here’s the code that builds the collision layer…
public partial class ConfiguratorMouseSystem : SubSystem
{
    private EntityQuery _query;

    protected override void OnCreate()
    {
        _query = new EntityQueryBuilder(Allocator.TempJob)
            .WithAll<Collider, Upgrade>()
            .Build(this);
    }

    protected override void OnUpdate()
    {
        var jobHandle = Physics.BuildCollisionLayer(_query, this).ScheduleParallel(out var collisionLayer, Allocator.TempJob);

        jobHandle.Complete();

        //do stuff with the collision layer
    }
Doesn’t look too complicated right?
However, getting this to run correctly turned out to be a bit of a serious headache. The problem came with job dependencies. To avoid race conditions, Unity’s job system will not allow a job to read from data that another job is writing to. Building the collision layer required writing to the various transform components, which were being written to by the job that animated the skeleton in the previous SingleClipSystem.
I spoke to Dreaming about this issue, and he advised me to complete the dependency. I didn’t immediately understand this, mistaking it for simply calling the CompleteDependency method on the EntityQuery. Actually understanding this took a bit more research.
On some research it turns out that, behind the scenes, Unity’s ECS is supposed to automatically keep track of dependencies. So if one System schedules a job with either Entities.ForEach or using an IJobEntity struct, Unity can analyse what data is going to be read and written by the job and inject the necessary dependencies. This was not happening in this instance. Usually that’s an issue to do with reading and writing user-created NativeArrays, but in this case I guess it’s because building the collision layer invokes jobs in a way that’s opaque to the dependency analyser?
I tried adding UpdateAfter(typeof(SingleClipSystem)) to this system, but it didn’t solve the race condition. The reason is that the UpdateAfter directives only determine when OnUpdate is called on the main thread. The SingleClipSystem schedules a bunch of jobs, but then immediately exits without waiting for them to finish. So these jobs are still in progress when OnUpdate is called for ConfiguratorMouseSystem.
Initially I used BuildCollisionLayer(_query, this).Run(...), which builds the collision layer on the main thread, instead of ScheduleParallel. I thought maybe switching to ScheduleParallel would fix the issue, since directly using the job system might have some extra dependency checks, but it did not.
The simplest solution was to, in the previous system, call Complete(). i.e.
JobHandle jobHandle = Entities.ForEach((ref Translation trans, ref Rotation rot, ref NonUniformScale scale, in BoneOwningSkeletonReference skeletonRef, in BoneIndex boneIndex) =>
    {
        //do a bunch of bone stuff
    }).ScheduleParallel(this.Dependency); //passing this.Dependency invokes the overload that returns a jobHandle

jobHandle.Complete();
This tells the main thread to wait for the job to be finished, which means it doesn’t move on to any other systems. This means the main thread is sitting idle, and not scheduling other jobs or anything! So it’s likely not optimal from a performance perspective.
Anyway, with that simple Complete(), I was able to raycast against objects parented to bones. Another hurdle cleared! Here’s a video showing a hover interaction…
However, while this worked, it was not correct, and it was costing me performance.
The proper solution was learning how to manipulate Dependency of the second system. I thought we would need to stash the jobHandle in some kind of singleton entity, or we could tell Unity that this system is going to be doing stuff with transforms, so the job will wait for any other jobs touching transforms to finish. However, it actually turned out to be a lot simpler than this. I just needed to write…
Dependency = Physics.BuildCollisionLayer(_query, this).ScheduleParallel(out var collisionLayer, Allocator.TempJob, Dependency);
which connects the job up to the automatic dependency management without forcing the main thread to wait. As soon as I did this, I got about a 10-20fps increase! Although exactly how much increase seems to vary with the weather so don’t read too much into performance. The more important thing is that it decouples the systems again.
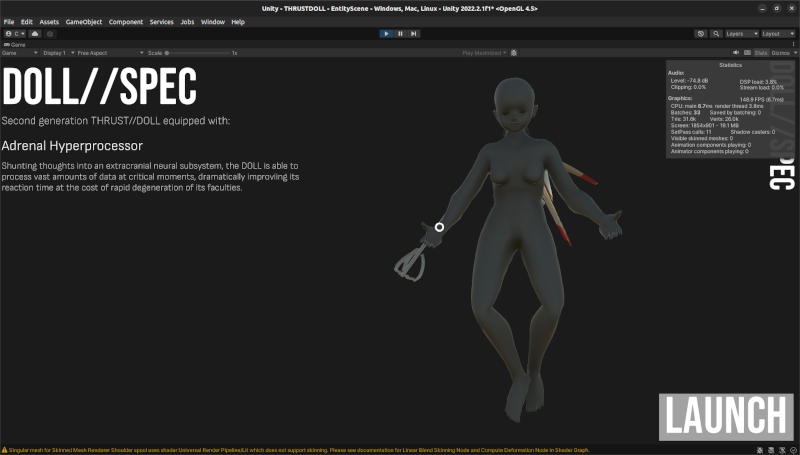
Text UI
Whoah there’s a bunch of text now huh!
I’m using Unity’s new UI Toolkit to render the main text interface, which is HTML-like and supposed to be much faster than the old GameObject-based text system, but can’t be placed in worldspace.
Text in DOTS seems to be a persistent issue. There is no pure DOTS way to draw text in Unity that I’ve been able to discover, so you’re forced to create a bridge to the world of GameObjects.
This raises the question of when GameObjects are updated compared to DOTS. The way it seems to work is that
- MonoBehaviours do their
Update() - ECS systems do their
OnUpdatein order - MonoBehaviours do their
LateUpdate()
So if I want GameObjects to do something, I can put them before or after ECS with the choice of Update or LateUpdate.
If I want code to run after the ECS has done its thing, I should write code in OnLateUpdate.
There are two parts to my interface. The static parts can be easily laid out using UML and USS, authored in the UI Builder. The trickier part is that I would like to draw text at a specific point on the screen based on the projection of interface elements into screen space. When the mouse hovers over a part, I want the name of that part to appear. Ideally this will be animated so that the text ‘slides into view’.
This means one of two things…
- world-space text rendering, which can be accomplished using TextMeshPro or Unity’s old UI System
- passing coordinates into the UI Toolkit, and moving an element using absolute positioning
Since I’m already drawing interface elements as quads in worldspace, TextMeshPro seems like a decent way to go. On the other hand, that’s two different systems drawing text, which seems a tad redundant, and requires two different bridges to MonoBehaviours.
TextMeshPro has ways to mask the text with a texture, which is helpful with the ‘slide in’ animation I’m considering. I’ll write about the solution I pick in the next devlog.
Modelling some more details on the doll
Saturday was largely spent on modelling, since I thought the silhouette of the doll was rather weak from the front. I added more details to the thruster, like some pipes and large vanes, and also created a grappling hook model. Here’s the result:
This makes for a more interesting silhouette. The converging lines point towards the nape of the doll’s neck.
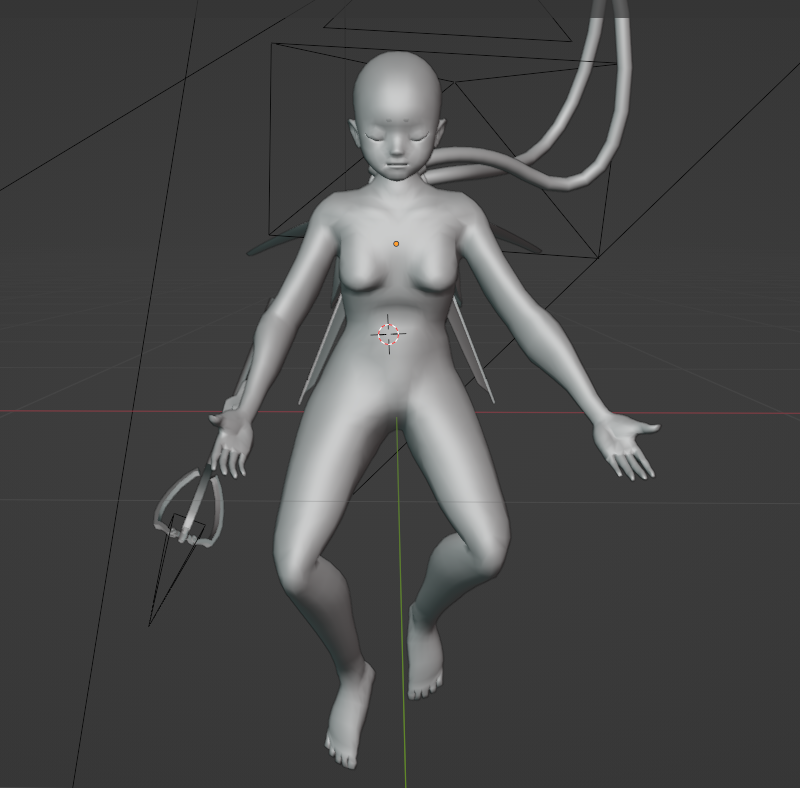
The vanes now direct the eye towards the doll’s face and don’t interfere too badly with the silhouette of the body.
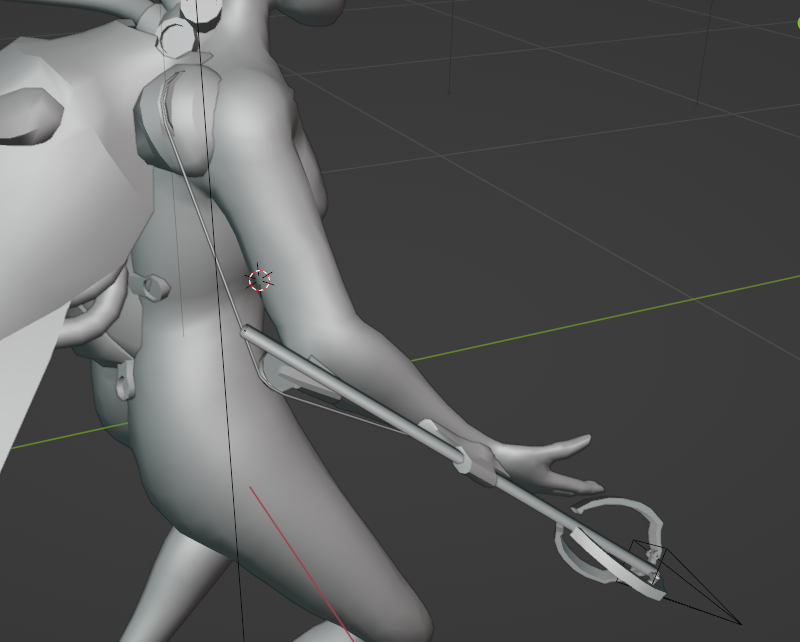
First-pass modelling on the grappling hook line assembly. The rigid elements are bone-parented, while the wire is skinned to the mesh.
The first time I tried importing this mesh into Unity, the editor crashed. The second time it worked just fine. Here’s the model in Unity:
You can’t really see the new parts from this camera angle.
I have a puzzle to solve with some of the other parts of the mesh that aren’t simply attached to the model. ‘Digitigrade Elastication’ requires replacing the legs with new, digitigrade legs. ‘Spacetime lacunae’ requires replacing the stomach, which is difficult to do in a way that looks good without clipping into the mesh proper.
For the stomach, one solution is to add an extra bone to the mesh which deforms the stomach, parented to the bottom of the spine. This is largely redundant with the second spine bone, but it can be moved backwards to create an indentation in the model. This should be possible in Unity too.
The resulting deformation is a little messy, but can probably be fixed with better weight painting.
Can the digitgrade limb also be achieved simply by transforming bones, without touching topology? Ideally, I’d rather make a different legs model to add some details to how it sutures onto the main body, but in that case I’ll need to swap between models of the doll on the fly! I’ll look into this in the next devlog post.
Rotating the doll
Since a lot of interesting parts of the model are on the back, it is important to be able to rotate the model inside the configurator. There are two affordances I could imagine for this (with mouse and keyboard): either dragging the left mouse button, with a long press necessary to distinguish from simple clicks on UI elements, or dragging the right mouse button.
Since it will be trivial to switch, I won’t worry too much about this design decision until I have a working prototype.
So how do we rotate a doll? It’s not too complicated: while the mouse button is held, we hide the cursor and measure how far the user moves in the x/y axis relative to wherever they started dragging. We could do this by reading the deltaposition per frame, as in the character controller example in the Latios fireworks demo, or simply by logging a starting position and comparing it.
Since it’s probably easier to read the DeltaPosition, and we’ll be using this method in the actual movement system, lets go with that one. Here’s an addition to ConfiguratorMouseSystem that lets you rotate stuff with the mouse:
if (mouse.leftButton.wasPressedThisFrame) {
    if (SystemAPI.Exists(uiSingleton.CurrentHover)) {
        SystemAPI.SetComponentEnabled<On>(uiSingleton.CurrentHover,!SystemAPI.IsComponentEnabled<On>(uiSingleton.CurrentHover));
    }
}

if (mouse.leftButton.isPressed) {
    float delta = mouse.delta.x.ReadValue();
    quaternion deltaRotation = quaternion.RotateY(delta*-0.005f);

    foreach (RefRW<Rotation> dollRotation in SystemAPI.Query<RefRW<Rotation>>().WithAll<Character>()) {
        dollRotation.ValueRW.Value = math.mul(deltaRotation,dollRotation.ValueRO.Value);
    }
}
Having rotation speed hardcoded is not ideal, and we should be implementing a config GameObject pretty soon. Otherwise… this works great!! Here’s a video:
Beautiful. Now we can see all parts of our model in Unity. All that remains is to hook up the UI interactions with text etc.
I’m going to prototype the movement system tomorrow, now I know the basics of writing a character controller in DOTS. It’s going to be some interesting mathematics. Until then… see you next time!
Comments